This chapter contains a diagnostic map to help you solve problems
that might occur when you use the network and network services software. Use
this chapter together with the appropriate Digital documentation to solve as
many problems as possible at your level.
Network and network service problems can occur for a number of reasons. The
diagnostic map in this chapter should help you isolate the problem.
The following figure explains how to use the diagnostic map:
After you isolate the problem, the map refers you to other chapters for
instructions on using the various problem solving tools and utilities.
The map also refers you to other manuals for more complete diagnostic
information for particular devices and software products.
You could experience problems that are not documented in this manual when you
use base system network and network services software with other layered
products. Each layered product has its own manual or set of manuals, which
might describe other solutions not provided here.
Before you start problem solving, ensure that the communications hardware is
ready for use. Verify the following:
Also check the product release notes for up-to-date information on known
problems.
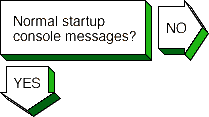
|
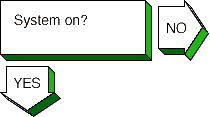
|
Turn on the power to your system. See the system
manual for your system's startup procedure and any problem solving
information.
|
|
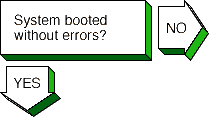
|
If you are running NIS and your system hangs after
the NIS daemons are started and before it mounts remote file
systems, no NIS server is available to respond to the
ypbind
request. If you know there is an NIS server for your
domain, wait until the server responds; the boot procedure will
continue.
If there is a LAT problem, the following message appears:
getty: cannot open "/dev/ttyxx"
See the solutions for solving LAT problems in
Section 13.14.
If your system is an NFS client and it hangs while mounting a remote file
system or directory, complete the following steps:
-
Check the cable and connection between your system and the
network.
-
Wait until all the servers listed in the
/etc/fstab
file are available on the network; your
system will then continue booting.
-
If you want your system to continue booting even if an
NFS server is down, do the following:
-
Halt the system.
-
Boot the system to single-user mode and run the
fsck
command on the local file systems.
-
Edit the
/etc/fstab
file and add the
bg
(background) option to the server entries. See
Chapter 8
for the correct format of an
fstab
entry with the
bg
option.
-
Reboot the system with the following command:
#
/sbin/reboot
If the
bg
option is specified in the
fstab
file entry, the remote file system or directory is automatically
mounted when the server is running and begins functioning as an NFS server.
|
|
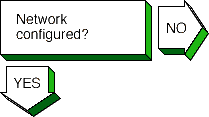
|
Check the
/etc/rc.config
file for the following entry:
NUM_NETCONFIG
If the entry is
0,
run the Network Configuration application. See
Section 2.3
for more information.
|
|
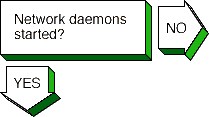
|
Verify that the network daemon
(inetd)
is running. Enter the following command:
#
ps -e | grep inetd
If no
inetd
daemon is running, start it, using the following command:
#
/sbin/init.d/inetd start
|
|
|
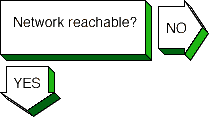
If a remote host's network is not reachable, the
following message is displayed:
network is unreachable
Complete the following steps:
-
Ensure that the network devices are configured properly on the local
host, using the
netstat -i
command. See
Section 2.3
for information on configuring network devices.
-
Check the routing tables on the local host, using the
netstat -r
command.
-
Trace the path looking at each Internet Protocol (IP)
router's routing tables to make sure there is an entry
for the remote host's network. Repair the incorrect IP
router's routing tables. (This step requires a thorough
knowledge of your topology.)
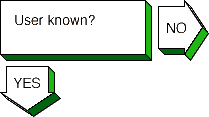
-
Check that the local host's address-to-name translation
for the remote host is correct. See the solutions for
[Host known?].
-
Check the routers along the path to the remote host to
determine whether they have security features enabled that prevent you from
reaching the remote host.
|
|

|
If a remote host is not known, the following message appears:
unknown host
Complete the following steps:
-
Check if the user is trying to reach the remote host using
a valid host name.
-
Check if the remote host is in another name domain and
that the user specified the full domain name.
-
If your site uses the BIND name service for name-to-address
translation, check the
/etc/svc.conf
file to see if
bind
is specified as a service for the
hosts
database entry. If it is not, edit the file and add it.
Also, verify if the BIND service has information about the
remote host. See the solutions for solving BIND client problems in
Section 13.5.
-
If your site uses NIS name service for name-to-address
translation, check the
/etc/svc.conf
file to see if
nis
is specified as a service for the
hosts
database entry. If it is not, edit the file and add it.
Also, verify if the NIS service has information about
the remote host. See the solutions for solving NIS client problems in
Section 13.7.
-
If your
/etc/svc.conf
file lists
local
as the only name-to-address translation mechanism, the
/etc/hosts
file does not have information on the remote host. See
System Administration
for more information.
|
|

|
If a remote host is not reachable, the following message appears:
host is unreachable
Complete the following steps:
-
Check the cabling between the local host and the network.
-
Verify that the remote host is running, using the
ping
command.
-
Make sure that the network devices are configured properly on
the local host, using the
netstat -i
command. See
Section 2.3
for information on configuring network devices.
-
Check the routing tables on the local host using the
netstat -r
command. Use the
ping
command to determine whether the IP router is reachable.
-
Check that the local host's address-to-name translation
for the remote host is correct. See the solutions for
[Host known?].
-
Check the routers along the path to the remote host to
determine whether they have security features enabled that prevent you from
reaching the remote host.
|
|
|
If a file cannot be accessed using the
rcp
or
rsh
commands, the following message appears:
permission denied
Complete the following steps:
-
Check that the user is intended to have access to the remote host. The
remote host might be intentionally preventing remote access.
-
Check that the correct host and user definitions exist in the user's
.rhosts
file on the remote host.
-
Check that the
/etc/hosts.equiv
file has been set up correctly.
-
Check that the directory and file protection on the files
to be copied or the
.rhosts
file on the remote system are correct.
If you are using NFS, go to
Section 13.9.
|
|

Problem still exists? Report your problem to Digital. See Chapter 16.
|
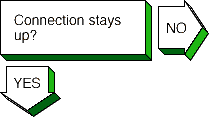
If the connection is broken, the following message appears:
connection timed out
Complete the following steps:
-
Test the network to determine whether the problem is
on the local host, remote host, or a host on the path between the two. See
Chapter 14
for more information on testing the network.
-
Once you have identified the host with the problem,
do the following:
-
Verify that the broadcast address and address mask
for the local host are properly set up in the
/etc/rc.config
file.
-
Confirm that the network device is properly configured.
-
Make sure the local host's
/etc/hosts
file has the correct IP address for the local host.
-
Make sure the cabling from the local host to the network is intact and
properly connected.
-
If connected over a local area network (LAN), check
the Address Resolution Protocol (ARP) entries and
LAN connections.
-
If connected over a wide area network (WAN), check
WAN connections and modems.
|
|
|
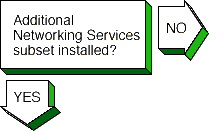
Verify whether the Additional Networking Services subset is
installed. Enter the following command:
#
setld -i | grep OSFINET
The following message should appear:
OSFINETnnn installed Additional Networking Services
(Network-Server/Communications)
If the subset is not installed, install it by using the
setld
command. See
System Administration
for more information on installing the subset.
|
|
|
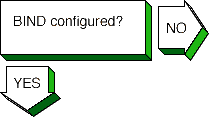
Check the
/etc/rc.config
file for the following entry:
BIND_SERVERTYPE=
If no type is specified (double quotation marks), run the BIND Configuration
application. See
Section 6.3
for more information.
|
|
|
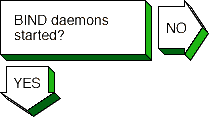
Verify that the BIND daemon
(named)
is running. Enter the following command:
#
ps -e | grep named
If no
named
process is running, start the
named
daemon, using the following command:
#
/sbin/init.d/named start
|
|
Problem still exists? Report your problem to Digital. See Chapter 16.
|
If the
nslookup
command does not return information
for any host or the host specified in the client
nslookup
command, check the
/etc/rc.config
file for the following entry:
BIND_SERVERTYPE=
If the type is:   Go to:

CLIENT            Stop. This system is not a BIND
                  server and cannot provide name
                  resolution to clients.
PRIMARY           Section 15.3
SECONDARY         Section 15.3
SLAVE             Section 15.4
CACHE             Section 15.8
|
|
|
Verify whether the Additional Networking subset is installed.
Enter the following command:
#
setld -i | grep OSFINET
The following message should appear:
OSFINETnnn installed Additional Networking Services
(Network-Server/Communications)
If the subset is not installed, install it by using the
setld
command. See
System Administration
for more information on installing the subset.
|
|
|
Check the
/etc/rc.config
file for the following entry:
BIND_CONF="YES"
If the entry does not exist, run the BIND Configuration application. See
Section 6.3
for more information.
|
|
Problem still exists? Report your problem to Digital. See Chapter 16.
|
If you attempted to use one of the network commands (for example,
telnet,
rlogin,
and
rsh
commands)
and the remote host is not known, the following message appears:
unknown host
Complete the following steps:
-
Check the
/etc/svc.conf
file to determine whether BIND is being used for the
hosts
database lookup. If it is, go to step 2.
If it is not, add it to the file by using the
/etc/svcsetup
command.
-
Retrieve information about the remote host with which you tried to
communicate by using the
nslookup
command. Enter the following command:
#
nslookup hostname
If the command succeeds, the client is set up correctly; try the network
command again. If the command fails, go to step 3.
-
View the
/etc/resolv.conf
file and retrieve the addresses for the
nameserver
entries.
-
Verify whether the servers are reachable by using the
ping
command. If no servers are reachable, contact your network administrator.
If any name server fails to respond to the
ping
command, delete the name server entry from the
resolv.conf
file.
-
Try the
nslookup
command again. If the command fails,
see the solutions for solving BIND server problems in
Section 13.4.
|
|
|
Verify whether the Additional Networking Services subset is
installed. Enter the following command:
#
setld -i | grep OSFINET
The following should appear:
OSFINETnnn installed Additional Networking Services
(Network-Server/Communications)
If the subset is not installed or is corrupt, install it by using the
setld
command. See
System Administration
for more information on installing the subset.
|
|
|
Check the
/etc/rc.config
file for the following entry:
NIS_CONF="YES"
If the entry does not exist, run the
nissetup
script. See
Section 7.3
for more information.
|
|
|
Verify that the
portmap
daemon is running. Enter the following command:
#
ps -e | grep portmap
If you do not find the
portmap
daemon, stop and restart NIS, using the following commands:
#
/sbin/init.d/nis stop
#
/sbin/init.d/nis start
If the
portmap
daemon does not start, reboot the server.
|
|

|
To verify that a
ypserv
process is running, enter the following command:
#
ps -e | grep yp
If no
ypserv
process is running, stop and start NIS, using the following commands:
#
/sbin/init.d/nis stop
#
/sbin/init.d/nis start
If a
ypserv
process is running, execute a
ypwhich
command. Enter the following command:
#
ypwhich
If the
ypwhich
command does not return an answer, find
the process ID (PID) of the
portmap
process and kill it. Enter the following commands:
#
ps -e | grep portmap
#
kill -9 portmap_PID
Note
Since other network services use the
portmap
daemon, stopping it can affect network service.
Therefore, notify your users of potential disruptions.
Stop and start NIS by using the following commands:
#
/sbin/init.d/nis stop
#
/sbin/init.d/nis start
|
|
|
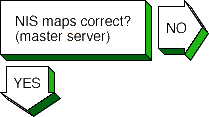
Verify the information in the map. Enter the following command:
#
ypcat map_name
Where
map_name
is the name of the NIS map. If the
information is incorrect, create a new map. Enter the following commands:
#
cd /var/yp
#
make map_name
The
make
command returns the following message:
map_name updated
If the
make
command indicates that the database is not
updated, complete the following steps:
-
Remove the
database_name.time file in the
/var/yp
and
/var/yp/domainname directories.
-
Create a new map by using the
make
command. Enter the following commands:
#
cd /var/yp
#
make map_name
|
|
Problem still exists? Report your problem to Digital. See Chapter 16.
|
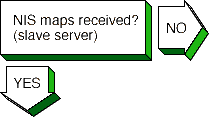
If you suspect that a slave server is not getting NIS
map updates, complete the following steps on the slave server:
-
Verify that the NIS master server is running and reachable, using the
ping
command. See
Section 14.1
for more information on using the
ping
command.
-
Create a
ypxfr
log file. Enter the following commands:
#
cd /var/yp
#
touch ypxfr.log
-
Run
ypxfr
interactively to get map updates. Enter the following command:
#
ypxfr mapname
-
Check the
ypxfr.log
file. After checking the log file and
resolving any problems, remove the log file. This turns logging off.
-
Verify the
ypxfr
entries in the
/var/spool/cron/crontabs/root
file. Use either the
pg
command or the
/usr/bin/crontab -l
command. The slave server entries are similar to the following:
# Network Information Service: SLAVE server entries
30 * * * * sh /var/yp/ypxfr_1perhour
31 1,13 * * * sh /var/yp/ypxfr_2perday
32 1 * * * sh /var/yp/ypxfr_2perday
-
Verify that the map has an entry in the corresponding
ypxfr
shell scripts.
-
Check the
syslogd
daemon message files for any NIS messages. See
Section 14.8
for more information.
-
Verify that the slave server is in the
ypservers
map for the domain.
|
|
|
Check the
/etc/rc.config
file for the following entry:
NIS_CONF="YES"
If the entry does not exist, run the
nissetup
script. See
Section 7.3
for more information.
|
|
|
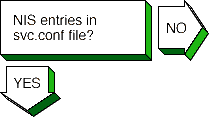
Check the
svc.conf
file to be sure
that it has entries for NIS. Use the
/usr/sbin/svcsetup
script to verify this. NIS entries are indicated by the letters "yp."
For the
passwd
and
group
databases, the
Security Integration Architecture (SIA) controls whether NIS is used. However,
in order to use NIS, the following characters must appear as the last line in
both databases:
+:
|
|
|
Verify that the
portmap
daemon is running. Enter the following command:
#
ps -e | grep portmap
If no
portmap
daemon is running, stop and restart NIS, using the following commands:
#
/sbin/init.d/nis stop
#
/sbin/init.d/nis start
If the
portmap
daemon does not start, reboot the client.
|
|
|
Verify that a
ypbind
process is running. Enter the following command:
#
ps -e | grep yp
If no
ypbind
process is running, stop and start NIS, using the following commands:
#
/sbin/init.d/nis stop
#
/sbin/init.d/nis start
If a
ypbind
process is running, execute a
ypwhich
command. Enter the following command:
#
ypwhich
If the
ypwhich
command does not return an answer, kill the
portmap
process. Enter the following command:
#
kill -9 portmap_PID
Stop and start NIS, using the following commands:
#
/sbin/init.d/nis stop
#
/sbin/init.d/nis start
|
|
|
If the
ypwhich
command gives you inconsistent
information when invoked several times in succession, your client system is
changing the server system to which it is bound. This can occur
over time, especially if your system is on a busy network or if the NIS servers
are busy. Once all clients get acceptable response time from the NIS servers,
the system will stabilize.
If the
ypwhich
command reports that the domain is not bound,
your system did not initially bind to a server system. Issue a
ypcat
command, then reissue the
ypwhich
command again.
|
|

Problem still exists? Report your problem to Digital. See Chapter 16.
|
If an NIS command hangs, the following message appears on the console:
yp: server not responding for domain domainname.
Still trying
The client cannot communicate with the server. Complete
the following steps:
-
Verify that the domain name returned by the
domainname
command matches the NIS_DOMAIN variable in the
server's
/etc/rc.config
file.
If the domain name does not match, reconfigure the client system by using the
nissetup
script. See
Section 7.3
for information on configuring NIS.
-
Verify that there is at least one NIS server for your domain
running on your local subnetwork. If there is not, you must use the
-S
option to the
ypbind
command. Reconfigure the client, using the
nissetup
command, and choose this option.
-
Check with other clients on the subnetwork to determine if they
are having problems with any of the NIS commands.
-
Verify that the server daemons on the remote system are
running. Enter the following command:
#
rpcinfo server_name
-
Check the
syslogd
daemon message files for any NIS messages. See
Section 14.8
for more information.
-
Verify that the server is running. See the solutions for
solving NIS server problems in
Section 13.6.
If the previous steps do not solve the problem,
complete the following steps:
-
Stop and start NIS. Enter the following commands:
#
/sbin/init.d/nis stop
#
/sbin/init.d/nis start
If this does not solve the problem, go to step 2.
-
Reboot the system.
-
Reconfigure NIS by running the
nissetup
script.
|
|
|
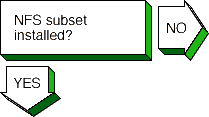
Verify whether the NFS subset is installed.
Enter the following command:
#
setld -i | grep OSFNFS
The following message should appear:
OSFNFSnnn installed NFS(tm) Utilities
(Network-Server/Communications)
If the NFS subset is not installed or is corrupt, install it by using the
setld
command. See
System Administration
for more information on installing the subset.
|
|

|
Check the
/etc/rc.config
file for the following entry:
NFSSERVING="1"
If the entry does not exist, run the NFS Configuration application. Be sure
to specify that you will be exporting directories, even if you are going to
edit the
/etc/exports
file manually. See
Section 8.3
for more information.
Verify that the network software has been configured. See the solution at
[Network configured?] in
Section 13.3.
|
|
|
Verify that the
portmap
daemon is running. Enter the following command:
#
ps -e | grep portmap
If the
portmap
daemon is not running, stop and restart
NFS, using the following commands:
#
/sbin/init.d/nfs stop
#
/sbin/init.d/nfs start
If the
portmap
daemon does not start, reboot the server.
|
|

|
Verify that the NFS daemons are registered with the
portmap
daemon. Enter the following commands:
#
rpcinfo -u server_name mount
#
rpcinfo -u server_name nfs
If neither is registered, start NFS by using the following command:
#
/sbin/init.d/nfs start
|
|
|
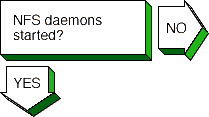
To verify that the NFS daemons are running, complete the following steps:
-
Verify that a
mountd
process is running. Enter the following command:
#
ps -e | grep mountd
If a
mountd
process is running, go to step 2. If no
mountd
process is running, stop and start NFS by using the following commands:
#
/sbin/init.d/nfs stop
#
/sbin/init.d/nfs start
-
Verify that a
nfsd
process is running. Enter the following command:
#
ps -e | grep nfsd
If no
nfsd
process is running, stop and start NFS by
using the following commands:
#
/sbin/init.d/nfs stop
#
/sbin/init.d/nfs start
|
|
Problem still exists? Report your problem to Digital. See Chapter 16.
|
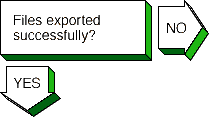
To verify that the files are being exported, complete
the following steps:
-
Verify that file is being exported. Enter the following command:
#
showmount -e
If the file is being exported, go to step 3.
-
If the file is not being exported, check that the file has
an entry in the
/etc/exports
file. If there is no entry in the
/etc/exports
file, edit the file and create an
entry. Have the remote system mount the file.
-
If the file is being exported and the users cannot mount
the file, check the
/etc/rc.config
file to see if they are allowed to mount the file. Enter the following
command:
#
/usr/sbin/rcmgr get NONROOTMOUNTS
If the
NONROOTMOUNTS
parameter is 0, only users running as root
can mount files from this server. To allow users not running as
root to mount the files, enter the following command:
#
/usr/sbin/rcmgr set NONROOTMOUNTS 1
-
Verify that the
mountd
daemon is running with Internet
address checking on. Enter the following command:
#
ps -e | grep mountd
If the
-i
option appears, the client's name and address must be in the
/etc/hosts
file, or in the BIND or NIS
hosts
database. Only known hosts can mount the file system.
If the
-d
or
-s
option appears, the client system must be in the same BIND domain or subdomain,
respectively, as the server.
-
If the
mountd
daemon is returning stale file handles for
exported files, send a hangup signal (SIGHUP) to the
mountd
daemon to force it to reread the
/etc/exports
file. Enter the following commands:
#
ps -e | grep mountd
#
kill -1 mountd_pid
|
|
|
Verify whether the NFS subset is installed.
Enter the following command:
#
setld -i | grep OSFNFS
The following message should appear:
OSFNFSnnn installed NFS(tm) Utilities
(Network-Server/Communications)
If the NFS subset is not installed or is corrupt, install it by using the
setld
command. See
System Administration
for more information on installing the subset.
|
|
|
Check the
/etc/rc.config
file for the following entry:
NFS_CONFIGURED="1"
If the entry does not exist, run the NFS Configuration application. See
Section 8.3
for more information.
Verify that the network software has been configured. See the solution for
[Network configured?] in
Section 13.3.
|
|
|
Verify that the
portmap
daemon is running. Enter the following command:
#
ps -e | grep portmap
If you do not find the
portmap
daemon, stop and restart NFS, using the following commands:
#
/sbin/init.d/nfs stop
#
/sbin/init.d/nfs start
If the
portmap
daemon does not start, reboot the client.
|
|
|
If the client cannot mount a remote file system or
directory, complete the following steps:
-
If an error message appears on the user's terminal, see
Appendix E
for the error message and a description.
-
Verify that the remote NFS server is on your local network and
in your
hosts
database.
-
Verify that the server daemons on the remote system
are running. Enter the following command:
#
rpcinfo -p server_name
-
Verify that the server is exporting the files you are
expecting. Enter the following command:
#
showmount -e server_name
-
See the solutions for solving NFS server problems in
Section 13.8.
If the server is running and you still have
problems, check the Ethernet connections and the Internet connections between
the client system and the remote server.
-
Check with other clients on the network to determine if
they are having problems with the remote server.
-
Verify the mount command line or the entry in the
/etc/fstab
file, and check the following:
-
The host name matches the name of the remote NFS server.
-
The mount point exists on your system.
-
If you get an authentication error, check the following:
-
If you are not a superuser, the server allows nonroot mounts.
-
Your host name is in the server's
hosts
database.
-
If your system is not in the same domain as the
server, the server performs domain checking. See
mountd(8)
for more information on server options.
|
|

Problem still exists? Report your problem to Digital. See Chapter 16.
|
If application programs that perform file-related
tasks do not complete their tasks or take a long time in doing so,
complete the following steps:
-
If an error message appears on the user's terminal, see
Appendix E
for the error message and a description.
-
Verify that the server is running. See the solutions for
solving NFS server problems in
Section 13.8.
If the server is running, check that the
nfsd
daemon is accumulating CPU time. If it is not, kill it and restart it. If this
does not solve the problem, reboot the server.
If the remote file systems or directories are mounted with the
hard
option, the program continues when the server is running once again.
-
Check with other clients on the network to determine if
they are having problems with the remote server. If
they are not, check the Ethernet connections and the
internet connections between the client system and the
remote server.
-
Check whether any
nfsiod
daemons are running. Enter the following command:
#
ps -e | grep nfsiod
If no
nfsiod
daemons are running, start some. Enter the following command:
#
/usr/sbin/nfsiod 7
Although the
nfsiod
daemons are not necessary for a client, they perform read-ahead and
write-behind functions, which might make I/O faster.
-
If file access requests succeed but file locking requests hang
indefinitely, verify that the local
rpc.statd
and
rpc.lockd
daemons are running. Enter the following commands:
#
ps -e | grep rpc.statd
#
ps -e | grep rpc.lockd
If they are not running, start them. Enter the following commands:
#
/usr/sbin/rpc.statd
#
/usr/sbin/rpc.lockd
Also, verify that the local
rpc.statd
and
rpc.lockd
daemons are running on the server. Enter the following commands:
#
rpcinfo -p server_name | grep status
#
rpcinfo -p server_name | grep lockmgr
If they are not running, contact the server system administrator.
|
|
|
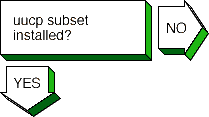
Verify whether the
uucp
subset is installed. Enter the following command:
#
setld -i | grep OSFUUCP
The following message should appear:
OSFUUCPnnn installed UNIX(tm)-to-UNIX(tm)Copy
Facility (General Applications)
If the
uucp
subset is not installed, install it by using the
setld
command. See
System Administration
for
more information on installing the subset.
|
|
|
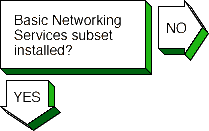
Verify whether the Basic Networking Services subset
(containing the
tip
and
cu
utilities) is installed. Enter the following command:
#
setld -i | grep OSFCLINET
The following message should appear:
OSFCLINETnnn installed Basic Networking Services
(Network-Server/Communications)
If the Basic Networking Services subset is not installed, install it by using
the
setld
command. See
System Administration
for more information on installing the subset.
|
|

|
Check for entries in the
Permissions,
Devices,
and
Systems
files in the
/usr/lib/uucp
directory. If there are no entries, run the
uucpsetup
script. See
Section 9.3
for more information.
|
|
|
Configure the network hardware as follows:
-
Direct connections to remote host -- Use a
null modem or modem eliminator cable to connect your system to the remote
host.
-
Phone line connection to remote host -- Use a
cable to connect your system to a modem and another cable to
connect your modem to a phone line. The modem you
use must be compatible with the modem at the remote
host. Make sure the modem is configured as follows:
-
Forced data set ready (DSR) is disabled.
-
Full or verbose status messages are enabled.
-
Character echo is disabled.
-
Use 8-bit characters with no parity.
-
XON/XOFF flow control is disabled.
-
TCP/IP connection to remote host -- Use a
cable to connect your system to the network. Then, run the
Network Configuration application to configure the network.
See
Section 2.3
for more information on setting up the network.
|
|
|
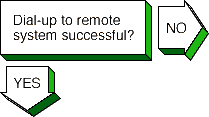
If you cannot dial up the remote system, check the following:
-
Make sure that the setup parameters (such as speed,
parity, modem control, flow control, and other terminal
characteristics) on the local and remote ends are properly defined for the type
of modem you have.
-
Dial the number to the remote node. If you do not get
an "Attached" message or a login prompt, plug a telephone handset into
the local telephone line to check for a dial tone. If you do not hear a dial
tone, call you local carrier to fix this problem.
If you get no message, check the cabling between the local system and the
modem.
-
If you get a dial tone, check that your modem is operational
and perform diagnostic tests on your modem. See the modem manual for more
information.
-
From another handset, dial the local telephone line. If
the local telephone rings and you can carry on a conversation, the telephone
line on the local end is good.
If you cannot pass voice traffic, or if there is no ring,
call your local carrier to fix this problem.
-
Repeat steps 2 and 3 on the remote node to resolve
problems with the remote end.
-
If the telephone line is operational, verify that the remote
modem is set up to automatically answer incoming calls when the system raises
the data terminal ready (DTR) signal. The system raises the DTR signal by
issuing a
uugetty
or
getty
command on the port.
|
|

|
Run the
uucp
tests to test the connection to the remote system. See
Section 14.5
and
Section 14.6.
|
|

Problem still exists? Report your problem to Digital. See Chapter 16.
|
If the
tip
command does not execute successfully, complete the following steps:
-
Check that the system name, connection speed, and
phone number are in the
/etc/remote
file or that the system name and connection speed are in the
/etc/remote
file and the phone number is in the
/etc/phones
file. See
remote(4)
and
phones(4)
for more information.
-
Check the
at
entry in the
/etc/remote
file. If the entry is correct, create an entry
for the modem in the
/etc/acucap
file. See
acucap(4)
for more information.
-
Check that the remote system is configured to answer incoming calls.
|
|

|
Check the
/etc/rc.config
file for the following entry:
XNTPD_CONF="YES"
If the entry does not exist, run the
ntpsetup
script. See
Section 10.3
for more information.
|
|

|
Verify that a
xntpd
process is running. Enter the following command:
#
ps -e | grep xntpd
If no
xntpd
process is running, start NTP by using the following command:
#
/sbin/init.d/xntpd start
|
|
|
If the
ntpq
or
xntpdc
command cannot find the server host, the following message appears:
***Can't find host hostname
The
hostname
is not in the
/etc/hosts
file, the BIND
hosts
database, or the NIS
hosts
database. Edit the
/etc/hosts
file and add an entry for the server host.
|
|
|
If you run one of the monitor programs and in the output from the
peers
command the reach column contains zeros (0s), complete the following steps:
-
Contact the system administrator of the server and verify which
NTP daemon the server is running. The entry for the server in the
/etc/ntp.conf
file must contain the phrase
version x after the server name, as follows:
server host1 version x -
Check the
/etc/hosts
file and verify that there
is an entry for each NTP server specified in the
/etc/ntp.conf
file. If you are using either BIND or NIS for host information, verify that
the
hosts
database has an entry for each NTP server.
If the
xntpdc hostname command does not display any information, check whether the
hostname
server is running NTP."
|
|

Problem still exists? Report your problem to Digital. See Chapter 16.
|
If the
ntpq
or
xntpdc
request times out, the following message appears:
hostname: timed out, nothing received
***Request timed out
Complete the following steps:
-
The
hostname
is not running the
xntpd
daemon. Check with the system administrator for that system.
-
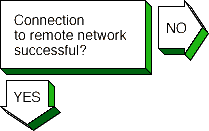
The network connection has gone down. See the solutions for
[Host reachable?] at the beginning of this chapter.
If you still cannot solve the problem, complete the following steps:
-
Check the
/etc/rc.config
file to make sure it contains an entry similar to the following:
XNTPD_CONF="YES"
export XNTPD_CONF
XNTP_SERV1=server1
export XNTP_SERV1
XNTP_SERV2=server2
export XNTP_SERV2
XNTP_SERV3=server3
export XNTP_SERV3
XNTPD_OPTS="-g"
export XNTPD_OPTS
If this entry does not exist or is incorrect, run the
/usr/sbin/ntpsetup
script. See
Section 10.3
for more information.
-
Check the
/etc/ntp.conf
file and make sure the
information in it is accurate. It should contain entries for hosts running NTP
with whom you want to synchronize system time. Make sure the correct version
number is specified for each server and peer. To correct any entries, run the
/usr/sbin/ntpsetup
shell script. See
Section 10.3
for information on running the script.
-
Check the
daemon.log
file in the
/var/adm/syslog.dated/date directory for information about NTP problems on the system.
|
|

|
Verify that the correct number of Serial Line Internet Protocol
(SLIP) pseudodevices are supported in the kernel by using the
netstat -in
command. If SLIP is supported, output similar to
the following appears for each interface:
sl0* 296 <Link> 0 0 0 0 0
The
sl
prefix indicates that SLIP is supported on the system.
In this example there is one SLIP interface.
If you need additional SLIP interfaces, specify them by adding the
nslip=x atribute under the
net:
subsystem in the
/etc/sysconfigtab
file. See
System Administration
for information on adding more SLIP interfaces.
On systems with 24 megabytes of memory, SLIP is not configured into the kernel.
To add SLIP into the kernel, edit the system configuration file
(/usr/sys/confhostname )
and add the following entry:
options SL
See
System Administration
for more information.
|
|
|
Configure the network hardware as follows:
-
Verify that you are using the correct hardware. See
Section 4.1.2.1
for more information.
-
Make sure the modem is configured as follows:
-
Use 8-bit characters with no parity.
-
Software flow control (XON/XOFF) is disabled.
-
For dial-in systems, follow the guidelines in
Section 4.1.3.1.
-
For dial-out systems, follow the guidelines in
Section 4.1.3.2.
|
|
|
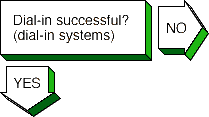
If a remote system cannot dial in to your system successfully,
complete the following steps:
-
Edit the
/etc/slhosts
file and include the
debug
option in the login entry that cannot log in. See
slhosts(4)
for more information.
-
Instruct the remote user to dial in again.
-
Check the
daemon.log
file in the
/var/adm/syslog.dated/date directory for information on SLIP problems on the dial-in system.
|
|
|
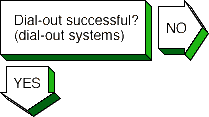
If you cannot dial out to the remote system, complete the following
steps:
-
Verify that the modem is working correctly:
-
Edit the
/etc/acucap
file and include the
db
option in your modem's entry. This prints usefule information for debugging a
new entry. See
acucap(4)
for more information.
-
Verify SLIP setup. Do the following:
-
Edit the
startslip
dial-out script file and specify the
debug
subcommand and a debug log file.
-
Try to dial out again.
-
Check the debug log file for information about SLIP dial-out problems.
|
|

|
If you cannot communicate with the remote host and none of the
debug messages shows an error, complete the following steps:
-
Check that the IP addresses and netmasks are correct on both ends of the
connection.
-
Check the following SLIP configuration parameters at
each end of the connection:
-
Internet Control Message Protocol (ICMP) traffic suppression -- If enabled
at either end of the connection, the
ping
command will fail.
-
TCP header compression -- If enabled at one end, TCP header compression must
be enabled or autoenabled on the other end.
|
|
|
If you can communicate with the remote host but not the the network
connected the the remote host, complete the following steps:
-
If your local system is using the remote system as a gateway system, issue
the
netstat -rn
command on the local system to verify that the
remote SLIP address is the default gateway.
-
On the gateway system (remote system), issue the
iprsetup -d
command to see if
ipforwarding
and
ipgateway
are on.
-
On the gateway system, verify that
gated
is running. See
gated(8)
for more information.
|
|
Problem still exists? Report your problem to Digital. See Chapter 16.
|
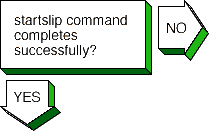
If the
startslip
command does not complete successfully, complete the following steps:
-
Build your kernel with the
PACKETFILTER
option.
-
Use the
tcpdump
command to examine packets sent and received through the SLIP interface. See
tcpdump(8)
for more information.
|
|
|
Verify that the Point-to-Point Protocol (PPP)
is supported in the kernel by using the
netstat -i
command. If PPP is supported, output similar to the following appears:
ppp0* 296 <Link> 0 0 0 0 0
ppp1* 296 <Link> 0 0 0 0 0
The
ppp
prefix indicates that PPP is supported on the
system. In this example there are two PPP pseudodevices.
If PPP is not supported, add PPP into the
/etc/sysconfigtab
file. See
System Administration
for information on adding PPP into the
sysconfigtab
file.
|
|
|
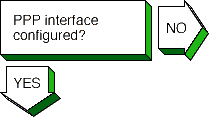
Verify that the PPP interface is configured with the
local and remote IP addresses and a network mask. Enter the following command:
#
ifconfig pppx
The
x
variable is the interface number (0, 1, 2, ...). If the PPP interface is
configured, output similar to the following appears:
ppp0: flags=10<POINTOPOINT>
|
|
|
Configure the network hardware as follows:
-
Direct connections to remote host -- Use a null
modem or modem eliminator cable to connect your system to the
remote host.
-
Phone line connection to remote host -- Use a
cable to connect your system to a modem and another cable to
connect your modem to a phone line. The modem you
use must be compatible with the modem at the remote
host. Make sure the modem is configured as follows:
-
Use 8-bit characters with no parity.
-
All flow control is disabled.
|
|
|
If you are logging messages to the console and the link comes up
successfully, the following messages appear on the console:
Local IP address: xx.xx.xx.xx
Remote IP address: yy.yy.yy.yy
If the link does not come up, check the following:
-
Check that the serial connection is set up successfully. Use the
chat -v
command to log the characters the
chat
program sends and receives.
-
Check that
pppd
starts on the remote system. Use the
chat -v
command to log the characters the
chat
program sends and receives.
-
Check the PPP negotiation between the two peers. Use the
pppd
command with the
debug
option to log the contents of all control packets sent and received.
|
|

Problem still exists? Report your problem to Digital. See Chapter 16.
|
If network applications do not work successfully, this might
indicate an IP-address assignment problem or a routing problem. Do the
following:
-
Use the
ifconfig,
netstat -i,
netstat -r,
ping,
and
traceroute
commands.
-
If you can communicate with the peer machine but cannot communicate with
other other machines beyond that in the network, there is a routing problem.
For instances where the local machine is connected to the Internet through the
peer, do the following:
-
Assign the local machine an IP address on the same subnet as the remote
machine.
-
Run the local
pppd
daemon with the
defaultroute
option.
-
Run the remote
pppd
daemon with the
proxyarp
option.
|
|

|
Verify whether the Local Area Transport subset is
installed. Enter the following command:
#
setld -i | grep OSFLAT
The following message should appear:
OSFLATnnn installed Local Area Transport (LAT)
(General Applications)
If the subset is not installed, install it by using the
setld
command. See
System Administration
for information on installing the subset.
|
|
|
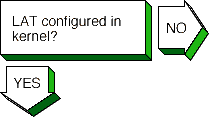
Verify whether the Local Area Transport is configured in the
kernel. Enter the following command:
#
sysconfig -q lat
If nothing is displayed, LAT is not configured in the kernel. Reconfigure the
kernel with the LAT option. See
System Administration
for information on reconfiguring the kernel.
|
|
|
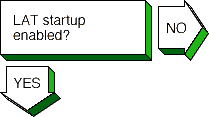
Check the
/etc/rc.config
file for the following entry:
LAT_SETUP="1"
If the entry does not exist, run the
latsetup
utility. See
Section 5.3
for information.
|
|
|
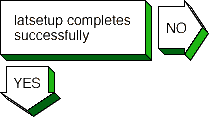
If
latsetup
fails while creating new LAT ttys, check
that
/usr/sbin
is included in the search path. Enter the
following command:
#
echo $PATH
If it is not, include it in your
PATH
environment variable. Then, create new LAT ttys using
latsetup.
|
|
|
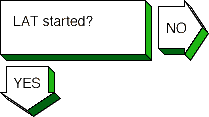
Verify whether LAT has been started. Enter the following command:
#
latcp -d
If LAT has been started, the following line appears:
LAT Protocol is active
If LAT has not been started, start it. Enter the following command:
#
latcp -s
|
|
|
If LAT starts up and messages appear continually on the
system console, check the following messages and perform the required steps:
Message 1
getty: cannot open "/dev/lat/xx". errno: 2
This means a LAT terminal device file (tty) does not exist and the
/etc/inittab
file contains an entry for this file. The
latsetup
utility will also report that
no LAT entries are available. Do the following:
-
Edit the
/etc/inittab
file and remove the LAT
getty
entries.
-
If LAT terminal devices are required, create the LAT terminal device files
and corresponding entries in the
/etc/inittab
file by using the
latsetup
command. See
latsetup(8)
for information.
Message 2
getty: cannot open "/dev/lat/xx". errno: 19
This means the kernel was not configured with the LAT option and the
/etc/inittab
file contains at least one LAT
getty
entry. Do either of the following:
-
Configure LAT into the kernel. See
System Administration
for information on configuring LAT into the kernel.
-
Remove the LAT
getty
entries from the
/etc/inittab
file, either manually or by using the
latsetup
command.
Message 3
INIT: Command is respawning too rapidly.
The following meanings are possible:
-
You are using an optional service name, such as
lattelnet,
and it is incorrectly defined. Do the following:
-
Verify that the optional service name defined by the
latcp -A
command is correct by using the
latcp -d
command.
-
Edit the
/etc/inittab
file and verify that a LAT entry has
the optional service name specified correctly.
-
An attempt to use a nonexistent LAT terminal device (tty) was made. Do the
following:
-
Edit the
/etc/inittab
file and remove the entry that has the nonexistent terminal device name.
-
If LAT terminal devices are required, create the LAT terminal device files
and corresponding entries in the
/etc/inittab
file by using the
latsetup
command. See
latsetup(8)
for more information.
|
|
|
If the user cannot connect to or display a service from a terminal
server via LAT, complete the following steps on the Digital UNIX system:
-
Check if the service name is correct, using the
latcp -d
command. If the service name is incorrect, delete the service with the
incorrect name. Enter the following command:
#
latcp -D -aservice_name
Then, add a service with the correct name. Enter the following command:
#
latcp -A -aservice_name
See
latcp(8)
for more information.
-
Display the group codes for the service to which the user is attempting to
connect using the
latcp -d
command. Check whether any group code matches a group displayed by the
show port
command at the terminal server. If no group code matches, do either of the
following:
See
latcp(8)
for more information.
-
Check whether LAT is started on the system. If it is not, start it. Enter
the following command:
#
latcp -s
-
If the problem persists, restart LAT. Enter the following command:
#
latcp -s
|
|
|
If problems occur when using an optional service, complete the
following steps:
-
Check whether the service was added as an optional service. Enter the
following command:
#
latcp -d
Look for the following line:
Service name: name (Optional)
If
Optional
is not displayed, the optional service was not defined with the
-o
option. Delete the service. Enter the following command:
#
latcp -D -aservice_name
Then, add the service with the correct name and
-o
option. Enter the following command:
#
latcp -A -aservice_name -o
See
latcp(8)
for more information.
-
Check if the optional service name matches the name defined in the
/etc/inittab
file. If it does not, do either of the following:
-
Edit the
/etc/inittab
file and specify the optional service name.
-
Delete the service. Enter the following command:
#
latcp -D -aservice_name
Then, add the service with the correct name and
-o
option. Enter the following command:
#
latcp -A -aservice_name -o
See
latcp(8)
for more information.
|
|
|
If the user cannot connect to a host using LAT, the following
messages appear:
Connection to node-name not established.
Service in use.
The
/etc/inittab
file does not contain a sufficient number of
getty
entries. Create more LAT terminal devices (ttys) and
add their corresponding entries into the
/etc/inittab
file by using the
latsetup
command. Then, restart LAT to advertise
the available services. Enter the following command:
#
latcp -s
See
Section 5.3
for information.
|
|
|
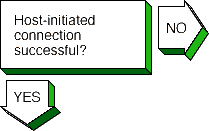
If a host-initiated connection fails, check that
the port, host, and service names are specified correctly.
Enter the following command:
#
latcp -d -P -L
If these names are not specified correctly, delete the application ports with
the incorrect name. Enter the following command:
#
latcp -D -pport_name
Then, add the application ports, using correct spelling. Enter either
of the following commands:
#
latcp -A -plocal_port -Hnode -Rrem_port
#
latcp -A -plocal_port -Hnode -Vsvc_name
See
latcp(8)
for information.
Note
When you delete an application port for a LAT printer, any currently executing
print operation continues until the printer buffer is empty. The print job
might not be complete.
|
|
|
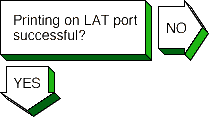
If you print a file to a printer attached to a LAT application
port, the printer is online, and no printing occurs, check the status of the
print queue. Enter the following command:
#
lpc status
The following line might appear:
waiting for printer to become ready (offline ?
If this line appears, verify whether LAT has been started. Enter the
following command:
#
latcp -d
If LAT has not been started, start it. Enter the following command:
#
latcp -s
|
|
|
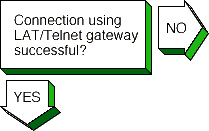
If problems are encountered with LAT/Telnet gateway, check the
syslogd
daemon messages file. Use the error message
to eliminate the error. See
Section 14.8
for more information on viewing the
daemon.log
file.
The
lattelnet
utility uses the syslog message priority of
LOG_INFO. For example, if you edit a LAT terminal entry in the
/etc/inittab
file, reassign it to
lattelnet
while a
getty
process is still active for the terminal, and a
user tries to connect to
lattelnet,
the connection will fail. The following error message appears in the
daemon.log
file:
No such file or directory
Terminate the
getty
process for the terminal port.
|
|
Problem still exists? Report your problem to Digital. See Chapter 16.
|
If the LAT connection terminates abnormally, complete the following
steps:
-
Check the LAT terminal device (ttys) files for duplicate minor numbers.
Enter the following command:
#
ls -l /dev/lat/*
If any exist, remove the duplicate device files, leaving the original file.
-
Check the
/etc/inittab
file for duplicate LAT entries. Remove the duplicate entries, leaving the
original entry.
|
|
|
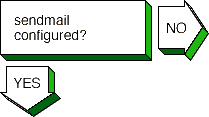
Check the
/etc/rc.config
file for the following entry:
MAIL_CONF="YES"
If the entry does not exist, run the Mail Configuration application. See
Section 11.3
for more information.
|
|
|
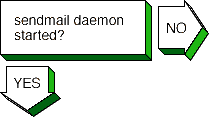
Verify whether sendmail has been started. Enter the following command:
#
ps -e | grep sendmail
If
sendmail
is not running, start it, using the following command:
#
sendmail
|
|
|
If a user cannot send mail to another user, complete the following steps:
-
Check whether the
aliases
database was changed. If it was,
update the database by using the
newaliases
command.
-
Check the
mail.log
files generated by the
syslogd
daemon for the specific mail message. If the message
reached its destination, the addressee is not on the destination system. Verify
that the user has the correct address. See
Section 14.8
for information on viewing the
syslogd
message files.
|
|

|
If you sent a mail message and the recipient did not receive it,
complete the following steps:
-
Check whether the address is correct.
-
Check whether the remote node is reachable by using the
ping
command.
-
Look in the
mail.log
files generated by the
syslogd
daemon for the sender's user name. See
Section 14.8
for information on viewing the
syslogd
message files.
If you find an entry, write down the message ID. If no entry is found, send
the message again.
-
Using the message ID, search through the
mail.log
files for the "from" and "to" entries.
If you find a "from" entry but no "to" entry, either
sendmail
did not receive the message or the message was corrupted. Check the
/var/spool/mqueue
directory for files containing the
message ID by entering the following command:
#
ls -l /var/spool/mqueue/*fAAmessage_ID
If the control file
(qfAAmessage_ID)
is present but no data file
(dfAAmessage_ID)
is present, the message was lost.
If you find both a "from" entry and a "to" entry and the status is deferred,
the message is in the queue. If there is no corresponding sent entry, use the
mailq
command to send the file and report the reason for the deferral.
If you find both a "from" entry and a "to" entry and the status is sent, the
message was delivered. If a local delivery, the message reached the
destination. If a remote delivery, have the system administrator on the remote
host search for the message.
|
|

Problem still exists? Report your problem to Digital. See Chapter 16.
|
If sendmail is not working correctly, complete the following steps:
-
Check for an error message in the rejected message.
-
Check for error messages in the
mail.log
files generated by the
syslogd
daemon. See
Section 14.8
for information on viewing the
syslogd
message file.
See
Appendix G
for a list of
sendmail
error messages.
|
![[Return to Library]](BOOKSHLF.GIF)
![[Contents]](TOC.GIF)
![[Previous Chapter]](REW.GIF)
![[Next Section]](NEXT.GIF)
![[Next Chapter]](FF.GIF)
![[Index]](INDEX.GIF)
![[Help]](HELP.GIF)

![[Previous Section]](PREV.GIF)