![[Return to Library]](BOOKSHLF.GIF)
![[Contents]](TOC.GIF)
![[Previous Chapter]](REW.GIF)
![[Next Section]](NEXT.GIF)
![[Next Chapter]](FF.GIF)
![[Index]](INDEX.GIF)
![[Help]](HELP.GIF)
![]()
The UNIX-to-UNIX Copy Program (UUCP) is a group of programs that enables batched, error-free file transfer and remote command execution between two UNIX systems. UUCP is typically used to transfer electronic mail, network nets, and public domain software over low-speed, low-cost communications links. Digital UNIX implements the HoneyDanBer version of UUCP.
This chapter describes the UUCP environment, how to plan for UUCP, how to configure your system for UUCP, and how to manage it. For general information about UUCP see uucp_intro(7). For information on how to use UUCP, see the Command and Shell User's Guide.
![]()
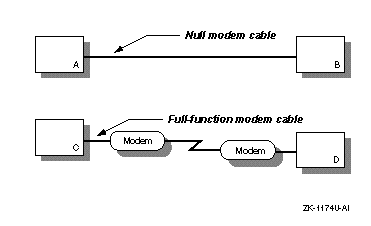
In the UUCP environment, systems can be connected to each other in the following ways:
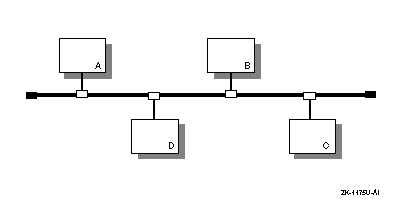
Figure 9-1 shows two simple UUCP configurations. Figure 9-2 shows a sample UUCP configuration on a LAN in which Host A has a TCP/IP connection with Host C.
![[Previous Section]](PREV.GIF)
This section describes those tasks you need to do before configuring UUCP.
In verifying the correct hardware, you are verifying both the cables and modems, if used.
Make sure you are using the correct cable to connect to the serial port of your system. If you do not, you might experience signal loss and the software will fail to function properly.
If the two systems are in close proximity to each other, use one of the null modem cables listed in Table 4-1.
If the two systems are connected through modems and telephone lines, see Table 4-6 for a list of modem cables to use.
When using modems with UUCP, adhere to the following guidelines:
UUCP can also be configured to run over TCP/IP local area networks (LANs).
For information on running UUCP over a LAN, see uucp_manual_setup(7).
UUCP configuration consists of the following parts:
The type of information you need depends on the types of connections you plan to set up and use.
Appendix A contains a worksheet that you can use to record the information that you need to provide to configure UUCP.
Figure 9-3 shows Part 8A of the Configuration Worksheet.
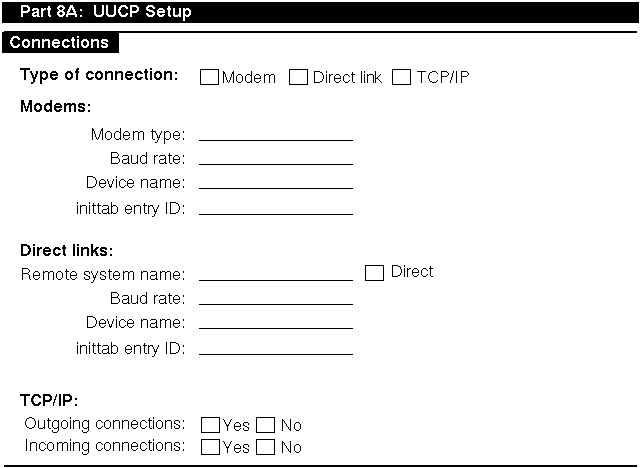
If you are viewing this manual online, you can use the print feature to print a copy of this part of the worksheet. The sections that follow explain the information you need to record in Part 8A of the worksheet.
For modem connections, supply the following information:
Note
The uugetty command should only be run on RS-232 lines, not printer or console lines.
For direct link connections, supply the following information:
If you want to connect to any system to which you have a direct hardwired connection, check Direct.
Note
The uugetty command should only be run on RS-232 lines, not printer or console lines.
For TCP/IP connections, supply the following information:
Otherwise, check NO.
Otherwise, check NO.
Figure 9-4 shows Part 8B of the Configuration Worksheet.
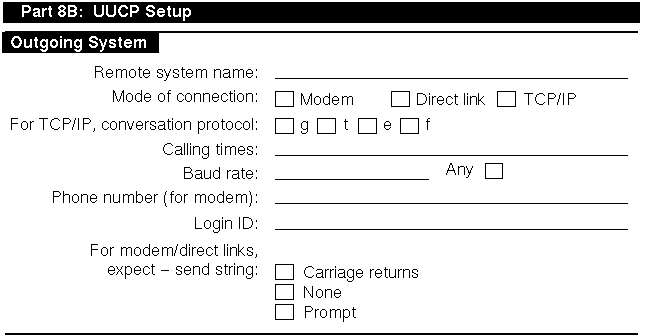
If you are viewing this manual online, you can use the print feature to print part of the worksheet. The following sections explain the information you need to record in Part 8B of the worksheet.
A dialing prefix is defined in the /usr/lib/uucp/Dialcodes file. The /usr/lib/uucp/Dialcodes file contains dial code abbreviations and partial phone numbers that complete the telephone entries in the /usr/lib/uucp/Systems file. Entries in the /usr/lib/uucp/Dialcodes file contain an alphabetic prefix attached to a partial phone number that can include, for example, access codes, area codes, and exchange numbers.
If you know the dialing prefix, enter it on the worksheet. If none is defined, enter it and the sequence of numbers to be associated with the prefix.
Note
Although the password for the login ID on the remote system is required in order to configure UUCP, do not write the password on this worksheet to protect system security.
Modems usually use a series of carriage returns as an expect-send string.
For more information on expect-send strings, see Systems(4).
Figure 9-5 shows Part 8C of the Configuration Worksheet.

If you are viewing this manual online, you can use the print feature to print a copy of this part of the worksheet. The sections that follow explain the information you need to record in Part 8C of the worksheet.
By convention, the login ID that you assign to a remote system establishing incoming connections is the system name prefixed with a U (uppercase u). For example, if you specify machine1 for incoming connections, the login ID, by convention, is Umachine1; however, you can select any login ID.
You also have the option of adding a comment to the /etc/passwd file for this login ID.
You have the option to assign more than one one login ID for each incoming system. Assigning multiple logins to a remote system allows you to maintain better access control for users on the remote system. With multiple logins, you can grant privileged users on the remote system more access on your system than you do to nonprivileged users. With multiple logins, you can assign multiple sets of permissions.
You must provide this information to the administrator of each remote system that will connect to your system as an incoming system.
If you check YES, remote system users can transfer files to and execute commands on a local system more easily. If security is a consideration, you can restrict this access so that the local system retains control of file transfers and command executions initiated by remote systems.
Security considerations at your site might require that you limit a remote system's access to the local system by using the default value CALL for this option.
If you use this option, no other other ID from the remote system can call in. Several systems, however, can use the same ID. The VALIDATE option is meaningful only when the login ID and password are protected.
If both systems use the CALLBACK option in their respective Permissions files, they will never be able to communicate with each other.
After you complete the required UUCP planning (Section 9.2), use the uucpsetup script to configure UUCP. To invoke the uucpsetup script, log in as superuser and either choose the UNIX-to-UNIX Copy Program (UUCP) option from the Setup Menu or enter the following command:
#
/usr/sbin/uucpsetup
The uucpsetup script prompts you for information required to configure connections, incoming systems, and outgoing systems.
Table 9-1 summarizes the various uucpsetup command syntaxes:
| Use this command: | If you want to: |
| uucpsetup | Configure connections, incoming systems, and outgoing systems. |
| uucpsetup -i | Configure the incoming systems only. |
| uucpsetup -m | Modify UUCP connections. |
| uucpsetup -o | Configure the outgoing systems only. |
| uucpsetup -p | Configure the Poll file. |
For information about other options, see uucpsetup(8).
The following sections provide information on how to configure connections, incoming systems, outgoing systems, and the Poll file.
After you invoke uucpsetup, use the the information you gathered in Section 9.2.2.1 to configure UUCP connections. The following guidelines explain how to answer some of the script questions:
The following example illustrates how to select the process ID (PID) u4:
Select an ID for the process in /etc/inittab file
For example type 'u1':
u4
The ID that you select is checked against those that exist in the /etc/inittab file. If the ID that you assign exists, the uucpsetup script prompts you to enter another ID.
You must also indicate whether the system will use the modem or direct line in shared mode.
For more information on the /etc/inittab file see inittab(4).
After you invoke uucpsetup, use the the information you gathered in Section 9.2.2.2 to configure UUCP for outgoing systems. This enables you to use UUCP to connect to other remote systems.
If you are doing a complete UUCP setup, the uucpsetup script prompts you for information on outgoing systems when you finish configuring connections. The following guidelines explain how to answer some of the script questions:
Enter the prefix for the Dialcodes file; for example "boston"
stands for 9=16171234 :
btown
What telephone number does the prefix stand for; Please include
the long distance access code, area, or country codes;
for example type 9=1617123 :
9=1617772
The 9 in this example is used to obtain a secondary dial tone. The 9 is site specific; it can be different for your site. The equal sign (=) is used with the 9, or number for your site, and means "wait for the dial tone." Following the equal sign (=) is the rest of the number. Enter the rest of the number.
If you define an outgoing TCP system, edit the /etc/uucp/Systems file and add an entry for the remote system. The remote system name must be the fully qualified name.
After you invoke uucpsetup, use the the information you gathered in Section 9.2.2.3 to configure UUCP for incoming systems. This enables specific remote systems to connect to your system using UUCP.
If you are doing a complete UUCP setup, the script prompts you for information on incoming systems when you are done configuring outgoing systems.
The first time you add an incoming system, the Incoming Systems Configuration menu prompts you for the name of the system you want to add. After you add an incoming system, this menu offers you the following choices:
The following guidelines explain how to answer some of the script questions:
Invoking 'vipw'.
Press RETURN to continue...
[Return]
root:fQPPWjF20Dfso:0:1:Charles Root:/:/bin/csh
nobody:*Nologin:4294967294:4294967294:anonymous NFS user:/:
daemon:*:1:1:Mr Background,,,:/:
uucp:No Login:2:2:UNIX-to-UNIX Copy:/usr/spool/uucppublic:\
     /usr/lib/uucp/uucico
bin:*:3:4:Mr Binary:/bin:
marcy:5jW0VXKeP6n1E:1242:15:Marcy Darcy,,,:\
     /usr/users/marcy:/bin/false
Umachine1:H/kj951Fq12ub:2:2:uucp login:/usr/spool/uucppublic:\
    /usr/lib/uucp/uucico
~
~
~
"/etc/ptmp" 15 lines, 933 characters
:wq
15 password entries, maximum length 100
You must enter a password
Changing password for Umachine1.
New password:
Retype new password:
You must provide this information to the administrator of each remote system that will connect to your system as an incoming system.
If you define an incoming UUCP system and your system uses NIS, edit the /etc/passwd file and add the wildcard (+:) as the last line (if not there already).
After you invoke uucpsetup with the -p option, you configure the /usr/lib/uucp/Poll file by completing the following steps:
Press Return to update the Poll file.
Monitoring the file transfer queue enables you to determine the status of several types of networking operations, including jobs that have been queued on a local system for transfer to a remote system. General users and system administrators can monitor the file transfer queue.
To get queue status manually, use the uustat -q command.
This command lists the jobs (waiting to execute or currently executing) queued for all systems. If a status file exists for a system, its date, time, and status information are reported.
The uustat command also allows you to do the following:
See uustat(1) for more information on uustat flags.
The following example shows all jobs in the current queue: one command file for system host4, three command files for system host6, and two command files for system host8. The command files for system host6 have been in the queue for 2 days.
#
uustat -q
host4 1C Sat May 9 11:12:30 1992 SUCCESSFUL
host6 3C(2) Sat May 9 11:02:35 1992 CAN'T ACCESS DEVICE
host8 2C Sat May 9 10:54:02 1992 NO DEVICES AVAILABLE
You can automatically receive status information about the uucp file transfer queue. To enable this mechanism, edit the /usr/spool/cron/crontabs/uucp file and delete the comment character (#) from the beginning of the following line:
# 48 8,12,16 * * * /usr/lib/uucp/uudemon.admin > /dev/null
In the preceding example:
| 48 | Represents minutes |
| 8,12,16 | Represents hours based on 24-hour clock notation |
| * * * | Three asterisks are placeholders representing the day of the month, the month of the year, and the day of the week |
The cron daemon will run the uudemon.admin shell script daily at 48 minutes past the hours 8, 12, and 16; that is, at 8:48 a.m., 12:48 p.m., and 4:48 p.m. The uudemon.admin script sends mail to the uucp login ID containing queue status information.
Note
These times are the defaults. You can change the time to fit the needs of your site by editing the line in the /usr/spool/cron/crontabs/uucp file.
You can also manually run the uudemon.admin script. If you do, you should run it at least once a day.
When examining queue status, check the number and age of the file-transfer and command execution requests queued in the /usr/spool/uucp/system_name directory. In some cases, queued jobs remain in the queue for some time, essentially going undelivered. The status information you need to check includes:
See Appendix F for error messages and solutions.
If necessary, delete the files in the queue, either manually or automatically. See Section 9.5 for information on deleting files.
Each system connected by uucp has the following spooling directories:
Depending upon the size of your installation and the number of files sent to the local /usr/spool/uucppublic directory by users on remote systems, the public directory can become quite large. Similarly, if requests are not transferred to remote systems for whatever reasons, the spooling directory could also become quite large. Therefore, part of uucp management is to clean up the spooling directories and conserve disk resources.
To clean up the spooling directories manually, do the following:
uucleanup [ options...]
The uucleanup program performs the following tasks:
Note
Depending on the size of your installation and the available storage space on the local system, you can set age limit for any length of time. However, you should allow files to remain in the spooling directory for at least the default number of days.
See uucleanup(8) for more information on the uucleanup command options.
The following example deletes all old files in the uucp spooling and public directories for system host2 on the local system:
#
uucleanup -shost2
Although automatic cleanup is not enabled when uucp is installed, you can enable it by doing the following:
# 45 23 * * * ulimit 5000; /usr/lib/uucp/uudemon.cleanu > /dev/null
In the preceding example:
| 45 | Represents minutes |
| 23 | Represents hours based on 24-hour clock notation |
| * * * | Three asterisks are placeholders representing the day of the month, the month of the year, and the day of the week |
The cron daemon will start the uudemon.cleanu shell script daily at 45 minutes after hour 23; that is, at 11:45 p.m. The shell script in turn starts the uucleanup program. This time is the default. You can change the time to fit the needs of your site by editing the line in the /usr/spool/cron/crontabs/uucp file.
You can instruct the cron daemon to run the uudemon.cleanu shell script daily, weekly, or at longer intervals, depending on the number of uucico and uuxqt transactions that occur on the local system.
The uudemon.cleanu script incorporates the actions of the uucleanup program and performs the following additional tasks:
The operating system allots uucp a specified amount of storage space for any one log file; the number of blocks is determined by the default ulimit. If the uudemon.cleanu script fails to execute because the ulimit is set too low for the requirements of the local system, you should increase the value.
See uudemon(8) for more information on command options.
When removing files from the queue, observe the guidelines for the following files:
The uucp program creates a log file for each remote system with which your local system communicates. Each time you use the networking utilities facility, uucp places status information about each transaction in the appropriate log file. Log file names can be in either of the following forms:
/usr/spool/uucp/.Log/daemon_name/system_name
/usr/spool/uucp/.Log/command_name/system_name
In the preceding example:
| daemon_name | Represents either uucico (called by the uucp and uuto commands) or uuxqt (called by the uux command) |
| command_name | Represents either uucp or uux |
| system_name | Represents the name of the system with which your local system is communicating |
To display individual log files, use the uulog command, with the following syntax:
uulog [options...]
You can use the uulog command to display a summary of uucp and uux requests by user or by system. See uulog(1) for more information on the uulog command and its options.
Instead of viewing the log files individually, you can have the uudemon.cleanu script automatically append these log files to one primary log file, and then view only the one log file.
The uudemon.cleanu script combines the uucico, uuxqt, uux, and uucp log files on a system and stores them in a directory named /usr/spool/uucp/.Old. By default, the uudemon.cleanu script saves log files that are up to 2 days old.
You can change the default by modifying the -o2 option in the following line in the uudemon.cleanu script:
uucleanup -D7 -C7 -X2 -o2 -W1
If storage space is a problem on a particular system, consider reducing the number of days that the files are kept in the individual log files. See Section 9.5 for information on setting up the uudemon.cleanu script.
The following command displays the log file for uucico requests for system host2:
#
uulog -s host2
The following command displays the log file for uuxqt requests for system host1:
#
uulog -x host1
The following command displays the last 40 lines of the file transfer log for system host6 and executes a tail -f command. Press Ctrl/C to terminate the command.
#
uulog -f host6 -40
The following two system log files are affected by uucp:
Both files can grow quite large over a period of time. Purge these files periodically to keep them at a reasonable size. See System Administration for information on these files.
The Maxuuxqts file, located in the /usr/lib/uucp directory, limits the number of uuxqt processes running simultaneously on a local system. Typically, the file requires no configuration or maintenance unless the system on which it is installed is utilized frequently and heavily by users on remote systems.
To change the number of uuxqt processes on the system, edit the Maxuuxqts file and change the ASCII number to meet the needs of your installation; the default is 2. In general, the larger the number, the greater the potential load on the local system.
When users issue uucp commands to copy files and execute remote commands, the files containing these work requests are queued for transfer in the local /usr/spool/uucp/system_name directory. The uucp daemon uusched schedules the transfer of these files.
To schedule jobs, start the uusched daemon by using the uusched command, with the following syntax:
uusched [ options... ]
The following options are available:
| -x debug_level | Produces debugging information about the progress of the uusched activity. The valid range for the debugging level is 0 to 9, with a default of 5. Higher numbers produce more detailed debugging information. |
| -u debug_level | Passes the -xdebug_level specification on to the uucico daemon, which then produces debugging output about the file-transport activities. |
Although you can start the uusched daemon manually, the preferred method is to start it automatically at specified intervals by using the uudemon.hour shell script, which is stored in /usr/lib/uucp. The shell script, in turn, is started periodically by the cron daemon, based on instructions in the /usr/spool/cron/crontabs/uucp file.
The /usr/lib/uucp/Maxuuscheds file limits the number of remote systems that the uucico program can contact at any one time. This file is used in conjunction with the uusched daemon and the lock files in the /usr/spool/locks directory to determine the number of systems currently being polled.
The Maxuuscheds file requires no configuration or maintenance unless the system on which it is installed is utilized frequently and heavily by users on remote systems. You use this file to help manage system resources and load averages.
The Maxuuscheds file contains an ASCII number that you can change in order to meet the needs of your installation; the default is 2. In general, the larger the number, the greater the potential load on the local system.
See uusched(8) for more information on the uusched command and its options.
The following command starts uusched daemon manually as a background process:
#
/usr/lib/uucp/uusched &
The uudemon.hour shell script is used in conjunction with the Poll file, the uudemon.poll shell script, and the /usr/spool/cron/crontabs/uucp file to initiate calls to remote systems. Specifically, uudemon.hour calls programs involved in transferring files between systems at specified hourly intervals.
You can instruct the cron daemon to run the uudemon.hour shell script at specified hourly intervals. The frequency at which you run the script depends on the amount of file transfer activity originating from the local computer.
Although the uudemon.hour shell script is not enabled when uucp is installed, you can enable it by doing the following:
# 25,55 * * * * /usr/lib/uucp/uudemon.hour > /dev/null
In the preceding example:
| 25,55 | Represents minutes past the hour |
| * * * * | Four asterisks are placeholders representing the hour interval, the day of the month, the month of the year, and the day of the week |
The cron daemon will run the uudemon.hour script at 25 minutes past the hour and again at 55 minutes past the hour; for example, at 8:25 a.m. and 8:55 a.m., 9:25 a.m. and 9:55 a.m., and so on.
These times are the defaults. You can change the time to fit the needs of your site by editing the line in the /usr/spool/cron/crontabs/uucp file.
If users on the local system initiate a large number of file transfers, you might need to specify that the cron daemon should start uudemon.hour several times an hour. If the number of file transfers originating from the local system is low, you can probably specify a start time once every 4 hours, for example.
![]()
The uudemon.poll shell script is used in conjunction with the Poll file, the uudemon.hour shell script, and the /usr/spool/cron/crontabs/uucp file to initiate calls to remote systems. The uudemon.poll shell script polls the systems listed in the Poll file, /usr/lib/uucp/Poll. In addition, it creates command files for the systems listed in the Poll file.
The time at which you run uudemon.poll depends on the time at which you run uudemon.hour. You generally schedule the polling shell script to run before the hourly script. This schedule enables uudemon.poll to create any required command files before the cron daemon runs uudemon.hour.
Although uudemon.poll is not enabled when uucp is installed, you can enable it by doing the following:
# 20,50 * * * * /usr/lib/uucp/uudemon.poll > /dev/null
In the preceding example:
| 20,50 | Represents minutes past the hour |
| * * * * | Four asterisks are placeholders representing the hour interval, the day of the month, the month of the year, and the day of the week |
The cron daemon will run the uudemon.poll script at 20 minutes past the hour and again at 50 minutes past the hour, for example, at 8:20 a.m. and 8:50 a.m., 9:20 a.m. and 9:50 a.m., and so on.
These times are the defaults. You can change the times at which the cron daemon executes uudemon.poll to correspond to the times you set up for uudemon.hour. You should instruct the cron daemon to run uudemon.poll about 5 to 10 minutes before running uudemon.hour.