![[Return to Library]](BOOKSHLF.GIF)
![[Contents]](TOC.GIF)
![[Previous Chapter]](REW.GIF)
![[Next Section]](NEXT.GIF)
![[Next Chapter]](FF.GIF)
![[Index]](INDEX.GIF)
![[Help]](HELP.GIF)
![]()
The Digital UNIX mail system enables users to send mail to other users, whether on the same system, same network, or the other side of the world. This chapter describes the Digital UNIX mail system and its components, guidelines for configuring and administering mail on a standalone system or across an enterprise, mail configuration planning, mail configuration, and day-to-day management tasks.
For additional introductory information on mail, see also mail_intro(7) and the sendmail book by O'Reilly & Associates.
![]()
In the Digital UNIX mail environment, systems can have the following roles:
Figure 11-1 shows a sample standalone configuration on a LAN in which all hosts are configured as mail standalone systems. Host B is also an NFS server, exporting the /var/spool/mail directory to hosts A, C, D, and E. Hosts A, C, D, and E are also NFS clients, importing the /var/spool/mail directory from host B.
The hosts must also have identical information in their passwd and aliases files. This information can be distributed either by using NIS or by manually editing the files on each system.
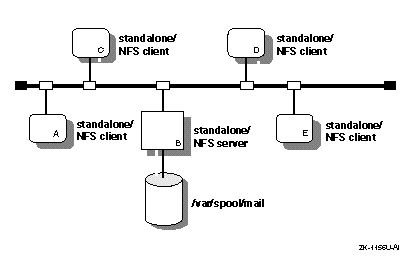
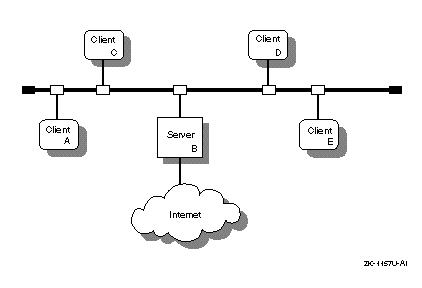
Figure 11-2 shows a sample client/server configuration in which host B is configured as a mail server and hosts A, C, D, and E are configured as mail clients. This is useful in larger enterprise networks that consist of multiple domains and connections to the Internet or other networks.
This configuration also provides for the creation of a natural hierarachy of mail servers in large enterprise networks with multiple domains. Mail clients in each domain would direct all traffic to one or more mail servers, depending on the number of clients in the domain. Each domain's servers would then forward mail to the enterprise's top domain servers for forwarding to the Internet. Since almost all of your local domain's mail traffic goes through the servers, this simplifies administration and problem resolution in that you only have to manage the servers.
The connection to the Internet in Figure 11-2 could be direct or through a local access provider. Business configurations would typically use firewalls and dedicated mail servers. If using a firewall, ensure the firewall and the mail server are configured to work with each other. See the documentation for your firewall product or consult with Digital Firewall Services for more information.
If users need to send mail between systems that use different mail protocols, such as DECnet, SMTP, and UUCP, you should designate specific server systems in your network to perform that function. These server systems are also known as mail relays.
Additional mail configurations are possible, but they require more effort to plan for and to configure. See the sendmail book by O'Reilly and Associates for more information.
In implementing a client/server mail environment, you need to decide the following:
This section describes each of these topics.
![[Previous Section]](PREV.GIF)
To direct outgoing mail to a server, you include the BIND mail exchanger (MX) entry in the /etc/namedb/hosts.db file. This entry specifies a system in the local domain that can deliver mail to systems not directly connected to the local network. Using MX to route mail has the following benefits:
For information on adding entries to the /etc/namedb/hosts.db file, see Section 6.5 and bind_manual_setup(7).
To simplify the handling of incoming mail to a domain and to ensure reliability, you should use domain-based addresses in your environment. Typically, mail sent over the Internet is usually addressed in the following format:
username@hostname.domain
For example: joe@host1.nyc.big.com
Using domain-based addresses, this address appears as follows:
joe@.nyc.big.com
Mail is sent to the local domain nyc.big.com instead of to the specific host within that domain host1.nyc.big.com; the return address is also @nyc.big.com. Then, the mail servers within the local domain decide how to deliver the mail to the user's account.
Domain-based addresses make it easier to manage your mail environment. You can change your mail system (that is, move user accounts and replace or move systems) without disrupting your mail delivery. These changes are transparent to users sending mail to your systems.
Once mail is delivered to the domain, you can deliver it to clients using either of the following mechanisms:
In order to deliver mail to each of the clients, each server in the domain must have an aliases file that contains entries for each user on the client. For example:
username1: username1@client1
username2: username2@client1
See Section 11.1.4 for information on distributing the aliases file.
For standalone and server systems, Digital recommends that you use the Network Information System (NIS) to distribute the mail aliases file from one machine. In LAN environment with standalone systems, distribute the mail aliases file from the system that is also the NFS server. In a client/server environment, distribute the aliases file to the servers in the domain. In either case, sharing the aliases file among systems simplifies administration in that you only need to update one aliases file, instead of several.
For client systems, do not distribute the aliases file and, if using NIS, do not put a yp entry for the aliases database in the svc.conf file.
If you are using multiple server systems in a domain, make sure that the passwd information is identical on each system. For security reasons and to ensure correct mail delivery, you should do this by manually editing the passwd file on each server system.
When you set up your Digital UNIX mail server system, you must consider that the mail address formats for DECnet Phase IV and DECnet/OSI are different from those for TCP/IP. Therefore, you need to establish a mapping scheme to translate mail addresses when sending mail between a DECnet node and a TCP/IP node.
The mapping scheme used by the Digital UNIX version of the sendmail program for DECnet Phase IV is to encapsulate DECnet addresses inside a pseudodomain. For example, a typical DECnet Phase IV address has the following format:
nodename::username
Mail addressed in this format is mapped to an address in the following format:
username@nodename.pseudodomain.top.domain
The variables represent the following:
The mapping for DECnet/OSI uses a similar scheme. A typical DECnet/OSI address has the following format:
username@namespace:.site.nodename
Mail addressed in this format is mapped as follows:
username@nodename.site.namespace.pseudodomain.top.domain
As with DECnet Phase IV, the pseudodomain can be an arbitrary string. However, if you use both DECnet Phase IV and DECnet/OSI within your organization the pseudodomain names should be different.
Some environments that support both DECnet Phase IV and DECnet/OSI use the DECnet Phase IV syntax for handling DECnet-based mail. This simplifies the mail administration task. In order to implement this, all DECnet-OSI nodes must have a unique Phase IV Synonym and must be configured to use the Phase IV Synonym. You can reconfigure a DECnet/OSI host by typing the following command line:
#
ncl set session control application mail11 Node Synonym=true
See the DECnet/OSI documentation for more information.
This section describes those tasks you need to do before configuring mail.
Depending on the protocols supported by your mail server, verify that the following required subsets are installed and configured:
See the documentation for each product for installation and configuration instructions. For UUCP, verify that the UUCP subset is installed by entering the following command:
#
setld -i | grep OSFUUCP
If it is not installed, install it by using the setld command. For more information on installing subsets, see setld(8), the Installation Guide, or the System Administration manual.
The following table lists specific mail configuration and the network service required:
| If you want to: | Configure this service: |
| Distribute the aliases file | NIS |
| Use domain-based addressing | BIND |
After you install and configure the required protocols and services, you configure mail using Mail Configuration application. Appendix A contains a worksheet that you can use to record the information that you need to complete the tasks in this book. If you are viewing this manual online, you can use the print feature to print a copy of this part of the worksheet.
Mail configuration consists of the following parts:
Figure 11-3 shows Part 10A of the Configuration Worksheet. The following sections explain the information you need to record in Part 10A of the worksheet.
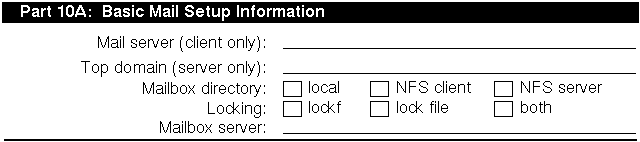
For standalone and client syatems, if it is on the local system, check LOCAL. If it is on a remote system and to be mounted on the local system using NFS, check CLIENT. If the local system is to export mail boxes to NFS clients, check SERVER.
For server systems, Digital recommends that you check SERVER to make the mailbox directories available to other systems. If you do not want to share the mailbox directories, check LOCAL. In this case, use the aliases command to send each user's mail to the appropriate system. See Section 11.7 and aliases(4) for more information.
For standalone and client systems, if the host with the mailbox directory is a Digital UNIX system, check LOCKF; this provides the best performance. If you are not sure what operating system the host with the mailbox directory is running, check LOCK FILE. If you want to use both, check BOTH.
Note
The locking mechanism you select must match the mechanism used by the NFS server. If you are not sure how the locking mechanisms are set on the NFS server, ask the administrator of the NFS server.
For server systems, if you checked LOCAL as the mailbox location, check LOCKF. If you checked CLIENT as the mailbox location, check LOCK FILE. If you checked SERVER as the mailbox location, check BOTH.
Figure 11-4 shows Part 10B of the Configuration Worksheet. The following sections explain the information you need to record in Part 10A of the worksheet.
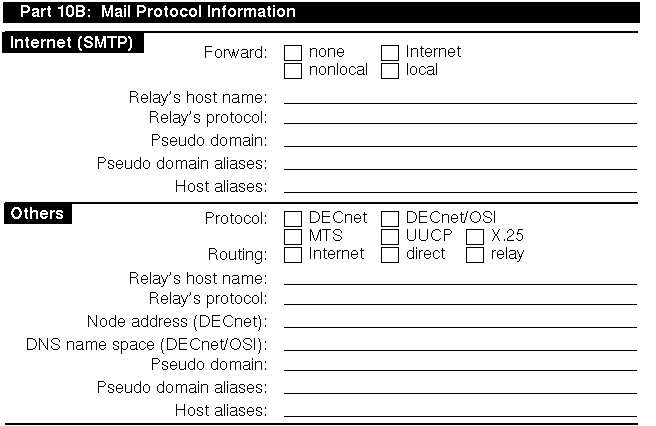
If the particular protocol is installed on this server, check DIRECT. If mail requiring the particular protocol is to be forwarded to another system for processing, check RELAY. Complete the Relay's Hostname and Relay's Protocol fields.
namespace:.site.nodename
Digital recommends that you use the Mail Configuration application of the Common Desktop Environment (CDE) Application Manager for configuring mail on systems with graphics capabilities. You can configure the following systems:
To start up the Mail Configuration application, do the following:
To exit the Mail Configuration application, choose File then Exit. See mailconfig8X for more information.
Note
For systems without graphics capabilities, you can use the mailsetup utility. See mailsetup(8) for more information.
The Mail Configuration application also has an extensive online help system. You can use it instead of the instructions in this section to configure mail on your system.
To configure mail for a standalone system, do the following:
Otherwise, click on Mailbox Setup. The Mailbox Setup dialog box appears.
To configure a mail client, do the following:
If your site does not use NFS to share system mailbox directories, click on Local instead of NFS Client, and then go to step 7.
Mail servers are part of a network and process mail for clients. To configure a mail server, do the following:
If you click on Relay, go to step 7.
If your site does not use NFS to distribute the system mailbox directories, click on Local instead of NFS Server, and then go to step 19.
Digital UNIX operating system includes the following mail utilities:
For more information on sendmail, see sendmail(8), sendmail.cf(4), and sendmail.m4(8).
Monitoring the mail queue enables you to determine the status of several types of networking operations, including jobs that have been queued on a local system for transfer to a remote system. General users and system administrators can monitor the mail queue.
To display the contents of the mail queue, use the mailq command. This command lists the number of requests and the queue ID, the message size, the date the message entered the queue, and the sender and recipient for each request. Alternatively, you can also use the sendmail -bp command.
See mailq(1) for more information.
If a major host is off line for a period of time, the number of entries in the queue might be quite large, causing the performance of the mail environment to suffer. To remedy this, you will have to archive the queue. See Section 11.6 for information.
The following example shows two requests in the mail queue:
#
mailq
                Mail Queue (2 requests)
--QID-- --Size-- -----Q-Time----- ------------Sender/Recipient------------
AA04956     1442 Tue Aug 24 10:12 <blaise>
                 (Deferred)
                                 <corcoran@host1.corp.com>
AA08618* (no control file)
When a major host is off line for a number of days, the mail queue might grow to be quite large. As a result, sendmail spends a lot of time sorting the large queue, severely affecting the mail environment performance. Archiving the mail queue enables your mail environment to function normally while the major host is off line. To archive the mail queue, do the following:
#
/sbin/init.d/sendmail restart
After the major host returns on line, process the old mail queue by using the following command:
#
/usr/sbin/sendmail -oQ/var/spool/old.mqueue -q
When the queue is empty, remove it by using the following command:
#
rm -r /var/spool/old.mqueue
Depending on how you choose to administer and distribute alias information on standalone or server systems, there are two ways to provide alias information for use in the mail environment:
By default, the /var/adm/sendmail/aliases file permissions code is 644. This means that global users cannot change and write the changes to the file. While this creates a reasonably secure system, it leaves the maintenance of the list of global users up to the system administrator.
You can distribute responsibility for maintenance by doing the following:
alias_name: :include:filename
The filename is the full path name and file name of the alias file.
See aliases(4) for more information.
You can also use NIS aliases database to administer and distribute alias information for use in the mail environment. To use the NIS aliases database, do the following:
See Chapter 7 for information on configuring NIS and Section 7.4.4 for information on updating an NIS map.
You can display statistics about mail traffic on your system by using the mailstats command as follows:
#
/usr/sbin/mailstats
At any time, you can initialize the statistics file by issuing the following commands:
#
cp /dev/null /var/adm/sendmail/sendmail.st
#
chmod 666 /dev/null /var/adm/sendmail/sendmail.st
![]()
To add a new host to the mail environment, do the following: