![[Return to Library]](BOOKSHLF.GIF)
![[TOC]](TOC.GIF)
![[PREV]](REW.GIF)

![[NEXT]](FF.GIF)
![[INDEX]](INDEX.GIF)
![[Help]](HELP.GIF)
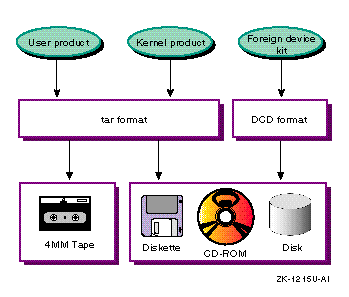
In tar format, the product files belonging to the same subset are dumped to the distribution media as a single file. During installation, the setld utility uncompresses the files, then moves them onto the target system, preserving the files' original directory structure. Kits for user and kernel products should be in tar format.
In DCD format, the files are written to the distribution media as a UNIX file system. Subsets distributed in DCD format cannot be compressed. Foreign device kits must be in DCD format.
You can distribute kits on tape, diskette, or CD-ROM, as follows:
You can distribute kits for user and kernel products on magnetic tape. You cannot distribute foreign device kits on magnetic tape because this media does not support DCD format. Use the gentapes utility to produce kits for magnetic tape media.
Diskettes are a good media for testing purposes or for small products, such as device drivers. However, the product must fit on a single diskette; it cannot span multiple diskettes. Use the gendisk utility to produce kits for diskette media.
CD-ROM media can support large kits or multiple kits on a single media. However, you must dedicate an entire hard disk on the kit development system to creating a kit master. The kit is first produced on the hard disk, then burned onto the CD-ROM. Use the gendisk utility to produce the master kit on hard disk. Follow the CD-ROM manufacturer's instructions for burning the kit onto the CD-ROM media.
Figure 5-1 shows the types of file formats and distribution
media that are available for layered product kits.
Figure 5-1: File Formats for Layered Product Kits
The gentapes and gendisk utilities refer to a file called /etc/kitcap,
a database of kit descriptors. This database contains information about the
kits to be built on the system. Each record contains a product code and the
names of the directories, files, and subsets that make up the product kit.
This chapter describes how to edit the /etc/kitcap
file and how to use the gentapes and gendisk
utilities to produce kits for each type of media.
The contents of a kitcap record differ depending
on whether you are going to produce tape or disk media. Therefore, you must
add one record for each media type on which you plan to distribute your kit.
For example, the following
record would be added to the /etc/kitcap file to produce
the ODB kit on TK50 tapes:
The product name, OAT100, is the same name that appears
in the key file. The product description, (Orpheus Authoring Tools) also appears in the key file. The name of the output directory
is specified as /dcb_tools/output, and three SPACE files are included for compatibility with operating system
kits. The last line of the record contains the instctrl
directory and the names of the two subsets that make up the kit -- OATODB100 and OATODBDOC100.
The following example shows the kitcap record for
the /dev/none driver:
Based on the information supplied in this record, the gendisk utility places the kit on the c partition, in
the / (root) directory of the disk media.
The product description is "EasyDriver none driver", the
kit output directory is named /easy/output, and subset
control information is in the instctrl directory. The
kit consists of one subset, named ESANONESTATIC100.
gentapes [-w -v] [hostname:] product-code special
The -w option specifies that gentapes writes to the tape without verifying it; the -v option specifies that the command verifies a tape without writing
to it first. If you specify neither option, gentapes writes
the tape, rewinds it, and verifies its contents.
The optional hostname argument is the name
of a remote TCP/IP network machine that contains the /etc/kitcap file. The gentapes utility searches /etc/kitcap on the remote machine for the product-code and uses it for creating the media. The colon (:) is a required
delimiter for TCP/IP networks, and space is permitted between the colon and
the product-code. If you do not specify a hostname, gentapes
looks on your own system. You can use NFS
file sharing to mount the kit files remotely on a system with the required
tape drive.
The product-code is a user-defined code that
describes the product. It should match the product name specified in the kitcap
record, which is usually a concatenation of the NAME and VERS fields of the key file.
The special argument is the name of the device
special file for the tape device, such as /dev/nrmt0h.
The following command produces a kit for
the ODB product on a magnetic tape:
The syntax of the gendisk command is as follows:
gendisk [-w -v ] [-d] [hostname:] product-code special
The -w option specifies that gendisk writes to the disk without verifying it; the -v option specifies that the command verifies a disk without writing
to it first. If you specify neither option, gendisk writes
the disk and verifies its contents.
The optional hostname argument is the name
of a remote TCP/IP network machine that contains the /etc/kitcap file. The gendisk utility searches /etc/kitcap on the remote machine for the product-code and uses it for creating the media. The colon (:) is a required
delimiter for TCP/IP networks, and space is permitted between the colon and
the product-code. If you do not specify a hostname, gendisk looks on your own system.
You can use NFS file sharing to mount the kit files remotely on a system
with the required disk drive.
The product-code is a user-defined code that
describes the product. It should match the product name specified in the kitcap
record, which is usually a concatenation of the NAME and VERS fields of the key file.
The special argument is the name of the device
special file for the disk device, such as /dev/rrz1a.
You can use gendisk to produce kits in either tar or DCD format, depending on whether you use the -d option.
To create a kit on diskette for the /dev/edgd product,
you would perform the following steps:
To create the /dev/edgd kit on CD-ROM media,
perform steps 3 through 11 and use a hard disk as the target instead of a
diskette. The hard disk serves as the master for the kit. You can then burn
the kit onto the CD-ROM, following the instructions that come with your
CD-ROM device.
![]()
5.1 Editing the /etc/kitcap File
Before you can build your kit, you must add a record to the /etc/kitcap database to describe your kit. When you add a record
to the file, use the following conventions:

5.1.1 Tape Media kitcap Record Format
The kitcap record for tape media contains the following elements:
# touch space

# tar -cf SPACE space
OAT100TK | Orpheus Authoring Tools: \
   /dcb_tools/output:SPACE:SPACE:SPACE: \
   instctrl:OATODB100:OATODBDOC100
5.1.2 Disk Media kitcap Record Format
You create
a disk media kitcap record when producing kits for distribution
on diskette or CD-ROM. The kitcap record for disk media
contains the following elements:
ESA100HD:c:/: \
  EasyDriver_none_driver: \
  /easy/output:instctrl:ESANONESTATIC100
5.2 Building a Kit on Magnetic Tape Media in tar Format
With the product subsets in the output area of
the kit directory structure, use the gentapes utility to
create the kit on magnetic tape. The syntax of the gentapes
command is as follows:
% gentapes OAT100 /dev/nrmt0h
5.3 Building a Kit on Disk Media
With the product
subsets in the output area of the kit directory structure, use the
gendisk utility to create the kit on a disk.
Note
5.3.1 Preparing a Kit in tar Format
To prepare a kit on disk
for a user or kernel product, you use the gendisk utility
without the -d option. You specify the product name
and the device special file name. For example, the following command creates
a kit in tar format for the /dev/none
driver on the c partition of the disk named rz0:
% gendisk ESA100 /dev/rz0c
5.3.2 Preparing a Foreign Device Kit in DCD Format
To prepare a foreign device kit, you run gendisk
with the -d option. The utility creates a kit in
DCD format on diskette or hard disk, as specified in the /etc/kitcap entry. In addition to running gendisk, you need
to include the following files to support foreign device installation and
RIS:
Note
# fddisk -fmt /dev/rfd0c
Disk type: 3.50 inch, HD (1.44MB)
Number of sectors pertrack: 18
Number of surfaces:   2
Number of cylinders: 80
Sector size:  512
Interleave factor:  2:4
Formatting disk...
  Percentage complete: Format complete, checking...
Quick check of disk passes OK.
# disklabel -wr fd0 rx23
Warning
# gendisk -d EDG100 /dev/rfd0c
Generating EDG100 Kit from visier on /dev/rfd0c

WARNING:  this will remove any information stored in
/dev/rfd0c

Are you sure you want to do this? (y/n): y

Do you want to clean the entire disk first? (y/n): n
Preparing /dev/rfd0c (floppy)
done.

Checking /dev/rfd0c
/sbin/usf_fdck /dev/rfd0c
** /dev/rfd0c
File system unmounted cleanly - no fsck needed

Mounting /dev/rfd0c on /usr/tmp/cd_mdt8344

Writing Images (dd=/).

	Image instctrl...done.
	Image EDGSTATIC100...done.

Verifying Images (dd=/).

	Image instctrl...done.
	Image EDGSTATIC100...done.

Kit EDG100 done.

Cleaning up working directories.
Unmounting /dev/rfd0c
# mount /dev/fd0c /mnt

# cd /mnt
# touch ./instctrl/EDGSTATIC100.kk
# mkdir -p ./sys/BINARY

# mkdir ./etc
# cp /kit_area/edgd.kit ./
# cd ./sys/BINARY

# ln -s ../../usr/opt/EDG100/edgd.mod ./edgd.mod
# cd ../../etc

# ln -s ../usr/opt/EDG100/sysconfigtab ./sysconfigtab

# cd /
# mkdir -p /mnt/ALPHA/EDGSTATIC100

# mv /mnt/instctrl /mnt/ALPHA/EDGSTATIC100
# umount /mnt