![[Return to Library]](BOOKSHLF.GIF)
![[TOC]](TOC.GIF)
![[PREV]](REW.GIF)

![[NEXT]](FF.GIF)
![[INDEX]](INDEX.GIF)
![[Help]](HELP.GIF)
When a system is installed with Digital UNIX Version 4.0B, a configuration
description file (CDF) is generated that contains the results of the questions
answered during the installation. This file is located on the installed system
in the /var/adm/smlogs directory under the file name install.cdf. The CDF contains all the configuration information
required to perform an initial system installation on a client system.
It is possible, however, to support slight differences in configuration. Section C.7.1 describes these acceptable differences.
In Digital UNIX Version 4.0, installation cloning could be done only
from a network connection to a remote installation services (RIS) server and
required user intervention. In Digital UNIX Version 4.0B, however, installation
cloning can be done from either a network connection or CD-ROM. In addition,
installation cloning can be set up so that it automatically bypasses the following
actions that previously required user intervention:
The first invocation of user-supplied files
occurs before the actual installation
process begins, that is, before any file systems are created and software
is installed. At that point, for example, an administrator may want to write
a new disk label onto a specific disk to customize disk partitions. This
file must be named preinstall.
The second invocation is allowed after software is installed. At that
point, for example, an administrator may want to install a customized software
application after the installation of the Digital UNIX base software subsets.
This file must be named postload.
Refer to Section C.9 and Section C.10
for more information about creating preinstall and postload files for execution during a full installation or installation
cloning process.
CDFs and user-supplied files can be used independently or in any combination.
The CDFs and user-supplied files can be located on different sources. For
example, the install.cdf file may be on a diskette, the preinstall file might come from the RIS server, and the postload file might come from the /isl directory
of the distribution media.
The installation process searches for the install.cdf, preinstall, and postload files in the following
order of priority:
For full installations, the type of kernel build depends on whether
a default or custom installation was performed. Default installations have
noninteractive kernel builds that select mandatory kernel options. Custom
installations have interactive kernel builds to give users the opportunity
to choose the options to build into the kernel.
The CDF contains the following information about an installation:
The CDF, install.cdf, is located on a newly installed
system in the /var/adm/smlogs directory.
Four items are defined in the installation CDF:
Section C.6.2 provides definitions of all attribute-value
pairs in the CDF.
The attribute-value pairs within individual items differ as a result
of the distribution method (CD-ROM or RIS) that was used to perform
the initial installation of the model system.
In addition, attribute-value pairs cannot contain blank spaces. Blank
spaces cause data validation errors. Be very careful to remove all blank
spaces especially at the end of a line. When you want to give an attribute
a null value, make sure there is nothing (null) after the equal sign (=).
Do not modify or remove attributes that are prefixed with an underscore
(_). These attributes, for example _action=create, are internal variables required by the full installation
and installation cloning processes.
![]()
C.1 Installation Cloning Overview
Installation cloning allows an administrator to replicate
the installation configuration from a model system that is already installed
with Digital UNIX Version 4.0B onto one or more systems with the same or similar
hardware configurations.

C.1.1 Prerequisites for Installation Cloning
The only prerequisite for installation cloning is that the system to
be installed by the installation cloning process has the same disk configuration
as the system where the CDF was generated. This means that the disks used
for the / (root), usr, and var file systems and swap
areas on both systems must have the same disk type and the same device name.
C.1.2 Benefits of Installation Cloning
The benefits to using installation cloning to mass-install systems are:
C.1.3 Installation Cloning Features
The files necessary for the installation cloning process can be placed
on a diskette, the /var/adm/ris/clients/sets/profile_set directory on a RIS server or in the /isl directory on a CD-ROM or extracted RIS area. A CD-ROM
is a read-only device and data cannot be written to it. However, if you have
a special license agreement to copy and repackage the Digital UNIX Version 4.0B
operating system, files can be written to the /isl directory
of the image, which will be written to the CD-ROM. Refer to Section C.11.4
for more information about burning (writing to) CD-ROMs.
C.2 Overview of Support for User-Supplied Files
The Digital UNIX full installation and installation
cloning processes have been enhanced to invoke user-supplied files that contain
scripts, programs, or executables to perform user-defined customizations.
This ability provides administrators with the opportunity to customize the
installation procedure. The files can be provided on diskette, a RIS server,
or in the /isl directory of the distribution media (either
CD-ROM or an extracted RIS area). Refer to Section C.11.2.1
for things to consider when moving files to an extracted RIS area.
C.3 Relationship Between CDFs and User-Supplied Files
CDFs are used only for an installation cloning
process. User-supplied files are invoked and executed during both types of
full installations (default and custom) and the installation cloning processes.
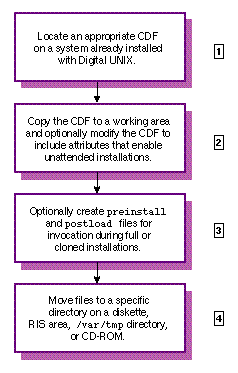
C.4 Role of the Administrator
To set up a system for installation cloning, an administrator
performs the tasks described in Figure C-1. To execute
user-supplied files during a full installation, the administrator performs
Tasks 3 and 4 only. The numbered list after the task summary describes the
tasks in more detail and provides pointers to more information.
Figure C-1: Summary of Administrator Tasks
C.5 Theory of Operation
This
section contains a synopsis of how the installation process uses the user-supplied
files and CDFs during full and cloned installations. Detailed information
is provided in subsequent sections. The work flow shown in Figure C-2
assumes that the administrator has completed the tasks shown in Section C.4.
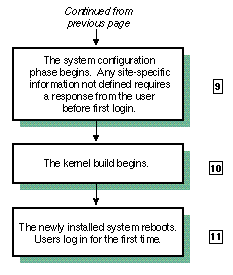
Figure C-2: Theory of Operation
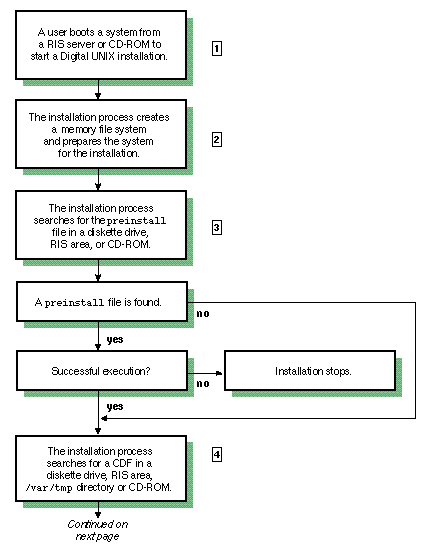
Figure C-3: Theory of Operation (cont'd)

Figure C-4: Theory of Operation (cont'd)
C.6 Description of the Configuration Description File
When Digital UNIX Version 4.0B is installed on a system,
the installation process creates a configuration description file (CDF). As
described previously, the information stored in the CDF can be used to mass-install
machines with the same or similar hardware configurations.NOTE
The CDF is in stanza file format, and is logically organized as groupings
of attribute-value pairs.
Each attribute-value
pair is separated with an equal sign (=).
Each logical grouping of attribute-value pairs is defined as an item.
Refer to the stanza(4) reference page
for more information about stanza file format.
C.6.1 Sample Configuration Description File
In
the sample CDF shown in Example C-1, attributes marked
with an asterisk (*) must be manually included
into the CDF when it is retrieved from an installed system because the installation
interfaces do not currently provide the ability to set these values. Section C.8 defines these attributes and shows you how to include
them in the CDF.
Example C-1: Sample Configuration Description File (CDF)
install:
      _item=Inst_islinfo
      prompt=no			*
      media_type=REMOTE
      server_timezone=Eastern
      timeset=1
      server_locality=US
      server=daria
      risdir=/
      _action=create
      srcloc=daria:
      client=kramer

install:
      _item=Inst_filesystem
      maj_min_num=8388608
      disk_number=0
      disk_name=rz0
      controller_type=SCSI
      name=root
      partition=a
      controller_number=0
      disk_type=RZ26L
      _action=create
      file_system_type=UFS

install:
      _item=Inst_filesystem
      maj_min_num=8388608
      disk_number=0
      disk_name=rz0
      controller_type=SCSI
      name=usr
      partition=g
      controller_number=0
      disk_type=RZ26L
      _action=create
      file_system_type=UFS

install:
      _item=Inst_filesystem
      maj_min_num=8388608
      disk_number=0
      disk_name="in /usr"
      controller_type=SCSI
      name=var
      partition=g
      controller_number=0
      disk_type=RZ26L
      _action=create
      file_system_type=UFS

install:
	     _item=Inst_filesystem
	     maj_min_num=8388608
	     disk_number=0
	     disk_name=rz0
	     controller_type=SCSI
	     name=swap1
	     partition=b
	     controller_number=0
	     disk_type=RZ26L
	     _action=create
	     file_system_type=swap

install:
	     _item=Inst_subsets
	     names=OSFBASE410,OSFBIN410,OSFBINCOM410,OSFCDEDT410,OSFCDEMAIL410,
OSF CDEMIN410,OSFCLINET410,OSFCMPLRS410,OSFDPSFONT410,OSFFONT15410,OSFHWB
ASE410,OSFHWBIN410,OSFHWBINCOM410,OSFKBDLK401410,OSFMITFONT410,OSFNETCON
F410,OSFNETSCAPE410,OSFNFS410,OSFNFSCONF410,OSFOLDX11410,OSFPRINT410,OSF
SER410,OSFSERTC410,OSFSYSMAN410,OSFTCLBASE410,OSFTKBASE410,OSFX11410,OSF
XADMIN410,OSFXPRINT410,OSFXSYSMAN410
	     _action=create
	     advflag=1

install:
	     _item=Inst_cinstall
	     kernel_option=all			*
	     password=C36V.nMSW0j/o
	     timeset=yes
	     timezone=Eastern
	     locality=US
	     _action=create
	     hostname=kramer
C.6.2 Attribute-Value Pair Definitions
This section provides definitions for all attribute-value
pairs in the CDF.Caution
C.6.2.1 Attributes in the Inst_islinfo Item
Table C-2 defines the attributes in the Inst_islinfo item in the CDF. The Inst_islinfo
item is used to convey the system state before the start of the installation
process.
C.6.2.2 Attributes in the Inst_filesystem Item
Table C-3 defines the attributes in the Inst_filesystem item in the CDF. The Inst_filesystem
item is used to convey information about the number and type of file systems
that are to be created on the cloned system. At a minimum, there must be
at least four file system items to describe the / (root), /usr, and /var
file systems and one swap area. Except where noted, you
optionally can modify all attribute-value pairs in this item, although Digital
does not recommend editing the CDF.
C.6.2.3 Attributes in the Inst_subsets Item
Table C-4 defines the attributes in the Inst_subsets item in the CDF. The Inst_subsets
item is used to convey information to the installation cloning process about
the Digital UNIX base software subsets that are to be installed on the system
to be cloned.
To use a single CDF to clone many systems, consider leaving the system-specific
attributes such as host name and password null, but provide attributes for
site-specific attributes such as kernel option, time zone, geographic location,
and date and time.
C.6.2.4 Attributes in the Inst_cinstall Item
Table C-5 defines the attributes in the Inst_cinstall item in the CDF. The Inst_cinstall
item is used to convey client system configuration information to the installation
cloning process. All of the attributes specified in the installation configuration
item are optional. If values are not provided for these attributes, the installation
process becomes interactive to request this information during the installation
configuration phase.
To reduce the disk space required when Digital UNIX is installed, the
software required to support the different graphics adapters, font sizes,
and keyboard types has been packaged so that only the software subsets required
to support options present on the system are mandatory and installed automatically.
All other software subsets are considered optional and are not installed unless
you specifically select them. Determining the mandatory software subsets
for a system is done automatically by the installation process and guarantees
that only appropriate software subsets are installed.
However, when a system is installed using installation cloning, the
software subsets installed on to the system are defined in the CDF. Therefore,
if the system to be cloned has a different graphics adapter, font size, or
keyboard type than the system on which the CDF was created, the appropriate
software subsets will not be installed and the cloned system may not be usable.
To generate a CDF that is versatile enough for use across differing
systems, you may want to consider installing a system to use as a model.
That is, perform a custom installation on a model system so that
the CDF generated from that installation is usable by systems with different
graphics adapters, font sizes, and keyboards. You do this by installing the
software subsets to support all graphics adapters, font sizes, and keyboard
types required by the systems to be cloned even though they are not required
by the model system.
Acceptable differences in disk configuration, graphics adapter, font
sizes, and keyboard type are explained in the following sections.
The system to be cloned must have the same disk configuration for the
disks on which root, usr, swap1, var (if it is not a directory under /usr) and swap2 (if allocated) are to be installed
as the system on which the CDF was generated. The same disk configuration
means that the disk type (for example RZ26) and the device
name (for example rz0) must match. If the partition tables
for these disks are not identical on both systems, the software defined in
the CDF may not fit on to the system to be cloned or would overlap the disk
partitions.
It does not matter if disks other than those used for the file systems
and swap areas created during an installation are different on the system
to be cloned.
Table C-6 illustrates acceptable differences
in disk configuration between a CDF generated from a model system and a system
to be cloned.
C.7 Generating or Selecting an Appropriate CDF
When generating a CDF through the installation
of a system or selecting which CDF to use to clone other similar systems,
you must consider the disk configuration, graphics adapter, font sizes and
keyboard types of the systems to be cloned. Ideally, however, you should
clone systems with identical hardware configurations.
C.7.1 Acceptable Differences in Disk Configurations
The
system to be installed by the installation cloning process should have the
same hardware configuration as the system where the CDF was generated. However,
it is possible to support slight differences in configuration.Note
| System | Disk Type | Device Name |
|---|---|---|
| model system | RZ26RZ25 | rz0 °rz1 |
| system to be cloned | RZ26RZ26 | rz0rz1 |
Assuming there are no other differences in disk configuration, the system to be cloned can use the CDF generated from the model system. The difference in disk type at device name rz1 is acceptable because the file systems and swap space were not placed on it. If the disk device at rz0 were different, however, an installation cloning could not be performed.
When selecting software subsets, look in the Windowing Environment category for software subsets starting with the words X Servers for <name>. Replace <name> with the name that describes the graphics options
supported by the software subset. In Digital UNIX Version 4.0B, the following
graphics software subsets are available:
Table C-7 displays the graphics adapters
on a model system and a system to be cloned. The hardware configuration of
the model system and the system to be cloned are determined to be similar
enough to allow the CDF from the model system to be used for the installation
cloning.
C.7.2 Considering Differences in Graphics Adapters
When
you install a model system from which you will use the CDF to clone other
systems, you must consider the graphics options of the systems that will be
cloned. If any of the systems to be cloned have different graphics options,
the software subsets required to support the graphics options needed by those
systems must be installed on the model system.Note
| System | Graphics Adapter |
|---|---|
| model system | Open3D |
| system to be cloned | QVision (PCbus) |
Do not use the CDF from a system that does not have graphics capabilities to clone systems that have the hardware to support graphics. There are several software subsets, most notably those associated with the common desktop environment (CDE), that will not be loaded on systems without graphics capabilities that are mandatory for systems with graphics capabilities. If you use a CDF from a system without graphics capabilities to clone a system with graphics capabilities, the desktop environment on the cloned system will be corrupted. Caution
If you are unsure of which graphics options are available on the systems you want to clone, install all of the graphics software subsets that are available. However, installing all of the software subsets requires more disk space than loading only selected graphics software subsets.
During an installation cloning, the font software subsets to be installed
are defined in the CDF. If the system to be cloned requires a different size
font than those defined by the software subsets in the CDF, the system to
be cloned will not have the appropriate fonts loaded.
When generating the CDF through the full installation of a model system,
you must consider the font sizes required by the systems to be cloned from
the CDF. If the systems to be cloned require different size fonts, load the
appropriate font software subset when installing the model system.
The need for DECwindows 75dpi Fonts or DECwindows 100dpi Fonts depends on the resolution of the graphics
adapter being used. On a system already installed with Digital UNIX, this
value can be determined by entering the following command:
Systems with multiple graphics adapters may require both the DECwindows 75dpi Fonts and DECwindows 100dpi Fonts
if the adapters include those with 1024x768 or less resolution and those with
greater resolution.
While there are other software subsets that contain fonts, only the
DECwindows fonts are packaged separately by size.
Table C-8 displays the different font sizes
required on a model system and a system to be cloned. The hardware configuration
of the model system and the system to be cloned are determined to be similar
enough to allow the CDF from the model system to be used for the installation
cloning.
C.7.3 Considering Differences in Font Size
To reduce the
disk space required when Digital UNIX is installed, the software required
to support the 75dpi (dots per inch) and 100dpi font sizes are contained in separate software subsets.
# sizer -gr
When the resolution
is 1024x768 or less, the DECwindows 75dpi Fonts are required.
When the resolution is greater, the DECwindows 100dpi Fonts
are required. If you are unsure of the resolution available on the systems
to be cloned, select both font software subsets to ensure that the correct
font is available.
If you are unsure of the fonts available on the systems you want to clone, you can ensure that you provide the appropriate fonts by installing all of the font software subsets on to the model system. Installing all of the font software subsets will require more space than loading selected fonts.
During an installation cloning, the keyboard support software subset
to be installed is defined in the CDF. If the system to be cloned has a different
keyboard type than the model system, the cloned system will not have the appropriate
keyboard software installed.
When generating the CDF through the installation of a model system,
you must consider the keyboard type of the systems that will be cloned using
the CDF. If the systems that will be cloned have different keyboard types,
load the appropriate keyboard support software subset when installing the
model system. The keyboard type can be determined from information available
when the system is in console mode or by looking at the model number on the
underside of the keyboard.
Table C-9 displays the keyboard types
on a model system and a system to be cloned. The hardware configuration of
the model system and the system to be cloned are determined to be similar
enough to allow the CDF from the model system to be used for the installation
cloning.
C.7.4 Considering Differences in Keyboard Type
To
reduce the disk space required when Digital UNIX is installed, the software
subsets required to support the different Digital keyboard types is contained
in separate software subsets.
| System | Keyboard Type |
|---|---|
| model system | PXCAL |
| system to be cloned | LK444 |
If you are unsure of the keyboard types available on the systems you want to clone, you can ensure that you provide the appropriate keyboard type by installing all of the keyboard software subsets. However, loading all keyboard software subsets will require more disk space than loading selected keyboard software subsets.
C.8 Modifying Attributes in the CDF to Achieve Unattended Installations
Digital recommends
that only experienced system administrators modify the attributes-value pairs
in the CDF. Before modifying the CDF, make sure you read the information
in the Caution in Section C.6.2.
Do not modify the original CDF located in the /var/adm/smlogs directory of an installed system. Instead, make a copy of install.cdf and modify the copy. The original install.cdf file contains information related to the system installation that could be valuable for future use. You should retain the install.cdf file in the /var/adm/smlogs directory.
Some attribute-value pairs must be manually added to the CDF for an installation cloning process because the installation interfaces do not currently provide the ability to set these values. The following sections describe the attribute-values pairs that can be manually added to the CDF to attain unattended installations.
The CDF confirmation question is now configurable through the prompt= attribute-value pair in the Inst_islinfo
item in the CDF. The value of the prompt= attribute determines
whether confirmation is required before the CDF is used to start an installation
cloning process. Valid values are:
A portion of a CDF in the following example shows you where to include
the prompt= attribute-value pair in the Inst_islinfo item:
The kernel_option attribute in the Inst_cinstall item allows a noninteractive tailored kernel build with all kernel
options (mandatory and optional) or mandatory kernel options only. In addition,
the interactive value can be specified to allow you to
tailor the kernel. The values for the kernel_option attribute
are defined as follows:
A portion of a CDF in the following example shows you where to include
the attribute-value pair into the Inst_cinstall item:
Kernel build failures that occur during a noninteractive kernel build
cause the kernel build process to become interactive and provides the user
with options for proceeding.
Setting site- and system-specific information such as host name, geographic
location, time zone, date, and time are trivial in the case of a RIS installation
because these values are obtained from the RIS server automatically during
the installation. This statement is true for full installations from RIS or
from a RIS installation cloning process.
In the case of a standalone system installed by a CD-ROM installation
cloning process, however, setting these values must be determined from the
CDF that drives the installation cloning. If the CDF does not define these
attributes, the values must be entered interactively during the configuration
phase of the installation cloning process that occurs after software has been
loaded.
The system-specific attributes to be considered are:
A system's host name is contained in the hostname=
attribute-value pair in the Inst_cinstall item. Refer
to Section 5.4 if you need guidelines
for choosing a proper host name. Host names for client systems that exist
on the same network must be unique. If the hostname=
attribute does not exist in the CDF, or if the value associated with this
attribute is null, the installation process becomes interactive during the
configuration phase of the installation cloning process to request this information.
Be aware that an encrypted value in the password=
attribute means that all cloned systems share the same root
password. You may want to consider leaving this value null so that the installation
process becomes interactive to request a root password.
For security reasons, sharing passwords among systems is not recommended.
If you choose to retain the encrypted password in the CDF, remember that
the password came from the model system and you should change the password
on that model system to protect it from unauthorized users. Because the value
of the password= attribute must be encrypted, this value
cannot be manually set. If you need to change the password on the model system, Section 5.5 contains guidelines for
choosing appropriate passwords.
When the geographic location (and when relevant, time zone) are specified
in the CDF, these values are used to configure the system accordingly.
If the locality= and timezone=
attributes do not exist in the CDF, or if the value associated with these
attributes is null, the installation process becomes interactive during the
configuration phase to request this information. A locality=
attribute can be present without a timezone= attribute
because not all geographic locations are divided into multiple time zones.
For example, the geographic location Japan does not have
multiple time zones. In that situation, the installation process recognizes
the fact that Japan does not have multiple time zones and bypasses the request
for a time zone.
It is not possible to specify dynamic values such as date and time in
a CDF and still retain accuracy at the cloned system. The ability does exist,
however, for the CDF to indicate that the date and time have been previously
set either by invocation of one of the installation interfaces, or through
a RIS installation cloning invocation. The method used is the timeset= attribute-value pair in the Inst_cinstall item:
Actions to be carried out before file systems are created and software
subsets are loaded might include writing a customized disk label to one or
more disks.
You would not want the preinstall file to execute
any function that requires the installed file systems and software to be available
because these phases of the installation have not yet been completed.
The user-supplied file must be named preinstall,
and the preinstall file and any files that it calls require
execute permission.
It is not necessary that this file be contained in the same location
in which the CDF and postload files are found.
If execution of the preinstall file fails, the preinstall file is responsible for supplying its own status or error
messages. Digital does not guarantee the results of executing the script or
program but does guarantee that upon successful completion, the installation
process proceeds.
The installation process queries the return status from the execution
of the preinstall file and terminates the installation
process if a non-zero return status is received.
The installation process searches for the preinstall
file in the following order of priority:
The sample preinstall script shown in the following
example applies a customized disk label to an RZ26 disk.
Actions to be carried out after software subsets are loaded might include
creating additional file systems or installing additional software that was
not installed as part of the Digital UNIX base operating system.
The postload file and any files that postload calls require execute permission. The installation process searches
for the postload file in the following order of priority:
It is not necessary that the postload file be contained
on the same media on which the CDF and preinstall file
are found.
The installation process queries the results of the execution of the postload file and terminates the installation process upon a non-zero
return status.
It is important to know that at this invocation point, the newly created root, /usr, and /var file
systems on the magnetic media are mount-relative with respect to the directory /mnt until the system is rebooted from the default boot device.
That is, the root file system is /mnt, the usr file system is /mnt/usr, and so on.
The sample postload script shown in Example C-4
is creating a new file system called users and is then
adding the entry into the /etc/fstab file to mount the
new file system upon every reboot.
During an installation cloning, the cloning process searches for the
CDF and user-supplied files in the following order of priority:
fddisk-fmt raw_diskette_device
disklabel-wr diskette_drive disk_type
newfsraw_diskette_device_partition
Use commands similar to the following to format the diskette
in diskette drive fd0, write a new disk label specifying
the rx23 type of diskette, and creating a new file system
on the entire diskette (partition c):
If either the preinstall or postload
files are located on the diskette, all files called by the preinstall or postload files must be located on the diskette.
Use commands similar to the following to mount the diskette drive and
copy the CDF and all related files to the diskette:
The Remote Installation Services utility (RIS) has been
modified to support client registration to both RIS environments and profile
set directories. RIS maintains the CDFs and user-supplied files in logically
organized subdirectories that are created by the RIS administrator. These
subdirectories, known as profile sets must be located
within the /var/adm/ris/clients/sets directory. The administrator
uses the mkdir command to make profile set directories.
A profile set is a directory that contains the files used during an
installation process. The sets directory can contain many
profile sets. Each of the profile set directories may contain a CDF (install.cdf), a preinstallation file (preinstall), a postinstallation file (postload), and all files called by the preinstall and postload files. All files are optional;
they can be used independently or in any combination. It is the RIS administrator's
responsibility to place the appropriate files into the correct profile set
directory.
The profile_set directories you create depend upon
your working environment and how you want to logically organize the functions
of the CDFs and files.
If, for example, your site
or facility requires engineering workstations to be installed and configured
different than the workstations in the accounting department, you might want
to create two profile set directories; one named engineering
and one named accounting. Those profile sets would contain
the CDFs and files that were created to suit the configuration needs of both
departments.
Another hypothetical situation for defining profile sets is one in which
separate CDFs and files are maintained for server type systems and workstation
type systems. Profile set directories named server and workstation might be set up under that scenario.
Use procedures similar to the following to copy the CDF, preinstall and postload files, and related files to a profile
set directory:
After you copy the appropriate CDF and other files to the profile sets
directory, you can register RIS clients for installation cloning or for user-defined
file invocation during a full RIS installation. You do this by registering
new clients to a RIS environment as well as to a profile set. If a RIS client
is registered to a profile set and boots across the network to start an installation,
the order of priority in which a search for a CDF and other optional files
is done is shown in Section C.11. If a CDF is found, it
is retrieved and used by the installation process to provide the answers to
all installation configuration questions.
If this action is not appropriate, the administrator should create profile
set directories to supply these files on a client-by-client basis.
The conversion process converts all existing CDFs into profile set directories.
The new profile set directory has the same name as the original CDF and the
original CDF is renamed to install.cdf. If the original
CDF name could not be used to name the new profile set directory, a unique
profile set name is created by appending a digit (starting with the number
one) to the original CDF name.
The first time RIS is invoked after Digital UNIX Version 4.0B has been
installed, messages similar to the following are displayed:
Examine the RIS database file on the RIS server, /var/adm/ris/clients/risdb, before deleting a profile set to ensure that no clients are registered
to it. The name of the profile set is specified in the fourth field; fields
are separated by a colon (:). In the following
sample entry in the risdb file, the client newman is registered to the accounting profile set:
This feature is valuable for users repackaging the Digital UNIX operating
system and who are providing the CDF and user-supplied files on the CD-ROM.
When there is a need to modify or select a CDF or postload
file as part of the installation process, a writable location is needed because
the CD-ROM cannot be written to. For example, assume that several CDFs are
shipped on the CD-ROM for the purpose of supporting different hardware or
configurations from one distribution media. In this case, you can create a preinstall file that examines the system on which the installation
is being executed, and based on the examination, select the appropriate CDF
file from among those shipped. The preinstall file can
then copy this CDF to /var/tmp/install.cdf where it will
later be read by the installation process. Similarly, the preinstall file could choose from among several postload
files and copy the one you want to /var/tmp/postload.
The preinstall script should assure that files copied
to /var/tmp have the appropriate permission codes (chmod 777 * is the safest way to ensure appropriate permissions).
Use the method you usually use to burn a CD-ROM (i.e., write to
a CD-ROM) if you plan to provide the install.cdf, preinstall, and postload files on a CD-ROM.
The method you use depends upon the type of CD-ROM burner you have.
The basic steps to create an image and burn a CD-ROM are:
C.8.1 Errors in the CDF
While modifying a CDF, a common error is to include a trailing blank
space after
an attribute-value pair. If the validation
process detects a trailing blank space in the CDF, a message similar to the
following will be displayed:
- ----------------------------------------
Some errors occurred:
SetItmAttr: invalid attribute value kernel_option=all
- ----------------------------------------
This error causes the
installation process to stop. In the previous example, the validation process
found a trailing blank space after the word all in the kernel_option=all attribute-value pair. The corrective action is
to edit the CDF and remove the blank space. Then, restart the installation
process at the client system.
C.8.2 Modifying the CDF Confirmation Attribute
Previous versions of the installation cloning process required
the user to confirm that the CDF was to be used to start an installation cloning
rather than a full installation. The purpose of this confirmation was to protect
a system from an inadvertent installation cloning if the system was mistakenly
still registered to a RIS environment and CDF.
If this attribute-value pair is not defined or is null, the
installation cloning process defaults to prompt=yes.
install:

_item=Inst_islinfo
prompt=no
media_type=CDROM
server=cosmo
_action=create
srcloc=/ALPHA/BASE
C.8.3 Modifying the Tailored Kernel Build Attribute
A Digital UNIX
default installation provides a noninteractive kernel build with mandatory
kernel options enabled. A custom installation provides an interactive kernel
build and allows you to tailor the kernel by allowing you to select mandatory
and optional kernel options.
install:

_item=Inst_cinstall
kernel_option=all
password=SdDt78fuPrMkE
timeset=yes
timezone=Eastern
locality=US
_action=create
hostname=kramer
C.8.4 Modifying Site- and System-Specific Attributes
You must
read this section if you plan to perform installation cloning from CD-ROM.
The site-specific attributes to be considered are:
Australia/  GMT      GMT+7    GMT-6    GMT4        Japan     Singapore
Belfast     GMT+0    GMT+8    GMT-7    GMT5        Libya     SystemV/
Brazil/     GMT+1    GMT+9    GMT-8    GMT6        London    Turkey
CET         GMT+10   GMT-0    GMT-9    GMT7        MET       UCT
Canada/     GMT+11   GMT-1    GMT0     GMT8        Mexico/   US/
Chile/      GMT+12   GMT-10   GMT1     GMT9        NZ        UTC
Cuba        GMT+13   GMT-11   GMT10    Greenwich   NZ-CHAT   Universal
Dublin      GMT+2    GMT-12   GMT11    Hongkong    Navajo    W-SU
EET         GMT+3    GMT-2    GMT12    Iceland     PRC       WET
Egypt       GMT+4    GMT-3    GMT13    Iran        Poland    Zulu
Factory     GMT+5    GMT-4    GMT2     Israel      ROC       localtime@
GB-Eire     GMT+6    GMT-5    GMT3     Jamaica     ROK       sources/
The geographic location directories contain the time zones within that specific
geographic location. When you specify a value for locality=,
you must choose a valid time zone for that geographic location.
C.9 Creating preinstall Files
The installation process tests
for the existence of customer supplied files at predefined invocation points.
The first invocation point is between the creation of the memory file systems
(MFS) and the search for a CDF. At this point, the installation process searches
for a file named preinstall, which is a user-supplied script,
program, or executable containing specific actions to be carried out before
the file system creation and software subset load phases of the installation
process.
Example C-2: Sample preinstall Script
#!/sbin/sh

#
# Write a custom disk label to the
# system disk before starting the installation.
#

# NOTE:  THIS FILE ASSUMES A DISK NAME OF rz0 AND DISK TYPE OF RZ26

#
# Make the device special file for rz0
#
(cd /dev; ./MAKEDEV rz0)

#
# First, zero the label
#
2>/dev/null disklabel -z rz0

#
# Next, restore the label
#
disklabel -Rr rz0 ./DLSAVE RZ26 ||                      [1]
{
	echo "\nError restoring disklabel on rz0\n"
	exit 1
}

echo "\nThe disklabel that has been applied is:\n"
disklabel -r rz0 | tail -10
exit 0
The sample DLSAVE file required by the preinstall script is shown in Example C-3.
The DLSAVE file contains a disk label that was created
by reading the disk label of the disk at rz0 and redirecting
the output into a file. To create this file, you would enter commands similar
to the following:
# disklabel -r rz0 > DLSAVE
Example C-3: DLSAVE File Required By the Sample preinstall Script
# /dev/rrz8a:
type: SCSI
disk: rz26
label:
flags:
bytes/sector: 512
sectors/track: 57
tracks/cylinder: 14
sectors/cylinder: 798
cylinders: 2570
sectors/unit: 2050860
rpm: 3600
interleave: 1
trackskew: 0
cylinderskew: 0
headswitch: 0		# milliseconds
track-to-track seek: 0	# milliseconds
drivedata: 0

8 partitions:
#      size  offset  fstype [fsize bsize  cpg]
 a:  131072       0  4.2BSD   1024  8192   16  # (Cyl.    0 - 164*)
 b:  262144  131072  unused   1024  8192       # (Cyl.  164*- 492*)
 c: 2050860       0  unused   1024  8192       # (Cyl.    0 - 2569)
 d:  552548  393216  unused   1024  8192       # (Cyl.  492*- 1185*)
 e:  552548  945764  unused   1024  8192       # (Cyl. 1185*- 1877*)
 f:  552548 1498312  unused   1024  8192       # (Cyl. 1877*- 2569*)
 g: 1210000  393216  4.2BSD   1024  8192   16  # (Cyl.  492*- 2009*)
 h:  447644 1603216  4.2BSD   1024  8192   16  # (Cyl. 2009*- 2569*)
C.10 Creating postload Files
Upon completion of the file system creation and software subset
load phases and the preparation of the configuration environment for the pending
configuration phase, the installation process searches for a file named postload, which contains specific actions to be carried out.
Example C-4: Sample postload Script
#!/sbin/sh
#
# postload - script which is invoked after the subset load of a full
#	installation.  The script creates a new file system and
#	adds an entry in the fstab file.  Doing this will make the
#	file system available as soon as the installation completes.

#
# Create a new file system on rz2c which is to be mounted at /usr/users
#

echo "postload:  creating new file system on rz2c\n"

# First, make sure that all device special files exist

(cd /dev; ./MAKEDEV rz2)

# Next, create the UFS file system on rz2c, an RZ26L disk.

/usr/sbin/newfs -F /dev/rrz2c RZ26L ||
{
	   echo "postload:  failed to create a new file system on rz2c\n"

	   # We consider this a nonfatal error and allow the install to
	   # continue.  This is done by returning 0.  Otherwise, exit with a
	   # non-zero value.

	   exit 0
}

# Next, add an entry to fstab so that this new file system is
# automatically mounted when the system boots.

# NOTE:  the actual installed file systems are mounted at /mnt.
# Therefore, we want to add the entry to /mnt/etc/fstab and
# not /etc/fstab.

echo "/dev/rz2c	/usr/users	ufs rw 1 2" >> /mnt/etc/fstab

# Finally, make sure the mount point is created.  Once again, create it
# relative to /mnt.

/bin/mkdir /mnt/usr/users

# Process complete!

exit 0
C.11 Moving the CDF and Files to the Appropriate Destination
It is the administrator's
responsibility to place the install.cdf file, the preinstall and postload files and all files required
by preinstall and postload into the
appropriate directories so the installation process can find them. Depending
upon how you want to deliver the CDF and all related files, you can copy them
to the following destinations:
C.11.1 Moving the CDF and Files to a Diskette
Before you can copy the CDF and user-supplied files to the diskette,
you must first format the diskette, write a new disk label, and then create
a new file system using the following command syntax:
# fddisk -fmt /dev/rfd0
# disklabel -wr fd0 rx23
# newfs /dev/rfd0c
# mount /dev/fd0c /mnt
# chmod 777 *
The asterisk (*)
is a wildcard character that represents all files in the directory.
# cp ./install.cdf /mnt/install.cdf

# cp ./preinstall /mnt/preinstall

# cp ./postload /mnt/postload

# cp ./file_name /mnt/file_name
# umount /mnt
C.11.2 Moving the CDF and Files to a RIS Server
The information contained in this section applies to RIS servers running
Digital UNIX Version 4.0A and later. This functionality was different on RIS
servers running Digital UNIX Version 4.0. For information about moving the
CDF and user-supplied files to a RIS server running Version 4.0, see the appropriate
Digital UNIX Version 4.0 documentation.
# cd /var/adm/ris/clients/sets

# mkdir engineering
# cd engineering
# chmod 755 *
The asterisk (*)
is a wildcard character that represents all files in the directory.
C.11.2.1 Moving Files to an Extracted RIS Area
If an install.cdf, preinstall,
or postload file is moved to the /isl
area of an extracted RIS area, the files will be used by all client systems
installing from that RIS area.
C.11.2.2 Changes to the RIS Interface
The following changes have been made to the Digital UNIX Version 4.0B
RIS interface to accommodate the addition of profile set directories:
Converting old cdf directory to new sets directory format...
CDF File acctng moved to set acctng and renamed install.cdf
CDF File acctng.cdf moved to set acctng1 and renamed install.cdf
CDF File acctng1.cdf moved to set acctng11 and renamed install.cdf
CDF File acctng.cdf2 moved to set acctng12 and renamed install.cdf
done
After the conversion is done, these messages will not be displayed
again.
Do you want to specify an Installation Profile Set
for Installation Cloning on this client? [y/n]
If you enter y, a list of available profile sets is displayed for selection.
This RIS server has the following Installation Profile Sets available:

acctng acctng1 acctng11 acctng12

Enter a set name or press <Return> to exit set selection: acctng

You have selected the acctng installation profile set.
This set contains the following files:
install.cdf preinstall postload DLSAVE
Once a profile set is selected,
RIS validates the CDF to ensure that the software subsets specified in the
CDF match the software subset names and software subset version numbers present
in the RIS environment to which the client system is registered. No validation
of the user supplied files is performed.
C.11.2.3 Registering a RIS Client to a Profile Set
Follow the general procedures in Sharing Software on a Local Area Network
to register a client system to a RIS environment and a profile set. The Sharing Software on a Local Area Network
guide was not updated to reflect the new prompts shown in Section C.11.2.2.
C.11.2.4 Determining Registration for RIS Clients
To determine if a RIS client is registered to a profile
set, examine the RIS database file, /var/adm/ris/clients/risdb,
on the RIS server. The name of the profile set is specified in the fourth
field; fields are separated by a colon. In the following sample entry in the risdb file, the client system kramer is registered
to the engineering profile set:
kramer:08-00-2b-58-89-1c:ris2.alpha,product_1:engineering
C.11.2.5 Removing a RIS Client from Profile Set Registration
You can remove a client from profile set registration by using the
Modify option from the RIS Utility
Main Menu. When you are prompted to specify a profile set for the client,
enter n or press Return to register the client without
specifying a profile set.
C.11.2.6 Deleting Profile Sets from the RIS Server
If a profile set is no longer
needed, you can delete it by removing the appropriate profile_set directory from the directory /var/adm/ris/clients/sets.
newman:08-00-2b-58-89-1c:ris2.alpha,product_1:accounting
C.11.3 Moving the CDF and Files to the /var/tmp Directory
The /var/tmp directory is a writable directory created
during the installation process and, therefore, cannot be used to ship the
CDF and user-supplied files. However, if a preinstall script
is used, it can copy dynamically the CDF , postload, and
any files needed by postload into /var/tmp
during the installation process. The preinstall file itself
cannot be invoked from /var/tmp as it is the only mechanism
available to move files into /var/tmp.
C.11.4 Burning the CDF and Files on to a CD-ROM
You can repackage the Digital UNIX Version 4.0B
operating system CD-ROM to include CDFs and user-supplied files in the /isl directory.
Note
# mkdir /mnt

# mount -r /dev/rz4c /mnt

# cd /mnt
# df -k
Remember this figure and make sure you have a disk large enough to meet the
space requirement.
# umount /mnt
# dd if=/dev/rz4c of=/dev/rz2c bs=32k
Caution
# mount /dev/rz2c /mnt

# cp ./preinstall /mnt/isl/preinstall

# cp ./install.cdf /mnt/isl/install.cdf

# cp ./postload /mnt/isl/postload

# cp ./file_name /mnt/isl/file_name
Note