![[Return to Library]](BOOKSHLF.GIF)
![[TOC]](TOC.GIF)
![[PREV]](REW.GIF)

![[NEXT]](FF.GIF)
![[INDEX]](INDEX.GIF)
![[Help]](HELP.GIF)
Note that printing text in languages other than English, particularly
Asian languages, may require specialized printer hardware.
This chapter discusses these topics as they apply to particular languages
or groups of languages. The chapter also describes command and DECwindows
environment features that English-language speakers do not normally use and
that allow you to display, enter, print, and mail text in languages other
than English. For information about using internationalization features of
applications that run in the Common Desktop Environment (CDE), see the CDE Companion.
Language-specific
user guides provide additional information about customization and use of
software provided for a particular language. These user guides are on the
CD-ROM titled "Digital UNIX Online Documentation." If one
or more of the language variant subsets are installed on your system, you
can use the following command to read language variant guides using Bookreader.
If you did not mount the CD-ROM device to the /mnt directory,
replace /mnt in the following example with the directory to which
you mounted the CD-ROM device.
PostScript files for the language variant user guides are also available
on the CD-ROM. The directories that contain the PostScript versions
of these guides have pathnames that adhere to the following format:
Non-English characters are embedded in the tables and text of these
guides. Therefore, to print a guide in PostScript format, you must first:
Refer to Section 6.12 and
Digital UNIX documentation also provides introductory reference pages
on the topics of internationalization (
For system software, you set locale by
defining the LANG environment variable. For example:
Refer to the discussion of
internationalization in the System Administration book and in the Command and Shell User's Guide
for more detailed information on using locales and defining the associated
variables for system and user setup. You can also refer to the
Many locale-specific files reside in directories whose names are constructed
from the language, territory, and codeset portions of a locale name. Commands
and other system applications insert the setting of the LANG variable
into search paths that contain %L as one of the directory nodes.
This makes it possible for software programs to find the correct set of files,
such as fonts, resource files, user-defined character files, and translated
reference pages, that should be used with the current locale. An @
suffix related to collation, if included in an assignment to the LANG variable, may result in applications being unable to find certain locale-specific
files.
On a workstation, you
also need to select a language to take advantage of text translations and
local-language features available with Common Desktop Environment (CDE) and
DECwindows Motif applications. For Asian languages, the correct language selection
is particularly important because it enables:
See the CDE Companion for information about setting language in
the Common Desktop Environment. Use the following steps to select a language
in the DECwindows environment:
If there is an input method that supports the selected language, you
should also start the input method server before starting a DECterm window
or other window where you want to work in that language (see Section 6.4).
Some languages also require a keyboard setting before you begin entering text
in the window (see Section 6.3).
There is a cut and paste restriction to keep in mind if you simultaneously
run windows in different languages. Cutting from one window and pasting to
another is supported only when both windows are set to the same language.
DECterm windows emulate terminals, so data is transferred as a byte stream
that has no embedded language information. Data appears on the target (paste)
window according to the language applied to the target window, not according
to the language applied to the source (cut) window. For example, data will
be meaningless if you cut text from a Chinese window and paste it in a German
window. For Chinese or Japanese, codeset converters support cut and paste
operations between windows set to the same language but different codesets.
Terminal users
must be using a localized keyboard or, if their Digital keyboard includes
the Compose key, using Compose-key sequences to enter non-English characters
from single-byte codesets. Many Digital terminals also provide software emulation
of a number of keyboard layouts for languages that are based on single-byte
codesets. The user guide for each terminal explains how you can use its keyboard
to enter non-English characters. Entry of multibyte characters in Asian languages
requires special terminal hardware.
Workstation users can set keyboard type to be appropriate for languages
for which there are standard keyboard types when appropriate support files
are installed on the system. You need to set keyboard type for Western and
Eastern European languages, Japanese, Thai, and Hebrew. Keyboard setting is
not required for Chinese and Korean languages.
If you are using
the Common Desktop Environment, refer to the CDE Companion for information
about changing keyboard setting. If you are using the DECwindows envirnonment,
you can change keyboard type by performing the following steps:
Unlike the language setting, keyboard setting is a global attribute
that applies to all windows. Therefore, if you are working in windows created
with different language settings, you may need to change the keyboard setting
as you move from one window to another.
You can access a keyboard layout for your current keyboard setting in
one of two ways:
Refer to
Refer to
The preediting string is
displayed in a window that is positioned over the point of insertion.
The preediting string is displayed
in a child window of the application RootWindow.
For some of the input styles selected in an application, the preediting
and status windows are not redrawn correctly if the application window is
occluded by other windows. To correct this problem, click on or refocus on
the application window.
Input methods for different
locales typically support more than one user interaction style but not all
of them. If you are working in languages that are supported by an input method,
you can specify styles in priority order through the VendorShell resource XmNpreeditType. By default, this resource is defined to be:
OnTheSpot,OverTheSpot,OffTheSpot,Root
The preceding value means that on-the-spot interaction style is used
if the input method supports it, else the over-the-spot is used if the input
method supports it, and so forth.
There are several ways to supply the XmNpreeditType resource
value to an application:
For example:
To position your selection in the list, click on the up-arrow or down-arrow
button.
Note that clicking on the Default button of the Input Style Options
box restores the system default order to entries on the list.
Input styles are supported
by specialized input method servers. An input method server runs as an independent
process and communicates with an application to handle input operations. An
input method server does not have to be running on the same system as the
application but must be running and made accessible to the application before
the application starts. It is therefore important to start an input method
server for the DECwindows Motif environment before starting a DECterm window
or any other DECwindows Motif application where you want to input characters
in a language that requires the server. Following are the input method servers
available in the operating system, along with the input styles that each server
supports:
Each of these servers has a corresponding reference page.
The applications that you run may support more, fewer, or none of the
input styles supported by a particular input server. The preedit option "None"
applies when an input server rejects all input styles supported by the application.
In the DECwindows environment, if an input method server is not defined
as an application and started through your .Xdefaults file at login
time (see Section 6.6), you have to start the server
from the command line. The following example starts the input server for
the Korean language:
In the Common Desktop Environment, the appropriate input server is automatically
started when you select the language.
If you are using a terminal and your keyboard
has a mode-switch LED (light emitting diode), the Keyboard Indicator utility
switches the LED on or off, depending on whether you last toggled the special
input mode on or off. When using a terminal, invoke the Keyboard Indicator
utility with the following command:
If you are using a workstation and your language is set to an Asian
language, invoke the Keyboard Indicator utility with the -map option,
as follows:
The -map option starts a DECwindows Motif application that
emulates a mode-switch LED. The application window contains one button, which
is displayed as on or off, corresponding to the input mode state. You can
click on this button to toggle in and out of input mode. The window is insensitive
if input mode switching is not supported for your current language setting.
You can have only one Keyboard Indicator application running during
your session. To stop the application, enter Ctrl/C in the window
from which you started the application or enter the following kill
command with the application's process id:
kill -INT process_id
If Keyboard Indicator is stopped by any other means, you must enter
the following command before restarting the application:
The preceding command erases the server status for the application so
that it can be restarted cleanly.
If your language is set to Hebrew, the Keyboard Manager application
(/usr/bin/X11/decwkm) provides the same function as the Keyboard
Indicator window provides for Asian languages.
Example 6-1 shows an .Xdefaults file, modified
by the choice to save current settings when quitting the session. The language
and keyboard settings are Japanese (DECkanji) and LK401aj, respectively. The
string dxjim has been added to several lines to define the Japanese
input method server as a DECwindows Motif application and automatically start
the server process.
Refer to Section 6.18 for information about using specific
DECwindows Motif applications with Asian languages. Section 6.18
also discusses X Server customization that is important when ideographic fonts
are used in local and remote displays.
For information about customizing session defaults in the Common Desktop
Environment, see the CDE Companion.
The I18NPATH variable defines the location of files that
provide Asian-language support and that are not in system default locations.
This variable is set to:
/usr/i18n
Your system administrator can choose to install files for Asian-language
support at a location different from /usr/i18n; however, there
must be a link to the other location in the /usr/i18n directory.
The PATH variable points to the location of commands and
is set to:
$I18NPATH/usr/bin:$PATH
The file /etc/i18n_profile includes the preceding variable
assignments on a systemwide basis for Bourne and Korn shell users. For C shell
users, the installation process includes the file /etc/i18n_login
in the file /etc/csh.login to set search paths correctly for Hebrew
and Asian languages. Unless specifically noted in descriptions of particular
commands or utilities, individual users do not need to change process-specific
search paths to find localized binaries and utilities.
Refer to the
Asian-language software subsets provide an enhanced stty
command that can enable support for multibyte codesets and special character
manipulation capabilities, such as the following:
This section provides general information about using the stty command to enable features added to the terminal subsystem for Asian
languages.
The stty utility sets or reports on terminal input/output characteristics
of the device that is the utility's standard input. Table 6-1
shows the stty options that set line discipline for Asian languages.
![]()
6.1 Working in a Multilanguage Environment: Introduction
To enable input and display in any language other than English, you
must always set the locale in which your process runs. Depending on the language,
you may need to perform additional tasks, for example, to:
% dxbook /mnt/DOCUMENTATION/WORLDWIDE/L10N_guides.decw_bookshelf &
/mnt/DOCUMENTATION/WORLDWIDE/language_territory/POSTSCRIPT
i18n_printing(5) for information
about setting up printers for local languages.i18n_intro(5)) and localization
(l10n_intro(5)), along with reference pages for all supported languages and
codesets.

6.2 Setting Locale and Language
System software that supports different
language environments may provide translated message files, application resource
files, help files, or some combination of these. If translations are available
for message files, you can vary the language of software messages and other
text by selecting a locale.
% setenv LANG en_US.ISO8859-1
i18n_intro(5)
reference page for a discussion of locale variables such as LANG.
If these locale variables are not defined, internationalized applications
assume the POSIX (C) locale, which supports only English.
Note
Note
6.3 Selecting Keyboard Type
To enter English
text, a standard keyboard provides a sufficient number of keys (combined with
shift states) to enter all uppercase and lowercase letters, numerals, and
punctuation marks. For many other languages, the default keyboard does not
provide enough keys and shift states to enter all characters.
6.3.1 Determining Keyboard Layout
If you change your keyboard from the one whose
characters are printed on the hardware keys, you need to know how characters
are mapped to keys and whether any characters must be entered by using a mode-switch
key or mode-switch key sequence. For some languages, such as Czech, up to
four different characters can be mapped to the same key. In such cases, you
use the key defined as the mode switch to toggle among different sets of characters
mapped to the same key. Note that mode switching is a character entry mechanism
that is different from Compose sequences. A particular keyboard setting may
support Compose sequences (which require one key to be defined as a multi-key),
mode switching (which requires at least one key to be defined as a mode-switch
key), both, or neither of these input mechanisms.dxkeycaps(1X) for more information on the application invoked
by the Edit Keycaps button.
% /usr/bin/X11/xkbprint -label symbols -o mykeyboard.ps :0
xkbprint(1X) for more information about the xkbprint command.
6.4 Determining Input Method
For some languages, such as Japanese, Chinese, and
Korean, you use an input method to enter characters, phrases, or both. An
input method lets you input a character by taking multiple editing actions
on entry data. The data entered at intermediate stages of character entry
is called the preediting string.
The X Input Method
specification defines four user interaction styles:
% dxnotepad -xrm '*preeditType: offthespot,onthespot' &
% /usr/bin/X11/dxhangulim &
Note
6.5 Determining the Input Mode Switch State
The keyboard layout
for an Asian language provides keys for only a small number of characters.
For Asian languages, you also use an input methodology (incorporating control-key
sequences, keypad-key sequences, or options in a DECwindows application) to
convert one or more characters that you can input directly from the keyboard
to other kinds of characters. Section 6.4 and
the language-specific user guides discuss input methods for Asian languages.
% /usr/bin/X11/kb_indicator &
% /usr/bin/X11/kb_indicator -map &
% /usr/bin/X11/kb_indicator -clear
6.6 Setting Parameters in the .Xdefaults File
In the DECwindows environment, if you want your session to be started
with a particular language, input method, or keyboard setting as the default,
you can manually edit the .Xdefaults file in your home directory
to add appropriate entries for language, input method (if applicable), and
keyboard. Alternatively, you can select the language and keyboard options
you want from DECwindows Motif Session Manager menus, quit the session, and
click on the affirmative answer when asked whether you want to save current
settings. Saving current settings adds lines to or modifies existing entries
in your .Xdefaults file. When you log back in to start a new session,
the changed defaults take effect.
Example 6-1: Sample .Xdefaults File
DXsession.x:    3
DXsession.y:    40
DXsession.AutoStart:    dxjim
DXsession.applications: Bookreader,CDA Viewer,Calculator,\
Calendar,Cardfiler,Clock,DECterm,Differences,\
Mail,Notepad,Paint,Print Screen,XTerm,dxjim
DXsession.dxjim.command:        /usr/bin/X11/dxjim
DXsession.num_AutoStart:        1
DXsession.num_applications:     15
DXsession.AppMenu:      Bookreader,CDA Viewer,Calculator,\
Calendar,Cardfiler,Clock,DECterm,Differences,Mail,Notepad,\
Paint,XTerm,dxjim
DXsession.num_AppMenu:  13
*xnlLanguage:   ja_JP
*keyboard_dialect:      japanese lk401aj
6.7 Defining the Search Path for Specialized Components
European languages are supported by data and executable files installed
at system default locations. Asian-language support for some commands and
programming libraries requires files that are subordinate to the directory /usr/i18n. These files supplement or replace files in system default
locations. When you install one or more of the Asian language subsets, the
installation procedure makes the following adjustments to variable settings
on a systemwide basis:
6.8 Using Terminal Interface Features for Asian Languages
The Digital UNIX
Asian terminal driver (atty) and Thai terminal driver (ttty) support input and output of English and other language characters
over asynchronous terminal lines. When one or both of these drivers are installed,
you can set terminal line characteristics to be appropriate for the language
you are using. The driver's local-language capabilities are supported in
the following terminal configurations:
atty(7) and ttty(7) reference pages for more information
about these terminal drivers.
The stty command requires an appropriate locale setting to be in effect before changing terminal line discipline to support that locale. For example, to set your terminal line discipline to handle Korean, enter:
% setenv LANG ko_KR.deckorean

% stty adec
To set your
terminal line discipline back to the tty default, enter:
The stty command entered with the -all option displays
all settings for the current terminal line discipline:
Note that the adec, jdec, and dec options
of the stty command set terminal code and application code appropriately
for Digital terminals and workstations. You need to explicitly use the tcode option, for example, if you are logging on from a Japanese terminal
that does not support the standard codeset for Digital terminals.
Table 6-2 specifies stty
options that explicitly set terminal and application code.
% stty dec
Note
% stty dec

% stty jdec
% stty adec

% stty all
atty disc;speed 9600 baud; 24 rows; 80 columns
erase = ^?; werase = ^W; kill = ^U; intr = ^C; quit = ^\; susp = ^Z
dsusp = ^Y; eof = ^D; eol <undef>; eol2 <undef>; stop = ^S; start = ^Q
lnext = ^V; discard = ^O; reprint = ^R; status <undef>; time = 0
min = 1
-parenb -parodd cs8 -cstopb hupcl cread -clocal
-ignbrk brkint -ignpar -parmrk -inpck -istrip -inlcr -igncr icrnl -iuclc
ixon -ixany -ixoff imaxbel
isig icanon -xcase echo echoe echok -echonl -noflsh -mdmbuf -nohang
-tostop echoctl -echoprt echoke -altwerase iexten -nokerninfo
opost -olcuc onlcr -ocrnl -onocr -onlret -ofill -ofdel tabs -onoeot
-odl lru size=256
-sim key= class=
tcode=dec acode=deckanji
6.8.1 Converting Between Application and Terminal Codesets
Many terminals support only one codeset, which is a problem when
you work on one terminal and need to run applications in locales (particularly
Asian locales) that are based on a variety of codesets. Therefore, the atty driver provides a mechanism for converting between the codeset
that an application uses and the codeset that a terminal supports. You control
codeset conversion by using options on the stty command line.
The following command lets you run an application that uses DEC Kanji (the default codeset for Japanese) on a terminal that supports only Shifted JIS (a codeset prevalent in the Japanese personal computer market):
% stty acode deckanji tcode sjis
The user guides for the Asian-language subsets provide additional details about supported application codesets and terminal codesets.
When the terminal line
discipline and terminal codeset characteristics are set appropriately for
multibyte codesets, the atty driver handles command-line editing
appropriately for languages supported by those codesets. For example, when
you enter the control sequence to delete a character (assuming you have defined
the control sequence), the entire character is deleted, regardless of how
many bytes it occupies. The character being erased can be either a single-byte
English character or a multibyte Asian character when both occur on the same
command line.
Word deletion is also supported, even when words combine single-byte
and multibyte characters. The atty driver accepts single-byte
space characters, two-byte space characters (if applicable to the terminal
code setting), or tab characters as word delimiters.
The erase and werase options of the stty command line let you define the control
sequence for character and word deletion. For example:
The preceding example specifies that Ctrl/H deletes the character
that precedes the cursor and Ctrl/J deletes the word preceding
the cursor.
History mode is a mode
of command-line editing that allows you to recall and optionally modify a
command entered previously. The history mode implementation discussed here
is one that is customized for Asian-language input and supported only for
the BSD terminal driver. Table 6-3 specifies
the stty options that enable or disable history mode editing.
6.8.2 Command Line Editing That Supports Multibyte Characters
This section
discusses how you enable and use command-line editing when Asian-language
support is installed on your system.
% stty erase ^H

% stty werase ^J
| stty Option | Description |
|---|---|
| history key | Sets the toggle key for the history mechanism and enables it. |
| -history | Disables the history mechanism. |
The atty driver can maintain a history of up to 32 commands,
each with a maximum length of 127 characters. Table 6-4
describes the commands you can use to edit command lines after entering the
history key.
In the preceding table erase_sequence and werase_sequence indicate the control sequences defined by the stty options erase and werase, respectively.
When editing a command line in history mode, you insert characters as follows:
If you enter the control characters that represent "kill," "interrupt," or "suspend," the tty driver breaks out of history mode and cancels the command line being edited.
6.8.3 Kana-Kanji Conversion: Customization of Japanese Input Options
In the Japanese language,
a particular language element, such as a vowel, can be represented by more
than one character. These characters can have both phonetic and ideographic
variants; furthermore, the phonetic character variants can print in either
two-column or single-column width. The different classes of characters, listed
in the following table, require different input schemes:
| Character Class | Description |
|---|---|
| Kanji | Ideographic |
| Hiragana | Phonetic |
| Katakana | Phonetic Katakana characters exist in full width (two-column) and half width (single-column) formats. The single-column format of Katakana is referred to as Hankaku. |
During a single session, a Japanese user can work with Kanji, Hiragana, and Katakana characters in various combinations. The user therefore must be able to customize terminal input mode to suit the character being entered. When the input device is a JIS terminal rather than a workstation, the user must adjust line discipline and terminal code settings in the software to match hardware capabilities (for example, whether the terminal uses 7-bit or 8-bit encoding).
The tty driver supports a mechanism known as Kana-Kanji conversion. This term refers to the conversion between phonetic and ideographic character encoding and the support for keyboard entry sequences that make Japanese character selection more efficient for the user. You use the stty command to enable or disable the Kana-Kanji conversion method and other aspects of Japanese input support. The stty options that support Japanese input are described in Table 6-6 and, unless noted otherwise, are used in conjunction with the jdec option. For example, the following command sets the terminal line discipline to support Japanese character encoding and also enables Kana-Kanji conversion:
% stty jdec ikk
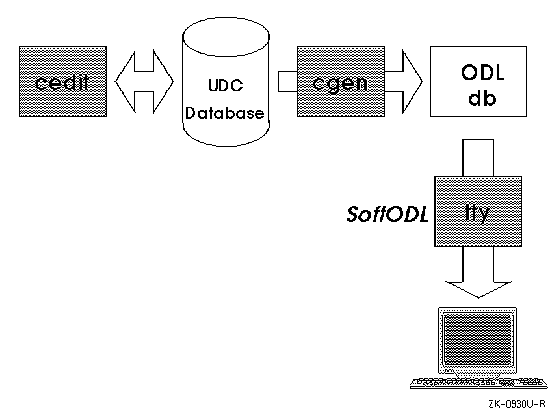
6.9 Setting Up and Using User-Defined Character Databases
The national character sets
for Japan, Taiwan, and China do not include some of the characters that can
appear in Asian place and personal names. Such characters are defined by
users and reside in site-specific databases. These databases are called user-defined
character (UDC) or character-attribute databases. When users define ideographic
characters, they must also define font glyphs, collating files, and other
support files for the characters. You create characters with the cedit application, discussed in Section 6.9.1. You use the cgen utility, discussed in Section 6.9.2, to create font,
collation, and other support files for user-defined characters. X applications
can also obtain fonts for user-defined characters directly from a UDC database
by using font renderers. Refer to Section 6.18.2 for
information about font renderers.
The system default sort command does not access the collation files created for user-defined characters. Refer to Section 6.14 for information on sorting strings that may contain these characters. Note
The rest of this section discusses some setup that is necessary before terminals or workstation monitors can display user-defined characters.
The atty driver includes a mechanism to allow on-demand loading
of files associated with user-defined characters. You enable this mechanism
and can change some of its default parameter values with the stty
command. Table 6-7 describes the stty
options that you use with on-demand loading.
Each user-defined character has a character attribute record, which
is stored in a character attribute, or UDC, database. A UDC database can
be systemwide or private. There can be only one systemwide database that all
users share; however, any user can have a private database as well.
The following command invokes the user-defined
character editor:
The preceding command, which
includes no options, uses the default database. If you are superuser, the
default database is /var/i18n/udc. If you are an unprivileged user,
the default database is $HOME/.udc. There are a number of problems
you can encounter when using user-defined characters that are maintained in
private databases; therefore, Digital recommends that user-defined characters
be maintained only in a systemwide database by a privileged user. The cedit command has a number of options and an argument, which are described
in Table 6-8.
6.9.1 Creating User-Defined Characters
The user-defined
character editor (cedit) is a curses application for managing attributes
of user-defined characters. The character attributes that you usually manipulate
with the cedit application include:
% cedit
The following command displays the cedit syntax format:
% cedit -h
Usage : cedit [-h] [-c <old_db>] [-r <ref_db>] [<cur_db>]
The cedit command returns an error message if your locale
setting is one that is not supported for creation of user-defined characters.
Locales supported
for user-defined characters include those for the Chinese and Japanese languages.
After you invoke cedit, you can use the Options menu on the cedit user interface screen to change the language of user interface
messages and help text back to English.
The following sections discuss the screens, menu items, editing modes,
and function keys of the cedit utility.
The user interface screen is divided into three areas:
This area contains a bar of menu names. When you select and activate
a particular menu, its items appear in the portion of the menu area below
the menu bar.
Below the menu area is the status area, which displays the current language
and codeset.
The bottom two lines of the screen accept user input and display warning
or informational messages.
To navigate the menu interface, you can use the four arrow keys to select
a menu and then press either Return or the space bar to see items on that
menu. You can accomplish the same goal more directly by pressing the key
for the letter that is underlined in the title of the menu.
Menu items are displayed in one of the following states:
An active item is one that you can select. Active items appear with
one letter highlighted and underlined. You can press the key for that letter
to start the function represented by the item.
You cannot select inactive items. Inactive items do not contain underlined
and highlighted letters.
If you press the down arrow key rather than the key for a highlighted
letter, you can select items without starting the functions they represent.
The currently selected item is shown in reverse video.
You activate an item when you press the key for a highlighted letter
or when you press Return or the space bar after selecting the item with the
down arrow key. Activating an item usually displays a pop-up menu, causes
a particular function to start, or both. Activating an item that is followed
by the characters >> displays a cascade menu.
In the text that follows, when you are told to choose an item, you should
activate it.
To return to a higher menu level without activating items, press Ctrl/X.
Menus on the user interface screen provide the following options for
managing user-defined characters and their attributes:
Use the File menu to:
Use
the Edit menu to select a character and create or change its font glyph, codeset
value, collating value, input key sequence, class, or name.
Section 6.9.1.2 discusses editing a character's
font glyph.
Use the Delete menu to
delete a character or some of its attributes.
Use the Show menu to display attributes of the character you are working
on or the status of databases (current character attribute database or reference
character attribute database).
The cedit utility keeps track of a character through its
attribute record. This record contains fields to identify the following attributes:
There is some variation among Asian codesets in terms of support for
UDC attributes. For example, you cannot define an input key sequence through cedit for a Japanese user-defined character. For Chinese, you can define
an input key sequence for use only with the DEC Hanyu codeset and TsangChi
and QuickTsangChi input modes.
Use the Commands menu to:
You can implement the copy operation blindly (No Confirm), confirm the
copy operation for each character in the range (Confirm All), or confirm the
copy operation only for characters that will overwrite other characters (Confirm
Conflict).
After you define a character in one font size, you can use this option
to make the character available in other sizes. The scaling algorithm is a
simple one, so you might need to do some manual editing to refine font glyphs
after they are scaled.
Use the Options menu to change the current setting for language and codeset
that is applied to your work on user-defined characters. You can also independently
set the language of messages and help text in the cedit user interface.
By default, the language of the cedit user interface is the same
as the locale setting in effect when you invoked cedit.
Use the Help menu to display introductory text for cedit
functions. Help is also available for menu items through the Help key when
this key is provided on your terminal or, for workstation users, enabled by
your terminal setting. In other words, you can first select a menu item with
the arrow keys and then press the Help key for a short description of the
selected item.
The cedit program then prompts you to enter the hexadecimal
code value (without the \x prefix) for the character to be edited.
The range of valid codes for UDC characters is defined in locales for Asian
languages. When more than one codeset is supported for the language and territory
of your current locale, cedit attempts to supply values for the
additional codesets so the character can be used with all the associated locales.
If cedit cannot determine the character's value in other
codesets, you can change the codeset setting through the Options menu and
then explicitly specify the character's encoding in the additional codeset.
In general, it is a good idea to define user-defined characters to have values
that can be mapped to other codesets supported for the language. For more
information on codes for user-defined characters in specific Asian languages,
refer to the language-specific user guides available with the Asian-language
subsets of Digital UNIX.
The cedit utility first searches your current UDC database
for the code that you enter. If a character with that code is not found in
the UDC database, the utility searches the current reference character database.
If you are creating a font glyph for use in a DECwindows Motif application,
the available size options may not be appropriate for the window area where
you intend to use the font. In this case, choose the smallest size option
that will accommodate both dimensions of your DECwindows font.
The cedit
program then displays the full-screen font editor interface as shown in Figure 6-3.
The cedit font-editing screen has several windows:
Each dot on the editing window represents one pixel.
Font glyph displays in the reference and display windows are enabled
only on certain terminals, specifically, on local-language terminals that
support the Dynamic Replacement Character Set (DRCS) function.
On DECterm windows, the font glyph in the Display window does not appear
in its actual size.
Fonts created in the editing window for use with system software
are processed to occupy the size dimensions you selected before the editor
interface screen appeared.
You can also create a font for use with DECwindows software
and whose dimensions are smaller than those selected. In this case, you confine
your editing operations to a rectangle that originates at the upper-left corner
of the editing window and has dimensions smaller than the available editing
space (see Figure 6-4). The UDC font converter that
supports DECwindows considers the upper-left corner of the editing window
as the font origin, generates dimensions needed to encompass the glyph based
on this origin, and discards unused space outside these dimensions. This utility
also allows you to explicitly specify the size dimensions for the compiled
font glyphs.
All functions in cedit are bound to keys; in other words,
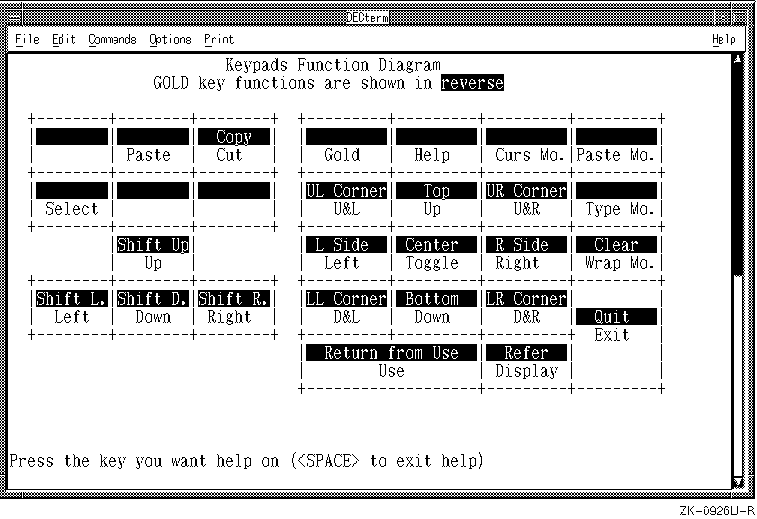
you press a key to invoke a function. Press either the PF2 or the Help key
to see a diagram of how keys are bound to editing functions. Note that your
online diagram may vary from the one shown here due to differences in keypad
design on some systems.
There are four kinds of editing modes for the cedit editing screen:
Using the arrow keys to move the cursor does not affect the pixel state.
However, when you use keypad keys to move the cursor, the following list describes
how Cursor modes affect the pixel state:
You can also toggle the pixel under the cursor with any movement by
pressing KP5.
Paste modes control the pixel operation when you perform the paste function.
Type modes determine whether the margin of one pixel width is maintained
around the character.
Letter mode means that you cannot set pixels to the on state when at
the boundary of the editing window.
Wrap modes enable or disable cursor wrapping.
Similar wrapping behavior occurs when you move the cursor beyond the
leftmost, uppermost, and lowermost pixels in the editing area.
The cedit font editor uses four buffers to store bitmap
data. Some of these buffers are used by editing functions, which are discussed
following the buffer descriptions.
This is the buffer whose contents normally appear in the editing window.
This buffer is associated with the Use function and contains a font
glyph you retrieved from a UDC database or one of the reference windows.
Use this buffer when pasting bitmap data in the editing window. The
bitmap data being pasted is copied either from a Use buffer or the Edit buffer
(if you are copying something from one section of the editing window to another).
This buffer contains the changes made during the last edit operation
and is used by the cedit Undo function to delete those changes.
When you are working on windows in the font-editing screen, you invoke
editing functions by using keystrokes or, in some cases, through a pop-up
menu that appears when you press the Do key. The following functions are available
on the pop-up menu:
This function lets you scale the current font glyph to another size
supported by the system. The SCALE function does not have a keystroke alternative
and is available only on the pop-up menu.
This function retrieves a font glyph from a UDC database or from one
of the reference windows.
This function saves a font glyph copied from a UDC database into one
of the reference windows.
Figure 6-5 shows the keypad keymaps for invoking
different editing functions. The keypad functions, along with the letter keys
used for drawing, are described in the following tables.
6.9.1.1 Working on the cedit User Interface Screen
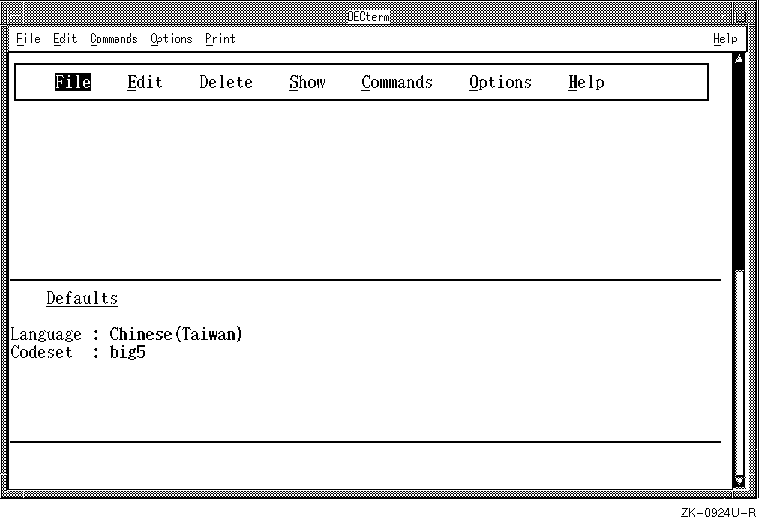
When the LANG variable is set to a supported locale, such
as zh_TW.big5, the cedit command displays the user interface
screen shown in Figure 6-2.
Figure 6-2: The cedit User Interface Screen
6.9.1.2 Editing Font Glyphs
To create or change
the font glyph of a user-defined character, you must invoke the font editing
screen of cedit as follows:
Figure 6-3: The cedit Font Editing Screen

Note
Figure 6-4: Interpretation of Font Editing Screen for Sizing DECwindows Font
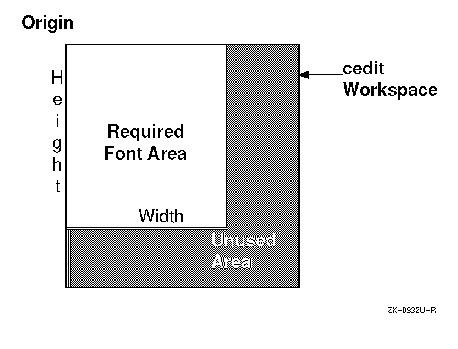
Figure 6-5: Keymap for cedit Functions
| Key | Description |
|---|---|
| Help or PF2 | Shows you which keys are bound to which editing functions. Press Help along with another key in the diagram for more information on a particular key's editing function. |
| PF1 | Toggles the GOLD state. Some keypad keys represent more than one function; in this case, one of those functions is invoked by pressing PF1 and then the other keypad key. |
| KP. | Displays the font glyph in actual size on the display window. |
| GOLD KP. | Clears the font glyph displayed in the editing window. |
| U or u | Undoes the previous operation. |
| Ctrl/L | Redraws the screen. |
| Ctrl/Z | Suspends the cedit program. |
| Do | Displays the pop-up menu for invoking SCALE, USE, and REFER functions. |
| Enter | Saves changes and exits from the font editor. |
| GOLD Enter | Quits the font editor without saving changes. |
| Key | Description |
|---|---|
| PF3 | Toggles Cursor mode. |
| PF4 | Toggles Paste mode. |
| KP- | Toggles Type mode. |
| KP. | Toggles Wrap mode. |
| Key | Description |
|---|---|
| Up-arrow | Moves the cursor up. |
| Down-arrow | Moves the cursor down. |
| Left-arrow | Moves the cursor left. |
| Right-arrow | Moves the cursor right. |
| KP7 | Depending on Cursor mode, moves the cursor up and left. |
| KP8 | Depending on Cursor mode, moves the cursor up. |
| KP9 | Depending on Cursor mode, moves the cursor up and right. |
| KP4 | Depending on Cursor mode, moves the cursor left. |
| KP6 | Depending on Cursor mode, moves the cursor right. |
| KP1 | Depending on Cursor mode, moves the cursor down and left. |
| KP2 | Depending on Cursor mode, moves the cursor down. |
| KP3 | Depending on Cursor mode, moves the cursor down and right. |
| KP5 | Toggles the pixel under the cursor without moving the cursor. |
| Key | Description |
|---|---|
| GOLD KP7 | Moves the cursor to the upper-left corner. |
| GOLD KP8 | Moves the cursor to the top row. |
| GOLD KP9 | Moves the cursor to the upper-right corner. |
| GOLD KP4 | Moves the cursor to the leftmost column. |
| GOLD KP5 | Moves the cursor to the center of the window. |
| GOLD KP6 | Moves the cursor to the rightmost column. |
| GOLD KP1 | Moves the cursor to the lower-left corner. |
| GOLD KP2 | Moves the cursor to the bottom row. |
| GOLD KP3 | Moves the cursor to the lower-right corner. |
| Key | Description |
|---|---|
| L or l | Draws a line connecting two selected points. |
| C or c | Draws a circle centered at a selected point. |
| r | Draws an open rectangle in a selected area. |
| R | Draws a solid rectangle in a selected area. |
| e | Draws an open ellipse in a selected area. |
| E | Draws a solid ellipse in a selected area. |
| X or x | Mirrors the font glyph along the horizontal axis (X-axis). |
| Y or y | Mirrors the font glyph along the vertical axis (Y-axis). |
| / | Mirrors the font glyph along the 45-degree diagonal axis. |
| \ | Mirrors the font glyph along the 135-degree diagonal axis. |
| F or f | Depending on cursor mode, fills an area. |
| T or t | Inverts the state of all pixels. |
| Key | Description |
|---|---|
| KP0 | Changes the display in the Edit window from the font glyph in the Edit buffer to the font glyph in the Use buffer. |
| GOLD KP. | Displays font glyphs in the reference windows. |
| GOLD KP0 | Changes the display in the Edit window from the font glyph in the Use buffer to the font glyph in the Edit buffer. |
| Select | Starts or cancels a selected area. |
| Insert | Inserts the contents of the CUT-AND-PASTE buffer. |
| Remove | Cuts a selected area to the CUT-AND-PASTE buffer. |
| GOLD Remove | Copies a selected area to the CUT-AND-PASTE buffer. |
| GOLD Up-arrow | Shifts the font glyph up by one line. |
| GOLD Down-arrow | Shifts the font glyph down by one line. |
| GOLD Left-arrow | Shifts the font glyph left by one column. |
| GOLD Right-arrow | Shifts the font glyph right by one column. |
There is often more than one way to perform the same editing operation. The following summary discusses one method to accomplish various operations:
Use the keys KP1 to KP9 to draw and navigate in the editing window. These keys are bound to cursor movement. With the exception of KP5, you can think of these keys as points on a compass; each point represents the direction in which drawing occurs. Drawing is affected by cursor mode, which is controlled using the KP3 key. When cursor mode is set to Move, the drawing keys move the cursor without drawing anything.
Use the KP5 key (in the middle of the compass) to toggle the pixel state on or off.
Cursor movement is affected by Type and Wrap modes, which are bound to the KP- and KP, keys, respectively.
Drawing keys change pixels one at a time. Several operations (cut, paste, and copy) affect pixels as a block. Use the Select function to define a select area. Then use Cut or Copy to move the block of pixels to a paste buffer. You can then move the cursor to another position and use the Paste function to move the pixels in the paste buffer to the new position. The paste operation is affected by the Paste mode setting.
To move the entire glyph in a particular direction, you can press the GOLD or PF1 key and the appropriate arrow key.
To undo the last editing operation, press the U key.
If you are working on an Asian terminal rather than in a DECterm window, you can press the KP. key to display the glyph in actual size. This operation is not supported through DECterm windows.
You can create several versions of a glyph, storing earlier versions in reference windows, and later choose the one you like best. Press the KP. key to move a glyph from the editing window to a reference window. The three reference windows are used in round-robin fashion, from left to right.
Note that the Refer function available from the pop-up menu allows you to move an existing glyph from the current or reference database to a reference window.
The Use function moves a glyph into the editing window. The Use function bound to the keypad copies a glyph from another codepoint in the current or reference database. The Use function accessed from the pop-up menu moves a glyph from one of the reference windows into the editing window.
The Use function saves a copy of the current glyph in the editing window to the Use buffer. You can retrieve the glyph from this buffer by pressing the KP0 key. Unlike the contents of the Undo buffer, the glyph in the Use buffer is available across editing operations.
The Scale option in the cedit main menu creates multiple sizes of all glyphs in the database with the currently selected size. The Scale option available for the font-editing screen creates multiple sizes of only the character currently being edited. If you are working with an existing UDC database, use the Scale option from the font-editing screen rather than the cedit main menu. When scaling is implemented from the cedit main menu and affects an entire database, the operation undoes any manual refinements that may have been made to fonts after scaling.
Press the Enter key to save your edits and to exit from the font editing screen.
Press the GOLD or PF2 and Enter keys to quit without saving your edits.
After you create a font glyph, you need to specify its name, input key sequence, collating value, and, optionally, the name of the class to which the character belongs. Use the Edit menu items on the cedit user interface screen to specify these attributes.
The following command creates some of these files for the UDC database ~wang/.udc:
If you enter the cgen command without specifying options,
it displays statistical information about the specified database. If you enter
the command without specifying a UDC database, the private user database is
used for a nonprivileged user and the system database for the superuser.
In other words, the database specification in the preceding example would
not be needed if the user who entered the command was logged on as wang.
Table 6-15 describes cgen command
options.
6.9.2 Creating UDC Support Files That System Software Uses
The character attributes
stored in the UDC database must be directed to specific kinds of files to
meet the needs of different kinds of system software. Terminal driver software
and the asort utility, for example, must recognize user-defined
character attributes but cannot directly access information in UDC databases.
Therefore, after you create or change character attributes in a UDC database,
you use the cgen command to create the following support files:
% cgen -odl -pre -col -iks ~wang/.udc
The remainder of this section discusses the fontconverter
command and when to use its available options. The cgen command
has comparable options; in other words, you can perform fontconverter operations indirectly by using similar options on the cgen
command line.
The preceding command converts fonts in the ~/.font/my_fonts.pre file. By default, the command creates the font files ~/.font/jisx.udc_24_24.pcf and ~/.font/jisx.udc_24_24.bdf.
For the fonts to be available to applications, you can perform one of
the following actions with the compiled (.pcf) fonts:
These commands make the fonts available for testing until a server restart
or system shutdown occurs.
Including the -bdf and -pcf options on the cgen command line is a one-step alternative
to executing the fontconverter and the preceding commands as separate
operations.
Table 6-16 lists and describes options
of the fontconverter command. With the exception of -preload, the options are listed in command-line order. See Section 6.9.3.2
for examples that use these options.
6.9.3 Processing UDC Fonts for Use with DECwindows
The preload font files created with the -pre option of the cgen utility must be converted to bdf (Bitmap Distribution
Format) or pcf (Portable Compiled Format) for use by X11 or DECwindows
applications. The fontconverter command performs this conversion
and can do one of two things with the converted output:
6.9.3.1 Using fontconverter Command Options
The following example shows the simplest form of the fontconverter command, which relies on defaults for file locations, output file names,
input file name extensions, and font dimensions. Assume for this example and
the following discussion that the locale is set to a Japanese locale when
the command is entered and that 24x24 was specified in the cedit
utility when the font glyphs were created.
% fontconverter my_fonts
% /usr/bin/X11/mkfontdir

% /usr/bin/X11/xset +fp `pwd`
% cp ~.fonts/jisx.udc_24_24.pcf \
/usr/i18n/usr/lib/X11/fonts/decwin/100dpi
% cd /usr/i18n/usr/lib/X11/fonts/decwin/100dpi
% /usr/bin/X11/mkfontdir
% /usr/bin/X11/xset fp rehash
If you do not use the -merge option, the fontconverter command creates standalone font files in both pcf and bdf format. When you specify the -merge option, the converted
fonts are merged into the pcf file specified by the -font option and a bdf file is not created.
When you merge UDC fonts with standard DECwindows fonts, you can use
the combined file with all DECwindows Motif applications.
When you create independent font files, you can use the fonts with applications
that explicitly load the file. If the font registry is one of the UDC registries
for a particular locale, you can also use the files with standard system applications.
Note that fontconverter processing time is longer when you
merge fonts into an existing file as compared to when you create independent
files.
The following example:
The following command:
When using this
terminal, a phrase database is loaded in its entirety to the terminal. Memory
limitations restrict the size of the database to 100 phrases. The last line
on the screen (line 26) is reserved for different input methods, phrase input
being one of them, and users are prompted to enter phrase codes on this line.
This
service, which is enabled through the -adec option of the stty command, extends support of phrase input to other Asian terminals
in the VT382 series. The SIM service loads phrases dynamically to the terminal;
therefore, the size of the phrase database is not limited by memory restrictions
of terminal hardware. When using a terminal supported by the SIM service,
you press a user-defined key sequence to toggle in and out of phrase input
mode. Entering phrase input mode shifts the site of user input to the 26th
line of the terminal screen where you are prompted to enter phrase codes.
DECterm windows
do not implement the 26th line of a terminal screen, so the SIM service does
not work correctly on workstations. Phrase input, along with other kinds of
input methods, is supported by the input method server for the Chinese and
Korean languages. On workstations, you enter phrases by invoking the Input
Method window and selecting the phrase item.
The phrase utility allows you to create and maintain a phrase
database and, when using the VT382-D terminal, to load the database to the
terminal.
Table 6-17 lists and describes basic terms
associated with phrase input.
6.9.3.2 Controlling Output File Format
X and DECwindows Motif applications require loadable fonts in pcf format.
% fontconverter -merge -font 'JISX.UDC_*' \
udc_font.pre
% fontconverter -udc deckanji.udc -font \
'JISX.UDC_*' udc_font.pre
6.10 Setting Up and Using the Chinese Phrase Input Method
In Korea, Taiwan, and China, users can input a complete
phrase by typing a keyword, abbreviation, or acronym.
This capability is provided by a phrase database
and one of the following:
6.10.1 Enabling the SIM Service
Table 6-18 lists and describes the options on the stty command line that enable and set certain characteristics for Chinese
phrase input through the VT382 series of Asian terminals. These options do
not apply to DECterm windows, for which phrase input is supported using mechanisms
other than SIM.
The command assumes that you are using a private phrase database if
you are a nonprivileged user and the systemwide phrase database if you are
superuser. You can change these defaults by using the utility's menu interface.
If you are working on a VT382-D traditional Chinese terminal, you may
also include one of the options described in Table 6-19.
These options allow you to use the hardware phrase input method supported
by your terminal.
6.10.2 Creating and Maintaining a Chinese Phrase Database
You can create or maintain a phrase
database by using the phrase utility. On workstations, you invoke
this utility with the following command:
% phrase
On startup, the phrase utility displays a full-screen, menu-driven interface like the
one in Figure 6-6.
Figure 6-6: User Interface Screen of the phrase Utility
Take the following steps to change the language of messages and other text on the user interface to English:
This action displays items on the LANGUAGE menu.
This action specifies English for the user interface.
The phrase utility is a curses application. To navigate the phrase utility user interface, use the following guidelines:
Pressing Ctrl/X when a menu is not activated causes the phrase utility to exit.
The phrase user interface screen includes:
The different menus allow you to perform the following operations:
If you do not explicitly select a class, class DEFAULT is assumed.
The following
guidelines and restrictions apply to the phrase-management operations that
you can perform:
You input phrase names and definitions in an area below the two-part
display window. Choose your phrase name carefully. This is the code used to
invoke the phrase later. You cannot modify the phrase name without deleting
and reentering the entire phrase definition.
There are no restrictions on the number of phrases in a class when phrases
are retrieved through other Asian terminals in the VT382 series or through
the Input Method window in the DECwindows Motif environment.
If you are using the hardware input method with a VT382D Traditional
Chinese terminal, refer to your terminal user guide for phrase input instructions.
To enable the SIM service, make sure your locale is set to one that
supports the Hanzi, Hanyu, or Korean codeset and that your terminal line discipline
is set to adec.
The following example sets this key sequence to be Ctrl/B:
When you define the key sequence to toggle in and out of phrase mode,
pick one that you do not already use at the command line or in other applications.
For example, do not define the key sequence to be Ctrl/C (abort
operation) or Ctrl/Z (suspend operation).
If you do not want to use phrases from the class DEFAULT or from your
default phrase database, use the stty command to:
The SIM service always searches your private phrase database first for
a phrase name and, if the name is not found, then searches the systemwide
phrase database. However, terminals that support the hardware phrase input
method can load phrases from only one database at a time. Therefore, a nonprivileged
user using the terminal hardware input method might enter the following command:
When the terminal setup is complete, you can perform the following actions
to retrieve a phrase:
At the bottom of your screen, you are then prompted to enter a phrase
code.
The phrase is returned to the screen or, if the phrase code was not
found, an error message appears.
When you want to exit from phrase input mode, press the simkey key sequence again.
While in phrase input mode, the characters that you enter are subject
to the following rules:
This behavior means that you do not have to exit from phrase mode to
enter a space or newline between phrases.
This behavior means that control sequences such as Ctrl/Z
and Ctrl/C are handled as you would expect for the system command
line, editor, or other application where the phrases are being entered.
To start phrase input, select Input Method Customization from the Input
Options menu and, in the pop-up dialog box, select Phrase.
Example 6-2 shows the default entries in the cp_dirs file. You can edit these entries to change the default locations.
Each line in the cp_dirs file represents one entry and consists
of the following format:
service_name standard_path system_path user_path
The service_name can be one of the following:
These files, depending on their font resolution, reside in either the 75dpi or 100dpi subdirectory.
These are raw font files used to preload multibyte-character terminals.
The preceding locations are specified as one of the following:
For example, you can specify - to be user_path
for all services related to user-defined characters if you want these characters
supported only through systemwide databases.
Comment lines in the cp_dirs file begin with the number sign
(#).
The following sections discuss these features.
The print filters for local-language text printers can
handle text files that contain ASCII and local-language characters, or output
files created by the nroff command. When processing nroff output, the filter removes multibyte characters that extend beyond
the page boundary and translates nroff control sequences for underlining,
superscripting, and subscripting to control sequences appropriate for the
printer. However, the filter does not support multiple nroff control sequences
on the same character.
The PostScript print filters can print PostScript files in addition
to text and nroff output files. The memory requirement for some
Asian fonts exceeds what is available on most printers, so there are specific
font-loading mechanisms for loading these fonts on PostScript printers (see Section 6.12.5).
A local-language print filter can be the specified filter in both the of and if fields in the /etc/printcap file. For
general information on /etc/printcap entries, refer to System Administrationand
the
The following
print filters process text data for Asian languages:
6.10.3 Using a Chinese Phrase Database
How you use a phrase database depends
on whether you are using the hardware input method or the software input method
(SIM) service. You can use either the hardware input method or SIM service
on a VT382D Traditional Chinese terminal. For other terminals in the VT382
series of Asian terminals or for a DECterm window on a workstation, you use
the SIM service.
6.10.3.1 Phrase Input Supported Through the SIM Service
Before you can use a phrase database,
you use the stty command to:
% stty sim
% stty simkey ^B
% stty simclass CORP
% stty simdb /var/i18n/sim
% [Ctrl/B]
6.10.3.2 Phrase Input in the DECwindows Motif Environment
When phrase input is supported by your language setting and the associated
input method server is running, your DECwindows Motif environment includes
an Input Options window. Click on the Options button in this window to:
6.11 Modifying the Database Location Configuration File
This section discusses the content and format of the file /var/i18n/conf/cp_dirs. Software services or hardware use this file
to locate various kinds of databases that support input of Asian user-defined
characters and phrases.
Example 6-2: Default cp_dirs File
#
# Attribute directory configuration file
#
#                       System location         User location
#                       ===============         =============
udc     -               /var/i18n/udc           ~/.udc
odl     -               /var/i18n/odl           ~/.odl
sim     -               /var/i18n/sim           ~/.sim
cdb     /usr/i18n/.cdb  /var/i18n/cdb           ~/.cdb
iks     -               /var/i18n/iks           ~/.iks
pre     -               /var/i18n/fonts         ~/.fonts
bdf     -               /var/i18n/fonts         ~/.fonts
pcf     -               /var/i18n/fonts         ~/.fonts
The cp_dirs file can contain only one entry for
each service named. Remaining fields in the entry line consist of the following:
6.12 Using Printer Interface Features That Support Local Languages
When
you install Digital UNIX language variant subsets, your printing subsystem
is enhanced with the following features:
6.12.1 Print Filters for Local Language Printers
A print filter
processes text data for a particular model of printer. The filter handles
the device dependencies of the printer and performs device accounting functions.
When each print job is completed, the print filter writes an accounting record
to the file specified by the af field of the printer's entry in
the /etc/printcap file.printcap(4) reference page. Supplementary information is provided in the i18n_printing(5)
reference page. A reference page for a specific language (for example, Japanese(5))
lists the names of print filters that support printing characters in that
language.
| Language | Filter | Printer |
|---|---|---|
| Japanese | la84of | LA84-J |
| Japanese | la86of | LA86-J |
| Japanese | la90of | LA90-J |
| Japanese | la280of | LA280-J |
| Japanese | la380of | LA380-J |
| Japanese | ln03jaof | LN03-J |
| Japanese | ln05jaof | LN05-J |
| Hanzi | la88cof | LA88-C |
| Hanzi | la380cbof | LA380-CB |
| Korean | la380kof | LA380-K |
| Korean | dl510kaof | DL510-KA |
| Hanyu | cp382dof | CP382-D |
| Thai | thailpof | EP1050+ |
The following print
filters process PostScript and text data for Asian languages and for some
of the languages supported by locales using the ISO8859-2, ISO8859-5, ISO8859-7,
and ISO8859-9 codesets:
| Language | Filter | Printer |
|---|---|---|
| Japanese | ln82rof | LN82R |
| Czech, Hanyu, Hanzi, Hungarian, Greek, Korean, Polish, Russian, Slovak, Slovene, and Turkish | dl1152wrof | DEClaser 1152 |
| Thai | dl1152trof, dl1152ttmrof | DEClaser 1152 |
| Czech, Hanyu, Hanzi, Hungarian, Greek, Korean, Polish, Russian, Slovak, Slovene, and Turkish | dl5100wrof | DEClaser 5100 |
| Thai | dl5100trof, dl5100ttmrof | DEClaser 5100 |
See the reference page for a specific language (for example, Japanese(5))
to find the names of print filters that support printing characters in that
language.
Table 6-22 lists and describes /etc/printcap symbols that are specific to support for local-language printers. Refer
to
If the preceding requirements are not met, files may occasionally be
printed in the wrong locale, resulting in meaningless output. There is one
problem that can result from setting up multiple print queues and directories
for the same printer. If two or more jobs are sent to different queues for
the same printer within a very short time, some jobs may be blocked so that
they do not print. If this happens, the system manager must use the lpc command to restart the blocked jobs.
Table 6-22 lists and describes /etc/printcap symbols that are specific to local-language requirements.
6.12.2 Support for Local Language Printers in /etc/printcap
The /etc/printcap file describes characteristics of each
printer on the system. Printer characteristics are specified by symbol/value
pairs, where each symbol is a 2-character mnemonic. Each time a user submits
a print job, the lpd printer daemon and printer spooling system
uses information in the /etc/printcap file to determine how that
job is handled. printcap(4) for descriptions of other symbols used in the /etc/printcap file. Refer to Section 6.12.3 for an example of using
the lprsetup command to add several of these options to the /etc/printcap for a local-language printer.
Note
The value assigned to the ya symbol is a quoted string that can include one or more of the following options:
Specifies the locale for interpretation of file text. The print filter uses this locale to validate characters in the text. For an Asian language that is supported by more than one codeset, a difference between the flocale and plocale values determines whether codeset conversion is done before the file is printed. If flocale is not specified, the filter interprets the file in the current locale.
Specifies the name of the outline font for printing PostScript files. This font must be appropriate for the specified plocale value.
Specifies the number of lines per page. When used in combination with the -w flag of the lpr command, the line number can control the font size and orientation of printed output.
Specifies the pathname of the software on-demand (SoftODL) database. By default, the printer uses the systemwide database as specified in the cp_dirs file.
Specifies the SoftODL font style and size to use, for example normal-24x24. If odlstyle is not specified, the default style and size set for the systemwide database is used.
For the Thai language, specifies that characters be printed on one and a half lines, rather than three lines, to produce more compressed and natural looking output. The onehalf option is valid only for the thailpof print filter.
Specifies the printer locale. Some printers, such as the LA380-CB printer, are country-specific and have built-in fonts that are encoded in a particular codeset. For these printers, the codeset part of locale_name should match the codeset of the built-in fonts. Other printers, such as the DEClaser 5100, are generic and suitable for printing files in a variety of languages. For these printers, the codeset part of locale_name should match the codeset of the font needed to print files in a particular language (or set of languages). Remember that to use the same generic printer for printing files in different languages, you must define a separate print queue and spool directory for each language (codeset) in which print jobs will be submitted.
Enables space-compensation mode for languages, such as Thai, that contain nonspacing characters. These characters can combine with other characters for display and therefore do not occupy space. Many of the existing tools that align text do not handle nonspacing characters correctly. If you want to print the Thai output that these tools generate, you should specify the spcom option to ensure proper text alignment in the printed file. This option is valid only when used with a Thai print filter or the th_TH.TACTIS plocale value.
Specifies the location of the character code tables used with the thailpof print filter. By default, tac_data_path is /usr/lbin/tac_data.
Enables text morphing for printing Thai characters. Text morphing replaces
some characters with others to produce better printed output. Refer to the Thai(5)
reference page for information on text morphing.
After you enter characteristics for a particular printer and verify
that your entries are correct, the lprsetup command creates the
printer spooling directory, links the filters, and writes the entry for the
printer in the /etc/printcap file.
Example 6-3 shows how you use the lprsetup
command to set up a local-language printer, in this case, ln05ja.
Table 6-23
lists Asian languages and the associated printer choices as displayed by the lprsetup script.
6.12.3 Enhancements to the lprsetup Command
The lprsetup command helps
you manage the printers on your system. The command queries you for answers
to questions about adding, deleting, or changing the characteristics of any
printers on your system. The questions have default answers, which are delimited
by brackets ([ ]). Online help is available for each question.
Either press only the Return key to choose the default answer or enter a valid
alternative. Follow instructions displayed by lprsetup to see the
help message for each question.
Example 6-3: Setting Up a Local Language Printer with lprsetup
# /usr/sbin/lprsetup   (1)
Digital OSF/1 Printer Setup Program

Command < add modify delete exit view quit help >: add

Adding printer entry, type '?' for help.


Enter printer name to add [0] : ln05    (2)

For more information on the specific printer types Enter
`printer?'

Enter the FULL name of one of the following printer
types:

cp382d  dl1152w dl510ka   dl5100w  ep1050+  fx80    fx1050    hpIIP
hpIIIP  hpIIID  hpIV      hp4M     ibmpro   la50    la70      la75
la84    la86    la88      la88c    la90     la280   la324     la380
la380cb la380k  la424     lf01r    lg02     lg06    lg12      lg31
lj250   ln03    ln03ja    ln03r    ln03s    ln05    ln05ja    ln05r
ln06    ln06r   ln07      ln07r    ln08     ln08r   ln09      ln10ja
ln82r   nec290  remote   unknown


or press RETURN for [unknown] : ln05ja    (3)

.
.
.

Enter the name of the printcap symbol you wish to modify.
Other valid entries are:

        'q' to quit (no more changes)
        'p' to print the symbols you have specified so far.
        'l' to list all of the possible symbols and defaults.

The names of the printcap symbols are:

 af  br  cf  ct  df  dn  du  fc  ff  fo  fs  gf  ic  if  lf  lo
 lp  mc  mx  nc  nf  of  op  os  pl  pp  ps  pw  px  py  rf  rm
 rp  rs  rw  sb  sc  sd  sf  sh  st  tf  tr  ts  uv  vf  xc  xf
 xs  ya  yd  yj  yp  ys  yt  Da  Dl  It  Lf  Lu  Ml  Nu  Or  Ot
 Ps  Sd  Si  Ss  Ul  Xf


Enter symbol name: ya    (4)

Enter a new value for symbol 'ya'? ["plocale=ja_JP.sdeckanji"]

Do you want to enable ODL? [n] y    (5)


Enter symbol name: yt    (6)

Enter a new value for symbol 'yt'? [fifo]


Enter symbol name: q    (7)

.
.
.
None (uses printer built-in fonts)
pfsetup[ -s| -d] [ queue_name ]...
You can use the pfsetup command in the following ways:
For font faulting to work, there must be two channels for printer communication.
The primary channel transfers file data from the host system to the printer.
The secondary channel transfers font requests and responses between the printer
and the host system. You specify the secondary channel through the yd entry for the printer in the /etc/printcap file.
When the printer receives unrecognized characters, it sends font requests
through its secondary communication channel.
The ffd daemon serves this channel and responds
to the font requests from the printer. The daemon searches the font files
for the requested fonts and sends back the requested data.
You can manually start and stop the ffd daemon with the following commands:
You have to download at least one font using the pfsetup
command to activate the font-faulting mechanism (refer to Section 6.12.5.1
for lists of fonts and to Section 6.12.5.2 for information
about the pfsetup command). After the font-faulting mechanism is
activated and until the printer is turned off, the mechanism automatically
sends information for any font to the printer as required. Therefore, the
printer can use all fonts that are installed on the printer's host system,
including fonts that are not explicitly downloaded.
The following sections discuss enhancements to these components, along
with a discussion of codeset conversion done by the comsat server.
Refer to the
To prevent data loss, when incoming messages are stored in mail folders,
the messages are encoded in the codeset in which they are received. Codeset
conversion takes place when users extract or display the messages.
To communicate mail interchange code information to other systems, outgoing
messages include two additional header lines like the following:
The charset field in the preceding example
specifies the mail interchange codeset, in this case, ISO-2022-JP. This codeset
is an ISO 7-bit state-dependent codeset for Japanese characters. Codesets
other than those that are part of the ISO standard, are identified by the
prefix X- in the codeset name. For example, when DEC Hanyu is the
codeset used for mail interchange, the following header lines are included
in outgoing mail messages:
The mailx command or MH commands use the following values
(listed in order of highest to lowest priority) to determine or set the mail
interchange and application codesets for a particular message:
If you create this file, it contains a single entry, which is the name
of a locale.
If neither of the preceding values is available, codeset conversion
does not occur.
If a codeset is not determined for outgoing mail interchange, the mail
is sent with no codeset identifier.
If neither of the preceding values is available, codeset conversion
does not occur.
When there is more than one locale available for a given combination
of language, territory, and codeset, some of the locale names include a suffix
with the format @variant. To avoid problems with pathnames
constructed using the %L specifier, you usually assign a locale
name with an @ suffix only to the appropriate locale category variable
(or variables). For example:
Supporting different collation orders through one or more locales is
adequate for most languages. However, collation orders for Asian languages
require additional support for the following reasons:
For the preceding reasons, the asort command was developed
and is available when you install language variant subsets that support Asian
languages. The asort command uses, by default, the collating order
defined for the LC_COLLATE variable and supports all the flags
supported by the sort command. In addition, the asort
command includes the following flags:
This flag indicates that the sort operation should use special system
sort tables, along with sort tables produced by the cgen utility
to support user-defined characters. This flag overrides the sort sequence
defined in the locale specified by the LC_COLLATE variable.
This flag, which you can use only when you also specify the -C flag, implements breadth-first sorting.
Refer to the
When formatting reference pages that contain
ideographic characters, the nroff command treats each character
as a single word. A string of ideographic characters, including 2-byte letters
and punctuation characters, can be wrapped to the next line subject to the
following constraints:
The standard no-first, no-last character lists are defined in nroff catalog files. For lists of these characters, refer to the language-specific
user guides that are available on the CD-ROM from which you install
subsets for Asian-language support.
The no-first and no-last constraints exist
to prevent nroff from placing a punctuation mark or right parenthesis
at the beginning of a text line or placing a left parenthesis at the end of
a text line. You can turn the standard constraints on and off in source files
with the .ki and .ko commands, respectively.
You can also
define a private set of no-first and no-last characters with the following
command:
.kl 'no-first-list'no-last-list '
The parameters no-first-list and no-last-list
are strings of characters you should include in the no-first and no-last categories.
You cancel a private no-first and no-last list by entering a .kl
command with null strings as the parameters. For example:
Using the command .kl ''' restores use of the standard set
of no-first and no-last characters for the current locale.
The nroff command can format text so that it is justified or not justified
to the right margin. When text is justified to the right margin, nroff inserts spaces between words in the line. Ideographic characters, although
treated as words in most stages of the formatting process, differ in terms
of whether they can be delimited by spaces.The
characters that can be preceded by a space, followed by a space, or both are
listed in the language-specific user guides that are available on line when
you install language variant subsets of Digital UNIX. When right-justifying
text, the nroff command inserts spaces only at the following places:
In other cases, no space is inserted between consecutive ideographic
characters. Therefore, if a text line contains only ideographic characters,
it may not be justified to the right margin.
The tbl
command is frequently used along with the neqn (equation formatting
preprocessor) to filter input passed to the nroff command. In
such cases, specify tbl first to minimize the volume of data passed
through the pipes.
For example:
When printing text of an Asian language, you must use printer hardware
that supports the language.
In addition, the man command automatically applies codeset
conversion (assuming the availability of appropriate converters) when reference
page translations for a particular language are encoded in a codeset that
does not match the codeset of the user's locale. Refer to the
Users, the applications they run, or both may need to set the process
environment to a particular locale and use a data file created with a codeset
different from the one on which the locale is based. The data file in question
might be appropriate for a given language and in a codeset different from
the user's locale for one of the following reasons:
You can convert a data file from one codeset to another by using the iconv command or the iconv_open, iconv, and iconv_close functions. For example, the following command reads data
in the file accounts_local, which is encoded in the deckorean codeset; converts the data to the eucKR codeset; and appends
the results to the file accounts_central:
The iconv command assumes that a converter name adheres to
the following format:
from-codeset_ to-codeset
For the preceding example, the iconv command would search
for and use the /usr/lib/nls/loc/iconv/deckorean_eucKR converter.
Table 6-24 specifies the codeset conversions
that Digital UNIX supports for English data. The user guides for the language
variant subsets include tables with codeset conversions supported for Asian
languages.
For detailed information about the iconv command, refer to
the
6.12.4 Printing Commands and Printer Daemon
The versions
of the lp, lpc, lpq, lpr, lprm, and lpstat commands with support for local-language
printers use the same syntax as the default versions of the commands.
The
same is true for the lpd program that is indirectly invoked to
run the printer daemon. The difference between the default and enhanced versions
of the commands and printer daemon is that the enhanced versions can handle
features added to the print subsystem for Asian languages.
6.12.5 Font Handling for PostScript Printers
The fonts for
the Chinese or the Korean language do not fit in the memory of most PostScript
printers. Fonts for the Thai language and some European languages do fit in
memory, but are large enough that they cannot be downloaded together with
fonts for other languages. Therefore, Digital UNIX provides a mechanism for
selectively downloading fonts to PostScript printers. This section lists the
fonts available to support different locales. It also explains how the font
mechanism works and how you set up DEClaser 1152 and DEClaser 5100 printers
to use fonts for languages that require specialized printer support.
6.12.5.1 Choosing Fonts for Different Locales
To support
locales for most Asian and some European languages, you must set up PostScript
printers so that they can use the appropriate fonts. Fonts for locales based
on the ISO8859-1 and Kanji codesets are fonts that are built in to the DEClaser
1152 and DEClaser 5100 printers. However, locales based on other codesets
require fonts that need to be downloaded to the printer. Section 6.12.5.2
discusses font downloading in more detail. The following list associates
languages and codesets with the appropriate set of fonts:
Arial-Bold-ISOLatin2
Arial-BoldItalic-ISOLatin2
Arial-Italic-ISOLatin2
Arial-ISOLatin2
ArialNarrow-Bold-ISOLatin2
ArialNarrow-BoldItalic-ISOLatin2
ArialNarrow-Italic-ISOLatin2
ArialNarrow-ISOLatin2
BookAntiqua-Bold-ISOLatin2
BookAntiqua-BoldItalic-ISOLatin2
BookAntiqua-Italic-ISOLatin2
BookAntiqua-ISOLatin2
BookmanOldStyle-Bold-ISOLatin2
BookmanOldStyle-BoldItalic-ISOLatin2
BookmanOldStyle-Italic-ISOLatin2
BookmanOldStyle-ISOLatin2
CenturyGothic-Bold-ISOLatin2
CenturyGothic-BoldItalic-ISOLatin2
CenturyGothic-Italic-ISOLatin2
CenturyGothic-ISOLatin2
CenturySchoolbook-Bold-ISOLatin2
CenturySchoolbook-BoldItalic-ISOLatin2
CenturySchoolbook-Italic-ISOLatin2
CenturySchoolbook-Italic-ISOLatin2
CenturySchoolbook-ISOLatin2
Courier-Bold-ISOLatin2
Courier-BoldItalic-ISOLatin2
Courier-Italic-ISOLatin2
Courier-ISOLatin2
MonotypeCorsiva-ISOLatin2
TimesNewRoman-Bold-ISOLatin2
TimesNewRoman-BoldItalic-ISOLatin2
TimesNewRoman-Italic-ISOLatin2
TimesNewRoman-ISOLatin2
Arial-Bold-ISOLatinCyrillic
Arial-BoldInclined-ISOLatinCyrillic
Arial-Inclined-ISOLatinCyrillic
Arial-ISOLatinCyrillic
Courier-Bold-ISOLatinCyrillic
Courier-BoldInclined-ISOLatinCyrillic
Courier-Inclined-ISOLatinCyrillic
Courier-ISOLatinCyrillic
Nimrod-Bold-ISOLatinCyrillic
Nimrod-BoldInclined-ISOLatinCyrillic
Nimrod-Inclined-ISOLatinCyrillic
Nimrod-ISOLatinCyrillic
Plantin-Bold-ISOLatinCyrillic
Plantin-BoldInclined-ISOLatinCyrillic
Plantin-Inclined-ISOLatinCyrillic
Plantin-ISOLatinCyrillic
TimesNewRoman-Bold-ISOLatinCyrillic
TimesNewRoman-BoldInclined-ISOLatinCyrillic
TimesNewRoman-Inclined-ISOLatinCyrillic
TimesNewRoman-ISOLatinCyrillic
Arial-Bold-ISOLatinGreek
Arial-BoldInclined-ISOLatinGreek
Arial-Inclined-ISOLatinGreek
Arial-ISOLatinGreek
Courier-Bold-ISOLatinGreek
Courier-BoldInclined-ISOLatinGreek
Courier-Inclined-ISOLatinGreek
Courier-ISOLatinGreek
TimesNewRoman-Bold-ISOLatinGreek
TimesNewRoman-BoldInclined-ISOLatinGreek
TimesNewRoman-Inclined-ISOLatinGreek
TimesNewRoman-ISOLatinGreek
Arial-Bold-ISOLatin5
Arial-BoldItalic-ISOLatin5
Arial-Italic-ISOLatin5
Arial-ISOLatin5
ArialNarrow-Bold-ISOLatin5
ArialNarrow-BoldItalic-ISOLatin5
ArialNarrow-Italic-ISOLatin5
ArialNarrow-ISOLatin5
BookAntiqua-Bold-ISOLatin5
BookAntiqua-BoldItalic-ISOLatin5
BookAntiqua-Italic-ISOLatin5
BookAntiqua-ISOLatin5
BookmanOldStyle-Bold-ISOLatin5
BookmanOldStyle-BoldItalic-ISOLatin5
BookmanOldStyle-Italic-ISOLatin5
BookmanOldStyle-ISOLatin5
CenturyGothic-Bold-ISOLatin5
CenturyGothic-BoldItalic-ISOLatin5
CenturyGothic-Italic-ISOLatin5
CenturyGothic-ISOLatin5
CenturySchoolbook-Bold-ISOLatin5
CenturySchoolbook-BoldItalic-ISOLatin5
CenturySchoolbook-Italic-ISOLatin5
CenturySchoolbook-ISOLatin5
Courier-Bold-ISOLatin5
Courier-BoldItalic-ISOLatin5
Courier-Italic-ISOLatin5
Courier-ISOLatin5
MonotypeCorsiva-ISOLatin5
TimesNewRoman-Bold-ISOLatin5
TimesNewRoman-BoldItalic-ISOLatin5
TimesNewRoman-Italic-ISOLatin5
TimesNewRoman-ISOLatin5
Sung-Light-CNS11643
Hei-Light-CNS11643
XiSong-GB2312-80
Hei-GB2312-80
Munjo
AngsanaUPC-Bold
AngsanaUPC-BoldItalic
AngsanaUPC-Italic
AngsanaUPC-Light
CordiaUPC-Bold
CordiaUPC-BoldItalic
CordiaUPC-Italic
CordiaUPC-Light
EucrosiaUPC-Bold
EucrosiaUPC-BoldItalic
EucrosiaUPC-Italic
EucrosiaUPC-Light
FreesiaUPC-Bold
FreesiaUPC-BoldItalic
FreesiaUPC-Italic
FreesiaUPC-Light
IrisUPC-Bold
IrisUPC-BoldItalic
IrisUPC-Italic
IrisUPC-Light
JasmineUPC-Bold
JasmineUPC-BoldItalic
JasmineUPC-Italic
JasmineUPC-Light
KodchiangUPC-Bold
KodchiangUPC-BoldItalic
KodchiangUPC-Italic
KodchiangUPC-Light
LilyUPC-Bold
LilyUPC-BoldItalic
LilyUPC-Italic
LilyUPC-Light
WaterlilyUPC-Bold
WaterlilyUPC-BoldItalic
WaterlilyUPC-Italic
WaterlilyUPC-Light
YuccaUPC-Bold
YuccaUPC-BoldItalic
YuccaUPC-Italic
YuccaUPC-Light
6.12.5.2 Setting Up Print Queues With the pfsetup Command
The pfsetup utility is available to manage font downloading for print queues.
This command identifies the correct downloading mechanism through the print
filter name. The pfsetup command has the following format:
6.12.5.3 Downloading Fonts to the DEClaser 1152
A mechanism called font faulting works
around the problem of downloading very large fonts to the DEClaser 1152 printer.
Font faulting is similar to the on-demand loading (ODL) mechanism used to
load user-defined characters; in other words, a subset of fonts is in the
device's memory at any particular time and new fonts are swapped in as needed.Note
6.12.5.4 Downloading Fonts to the DEClaser 5100
For a DEClaser 5100
printer with a font disk, you can use the pfsetup command to download
any fonts installed on the printer's host system. The command prompts you
to verify that the printer has a font disk and then downloads the fonts you
choose (refer to Section 6.12.5.1 for lists of fonts
and to Section 6.12.5.2 for information about the pfsetup command). The number of fonts you can download is limited by
the amount of space available on the font disk. After fonts are downloaded,
the printer requires no additional setup to use them.
6.13 Using Mail in a Multilanguage Environment
Digital UNIX provides
enhanced versions of the following commands and utilities to handle languages
based on multibyte-character codesets:
sendmail(8), mailx(1), mh(1), comsat(8) reference pages for
more complete software descriptions.
6.13.1 The sendmail Utility
The sendmail utility, which is a back end to several user commands, can
be configured to pass only 7-bit data in accordance with the Simple Mail Transfer
Protocol (SMTP) or to pass 8-bit data as required for multibyte-character
support. By default, sendmail supports only 7-bit data. You can
configure sendmail to pass mail messages in 8-bit format
by using the /usr/sbin/wwsetup script or, in the Common Desktop
Environment, by clicking on the Mail option of the I18N Configuration application.
(The navigation path to the I18N Configuration application is Application
Manager -> System Administration -> Configuration -> I18N.)
Note
6.13.2 The mailx Command and MH Commands
Both the mailx command and all applicable commands in the MH system support the
conversion of mail messages between the mail interchange codeset (used to
transfer messages to some hosts) and a user's application codeset. For example,
if the mail interchange codeset is ISO-2022-JP and the application codeset
is eucJP, the mailx or MH command converts incoming messages to
the Japanese EUC codeset before displaying them.
Mime-Version: 1.0

Content-Type: TEXT/PLAIN; charset=ISO-2022-JP
Mime-Version: 1.0

Content-Type: TEXT/PLAIN; charset=X-dechanyu
6.13.3 The comsat Server
The comsat server, which notifies users of incoming mail messages, always attempts
to convert incoming mail messages from the mail interchange codeset to the
user's application codeset. The comsat server uses the following
values (in order of highest to lowest priority) to determine the codesets
that apply to a message:
6.14 Applying Sort Orders to Non-English Characters
The sort command sorts characters according
to the collation sequence defined for the current locale. A particular locale
can apply one set of collation rules to the associated character set. Multiple
locale names do exist, however, for the same combination of language, territory,
and character set. Most often, these variations exist to offer users the choice
of more than one collating sequence.
% setenv LANG zh_TW.eucTW

% setenv LC_COLLATE zh_TW.eucTW@radical
asort(1) reference page for more information about using
this command.
6.15 Processing Reference Pages in Languages Other Than English
Programmers who supply software
applications for UNIX systems frequently supply online reference pages (manpages)
to document the application and its components. UNIX text-processing commands
and utilities must be able to process translated versions of these reference
pages for applications sold to the international market. Enhanced versions
of the nroff, tbl, and man commands are included
in Digital UNIX to support this requirement.
6.15.1 The nroff Command
The nroff command includes the following
capabilities to support locales:
.kl '''
Note
6.15.2 The tbl Command
The tbl command preprocesses table formatting
commands within blocks delimited by the .TS and .TE
macros. The tbl command handles multibyte characters that can occur
in text of languages other than English.
% cd /usr/usr/share/ja_JP.deckanji/man/man1

% tbl od.1 | neqn | nroff -Tlpr -man -h | \
lpr -Pmyprinter
6.15.3 The man Command
The man command can handle multibyte characters
in reference page files.
By default, the man command automatically searches for
reference pages in the/usr/share/locale_name /man directory before searching the /usr/share/man and /usr/local/man directories. Therefore, if the LANG environment
variable is set to an installed locale and if reference page translations
are available for that locale, the man command automatically displays
reference pages in the appropriate language.man(1)
reference page for information about redefining the man command
search path and for more details about codeset conversion.
6.16 Converting Data Files from One Codeset to Another
Each locale is based on a specific codeset. Therefore, when an application
uses a file whose data is coded in one codeset and runs in a locale based
on another codeset, character interpretation may be meaningless. For example,
assume that a fictional language includes a character named "quo",
which is encoded as \031 in one codeset and \042 in another codeset. If the "quo"
character is stored in a data file as \031, the application that reads data
from that file should be running in the locale based on the same codeset.
Otherwise, \031 identifies a character other than "quo".
% iconv -f deckorean -t eucKR accounts_local \
>> accounts_central
The iconv command and associated
functions can use either an algorithmic converter or a table converter to
convert data. Algorithmic converters, if installed on your system, reside
in the /usr/lib/nls/loc/iconv directory; this directory is the
one searched first for a converter. Table converters, if installed on your
system, reside in the /usr/lib/nls/loc/iconvTable directory.
The value of the LOCPATH variable, if defined, overrides the command's
default search path.iconv(1) and iconv_intro(5) reference pages. For information on
functions that programs can use to perform codeset conversion, refer to the iconv_open(3), iconv(3),
and iconv_close(3) reference pages.
| Codeset | ASCII-GR | ISO8859-1 | ISO8859-1-GL | ISO8859-1-GR |
|---|---|---|---|---|
| ASCII-GR | - | Yes | No | No |
| ISO8859-1 | Yes | - | Yes | Yes |
| ISO8859-1-GL | No | Yes | - | No |
| ISO8859-1-GR | No | Yes | No | - |
The operating system includes the multilingual Emacs
software from the Free Software Foundation. Before using this editor, you
must add the /usr/i18n/mule/bin directory to your process-specific
search path. You can then invoke this editor by using the mule
command.
The vi and more commands discard
text that follows an invalid multibyte character. If you encounter this problem,
it is likely that your locale setting is not correct for the text being viewed
or edited. In this case, reset your locale to one that matches the text and
invoke the command again.
When used with Thai characters, vi may wrap lines before
the right boundary of the screen. This happens because Thai text includes
nonspacing characters, which contribute to the character count but not to
display width. The editor wraps lines based on character count. For example, vi may wrap a line after entry of 80 characters, even though these characters
do not occupy 80 columns on the screen.
It is a limitation
of UNIX file systems that you cannot use a multibyte character whose second
or subsequent byte is an ASCII slash (/) in names of files, users,
or other objects. For portability reasons, Digital recommends that you avoid
using multibyte characters in these names.
The X Server font-cache mechanism allows you to change the number of
cache units and the size of these units to best accommodate the character
sets used in displays. You will probably need to change the default values
set for cache parameters to achieve the best performance from your system
if it will display Asian-language text. Consider the following criteria when
deciding on the optimal values for font caching:
If you intend to work with several ideographic languages during the
same DECwindows Motif session, you need larger values for acceptable performance.
Variation in font number and size depends partly on the kinds of applications
you run. A desktop publishing application typically requires more fonts than
other types of applications whereas a software development tool requires fewer.
In Asian languages, only a subset of characters are used frequently.
The size of this subset varies from one language to another. For example,
around 20,000 standard characters are supported for Taiwan but only 5,000
of those characters are used frequently. Estimates for the number of frequently
used characters for other Asian countries is as follows: People's Republic
of China (3000), Korea (2000), and Japan (2000). Font-cache parameters are
tuned to accommodate the subset of characters that are used frequently.
To
change the cache size (which is the number of cache units) and the size of
each cache unit, you must modify the X Server configuration file /usr/lib/X11/xdm/Xservers. This file contains a line, similar to the following one, that starts
the X Server:
You can modify this line to add definitions for cache size and unit
size. For example:
:0 local /usr/bin/X11/X -cs cache_size -cu unit_size
Table 6-25 describes the options that
tune the font-cache mechanism.
6.17 Miscellaneous Information for Base System Commands
The following list includes information about features and restrictions
that apply when using traditional UNIX commands in local-language environments:
6.18 Using Language Support Enhancements for DECwindows Motif Applications
In the DECwindows Motif environment, you use versions of
DECwindows Motif fonts, codesets, servers, and applications that support features
discussed in earlier sections of this chapter. This section provides more
detail on using DECwindows Motif with Asian languages. Topics include:
6.18.1 Tuning the X Server for Ideographic Languages
Asian languages have large
ideographic character sets, so all characters needed for display are not loaded
into memory at the same time. Instead, only as many characters as will fit
in the memory cache are simultaneously loaded. When characters needed for
display are not currently cached in memory, the least recently used font glyphs
are removed from the cache to make room. The font-cache mechanism allows
you to display ideographic text in multiple typefaces, font sizes, and font
styles without increasing the amount of memory that systems must have to support
ideographic languages.
:0 local /usr/bin/X11/X
Font caching applies only to uncompressed fonts in pcf format. Font caching is not applied to any compressed fonts or to fonts in bdf format. Because font caching cannot be used with compressed fonts, the 2-byte fonts for Asian languages are not installed in compressed format. Note
You can calculate cache unit size with the following formula:
Consider the following calculation for a typical font size of 24x24:
For 34x34 fonts, the unit size calculation would yield 272 bytes.
Given that 96 bytes are needed to cache a 24x24 font glyph and 272 bytes
is needed to cache a 34x34 font glyph, the default unit size of 128 has the
following implications:
Small fonts (whose characters require a single, 128-byte unit) are used
more frequently for displaying ideographic characters. Therefore, you usually
have to change only the cache size to achieve acceptable performance in text
displays of languages with ideographic characters.
In addition, you must specify the paths for the PostScript font files
in the catalogue list in the same configuration file. Double-byte
PostScript fonts for the Asian languages are available in the following directories:
Each font in these directories has the following components:
This header file is the only file that must be listed in the fonts.dir file in the font directory.
The renderer for Asian double-byte PostScript fonts uses its
own configuration file that specifies the following information:
The default pathname for this configuration file is /var/X11/renderer/DECpscf_config; however, you can change this path by setting the DECPSCF_CONFIG_PATH environment variable.
The UDC font renderer can be set up for use either through the X Server
or the font server as follows:
In addition, you must specify the path to the UDC database in the catalogue list of the same configuration file. This path should be set
to the top directory for the UDC database. For example, /var/i18n/udc is the correct path for a systemwide UDC database if the database was
set up in the default directory.
To process UDC characters in a particular language, the font renderer
also requires entries in the fonts.dir file in the appropriate
PostScript font directory from the following list:
Edit the fonts.dir file to specify virtual file names in
the format locale_name.udc followed by the corresponding
XLFD names registered for the codesets. The following table shows the XLFD
entry that corresponds to different Asian codesets.
The following sections explain how to work around the preceding restrictions
for the DECwindows Motif environment.
The MwmFontSetup script:
At this point, you can select the EXIT option to exit from the procedure.
Note that the MwmFontSetup is useful only in the DECwindows Motif environment. In
the Common Desktop Environment, applications access fonts through alias names
that are mapped to the real names of the fonts. Font alias files must exist
for each supported locale. For example, the font alias files for Japanese
Extended UNIX Code are /usr/dt/config/xfonts/ja_JP.eucJP/75dpi/fonts.alias, /usr/dt/config/xfonts/ja_JP.eucJP/100dpi/fonts.alias, and /usr/dt/config/ja_JP.eucJP/sys.font. These alias files are installed
when Digital UNIX software for Japanese language support is installed.
The system where Asian-language subsets are installed may function as
a client in a client-server display environment. In this case, the local-language
fonts must also be available to the Motif Window Managers for all the server
systems where native language text is displayed. You need to install fonts
for other locales either on individual systems used for remote login to the
system where language variant subsets are installed or make the fonts known
to the other systems through a font server. Table 6-27, Table 6-28, Table 6-30, Table 6-31, Table 6-32,
and Table 6-33 describe the fonts used to display
text in various local languages.
You can use the /usr/bin/X11/xlsfonts
command to determine which fonts are currently installed on a system.
unit_size =
((floor(ceil((double)WIDTH / 8.0) /4.0)) + 1.0) * 4.0 * (double)HEIGHT
unit_size in bytes
= ((floor(ceil((double) 24 / 8.0 / 4.0)) + 1.0) * 4.0 * (double) 24
= 96
6.18.2 Using Font Renderers for Multibyte PostScript Fonts
The operating
sytem includes font renderers that allow any X application to use the PostScript
fonts available for the Chinese and Korean languages. The system administrator
can set up font renderers for the following kinds of fonts for use through
the X Server or the font server:
6.18.2.1 Setting Up the Font Renderer for Double-Byte PostScript Fonts
The font renderer for Chinese and Korean PostScript fonts can be set up
for use either through the X Server or the font server by editing the appropriate
configuration file:
renderers = other_renderer, other_renderer,...
     libfr_DECpscf.so;DECpscfRegisterFontFileFunctions
/usr/i18n/lib/X11/fonts/KoreanPS
/usr/i18n/lib/X11/fonts/SChinesePS
/usr/i18n/lib/X11/fonts/TChinesePS
6.18.2.2 Setting Up the Font Renderer for UDC Fonts
The UDC font renderer
accesses the UDC database directly to obtain font glyphs. Therefore, X applications
that use this renderer do not need to use .pcf files generated
by the cgen utility.
renderers = other_renderer, other_renderer,...
     libfr_UDC.so;UDCRegisterFontFileFunctions
/usr/i18n/lib/X11/fonts/SChinesePS
/usr/i18n/lib/X11/fonts/TChinesePS
Codeset XLFD Registry Name
dechanyu, eucTW
DEC.CNS11643.1986-UDC
big5
BIG5-UDC
dechanzi
GB2312.1980-UDC
deckanji, sdeckanji, eucJP
JISX.UDC-1
The following example entry is appropriate for the fonts.dir
file in the /usr/i18n/lib/X11/fonts/TChinesePS directory:
2
zh_TW.dechanyu.udc -system-decwin-normal-r--24-240-75-75-m-24-DEC.CNS11643.1986-UDC
zh_TW.big5.udc -system-decwin-normal-r--24-240-75-75-m-24-BIG5-UDC
6.18.3 Changing the Language of the Start Session Window
The language of
the window used to resume your session when it is in pause state is determined
by the current language setting for your session. However, you must set the
language of the Start Session window where you log in to your workstation
by modifying the X Display Manager configuration file /usr/var/X11/xdm/xdm-config. In this file, define the entry for the DisplayManager*language resource to be a locale for the language you want. The following example
sets this resource to a locale for Japanese:
DisplayManager*language: ja_JP.sdeckanji
6.18.4 Setting Fonts for Display of Local Languages
The system
where you install language variant subsets is automatically updated with fonts
required for text display in the supported languages. Usually, the new fonts
are also added to the font list in the systemwide resource file /usr/lib/X11/app-defaults/Mwm that the local Motif Window Manager uses. This automatic update procedure
is sufficient, except when:
6.18.4.1 Using MwmFontSetup to Update a Private Mwm File
Currently, the subsets that support Japanese
and Hebrew install a language-specific version of the systemwide Mwm resource file. Therefore, if you need access to Japanese or Hebrew
fonts along with access to fonts that support other languages, you cannot
rely on the systemwide Mwm file and must update the font list in
your private Mwm file. You can run the /usr/i18n/usr/bin/X11/MwmFontSetup script to add or remove language-specific fonts from the font list
in $HOME/Mwm.
6.18.4.2 Accessing Local Language Fonts for Remote Displays
The information in this section is appropriate for the DECwindows Motif
environment. In the Common Desktop Environment, fonts are mapped to generic
alias names.
Color monitor: /usr/lib/X11/app-defaults/Mwm
Black-and-white monitor: /usr/lib/X11/app-defaults/Mwm_bw
Gray-scale monitor: /usr/lib/X11/app-defaults/Mwm_gray
Color monitor: $HOME/Mwm
Black-and-white monitor: $HOME/Mwm_bw
Gray-scale monitor: $HOME/Mwm_gray
If users remotely log on to their home systems, where language variant subsets are installed and where they have run the MwmFontSetup script, their private Mwm resource files may already list the fonts moved to the display systems. Refer to Section 6.18.4.1 for information about the MwmFontSetup script.
Fine Font is available for Japanese and Thai only.
German Standard Font is not supported when a DECterm window emulates
a terminal that supports ideographic characters. For other ISO Latin character
sets, the size options are the same as those offered for standard DECterm
software.
Resource files should
not be shared among locales. Therefore, do not save any application's resource
file in one locale and attempt to use the same resource file when invoking
the application in another locale.
For example, an input method server is killed if it was being run on
a remote system that shut down.
If the connection between a DECterm window and the input method server
was broken, you can first try to reconnect to the server by selecting the
Reset Terminal item from the window's Commands menu. Alternatively, you can
start the input method server and then create another DECterm window where
you can use the input method.
For information about terminal programming enhancements that applications
can use to draw ruled lines on a DECterm window, see Section 4.2.
The viewer works with converters that convert files from one data format
to another.
If you want to view or convert text files that contain Asian-language
characters, you must specify an option file to the CDA viewer and converters.
This file must contain an entry to identify the codeset that applies to the
text file being viewed, converted, or both. An option entry for text files
starts with the keyword text. For Asian-language text files, this
entry line must specify the appropriate character encoding (text_encoding). The following example is appropriate for a Japanese text file encoded
in DEC Kanji:
By convention, option files use the file extension .cda_options, so an appropriate name for the options file with the preceding entry
might be japanese.cda_options.
The following table lists the supported encodings for text files used
with CDA viewers and converters.
6.18.5 Customizing the DECterm Window for Local Languages
The following features and restrictions apply to DECterm windows
that you create when an Asian language is specified for the language setting:
6.18.6 Using the CDA Viewer and Converters with Asian Language Text
The CDA viewer is a DECwindows Motif application
that lets you display the contents of compound documents and graphics, image
files, and text files that contain ideographic characters. The viewer also
supports PostScript files; however, PostScript display is supported only for
languages with single-byte characters.
text text_encoding dec_kanji
| Language | Codeset | text_encoding Keyword |
|---|---|---|
| Chinese (Simplified) | DEC Hanzi | dec_hanzi |
| Chinese (Traditional) | DEC Hanyu | dec_hanyu |
| Japanese | DEC Kanji | dec_kanji |
| Korean | DEC Hangul (Korean) | dec_hangul |
You specify an options file to CDA
commands with the -O flag. The following example shows how
to invoke the CDA viewer for the DECwindows Motif environment to display a
Japanese text file named ja_document.txt:
The following example shows how to invoke a CDA converter
to convert the same Japanese text file to ddif format:
After the text file is converted to ddif format, you can
convert the ddif file to a PostScript file, as follows:
Your system
should have the required fonts installed if you are using the CDA converter
to produce a PostScript file with Asian-language characters. The following
table lists the basic fonts that the CDA converter uses for different Asian
languages.
% dxvdoc -f text -O japanese.cda_options \
ja_document.txt
% cdoc -s text -O japanese.cda_options \
-o ja_document.ddif ja_document.txt
% cdoc -d ps -o ja_document.ps ja_document.ddif
| Language | Basic Font |
|---|---|
| Korean | Munjo |
| Hanyu | Sung-Light-CNS11643 or Sung-Light-DTSCS |
| Hanzi | XiSong-GB2312-80 |
| Japanese | Ryumin-Light-EUC-H or Ryumin-Light.Hankaku |
If the preceding fonts do not exist on the system, the converter uses Courier font.
As an alternative to the option file mechanism for specifying the encoding of input text files, you can define the environment variables DDIF_READ_TEXT_GL and DDIF_READ_TEXT_GR. The following table lists the supported values and associated encoding for these variables:
| DDIF_READ_TEXT_GL | DDIF_READ_TEXT_GR | Encoding |
|---|---|---|
| LATIN1 | MCS | MCS |
| LATIN1 | LATIN1 | ISO Latin-1 |
| LATIN1 | KATAKANA | ASCII-Kana |
| LATIN1 | KANJI | DEC Kanji |
| ROMAN | MCS | Roman-MCS |
| ROMAN | LATIN1 | Roman |
| ROMAN | KANJI | Roman-Kanji |
| ROMAN | KATAKANA | Roman-Kana |
| LATIN1 | HANZI | DEC Hanzi |
| LATIN1 | HANGUL | DEC Hangul (Korean) |
| LATIN1 | HANYU | DEC Hanyu |
The CDA converter does not support vertical writing. Therefore, vertical text prints horizontally in files produced by the converter. Note
For complete information about CDA viewers and converters, refer to
the cda(4) reference page. The cda(4) reference page also lists additional
reference pages that describe specific CDA commands. Only a few of those commands
and their options have been described here.