Upsize for Word 2010
An Word Plugin to Assist with Document Resizing
User Guide
Introduction
Upsize is a plug-in for Microsoft Word 2010 that provides a set of tools to assist users to resizing documents for visually impaired readers.
It is currently under development at the University of Auckland.
Current features include:
- Text enlargement
- Font replacement and alignment adjustment
- Removal and replacement of text formatting such as italics
- Page splitting tools to allow the resizing to be done page by page, so that changes do not cascade through the document
- Automatic insertion of original page numbers
- Tools for page rotation and margin adjustment
Please click on the link below for instructions on Installation:
http://www.cs.auckland.ac.nz/upsize/download.html
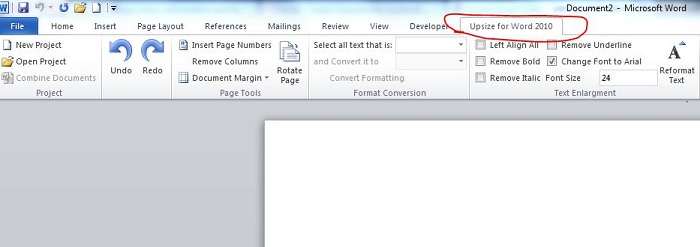
Text Reformatting
Upsize can automatically change the text size and font of a document's text. The text can be changed to a variety of different styles based on your settings.
When reformatting text you have two options, reformatting all the text in the document or only the selected text. Reformatting all the text is the default - check that no text is selected and click the "Reformat Text" button. The text will then be reformatted based on the settings entered. If some text is selected the reformatting will be applied to the selected text only.
The options available for text reformatting are:
- Left Align all - Changes the alignment of all text to left align
- Remove Bold, Italic and Underline - Removes all of the selected formatting from the text being reformatted
- Change Font to Arial - Replaces all fonts with Arial font
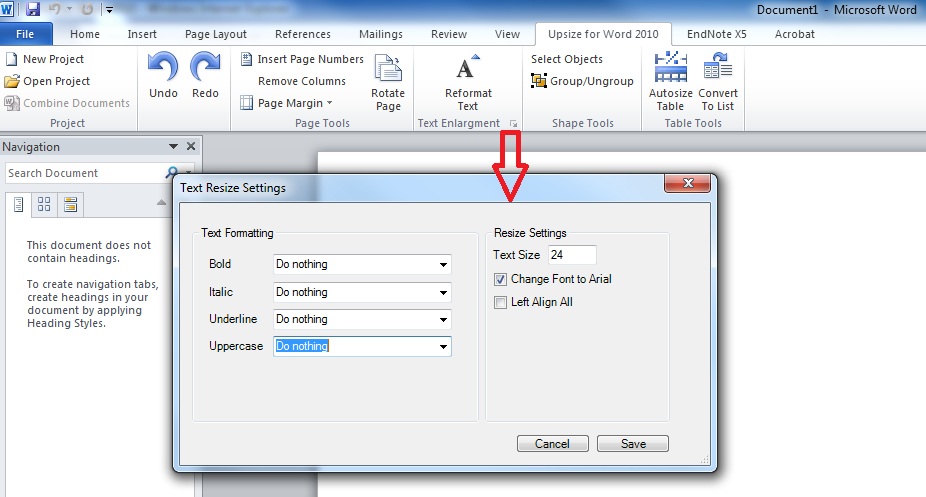
Format Conversion
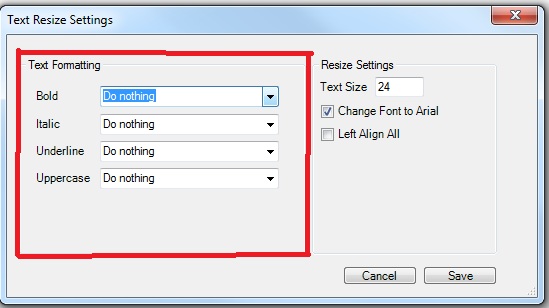
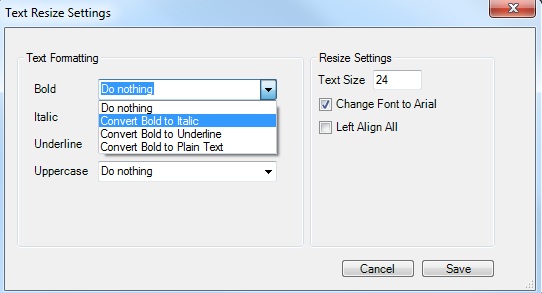

Upsize has the ability to find and replace specific formats. To use this tool on the Upsize ribbon select the format you want to replace from the drop down box 'Select all text that is:' (bold etc). Then select the format you want to replace it with from the dropdown box 'and Convert it to'. Finally select the 'Convert Formatting' button. All the text of specified format will be found and reformatted.
Currently supported format replacement is: "Bold", "Italic", "Underline" and "Uppercase"
Page Number Insertion
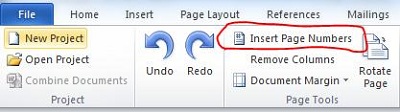
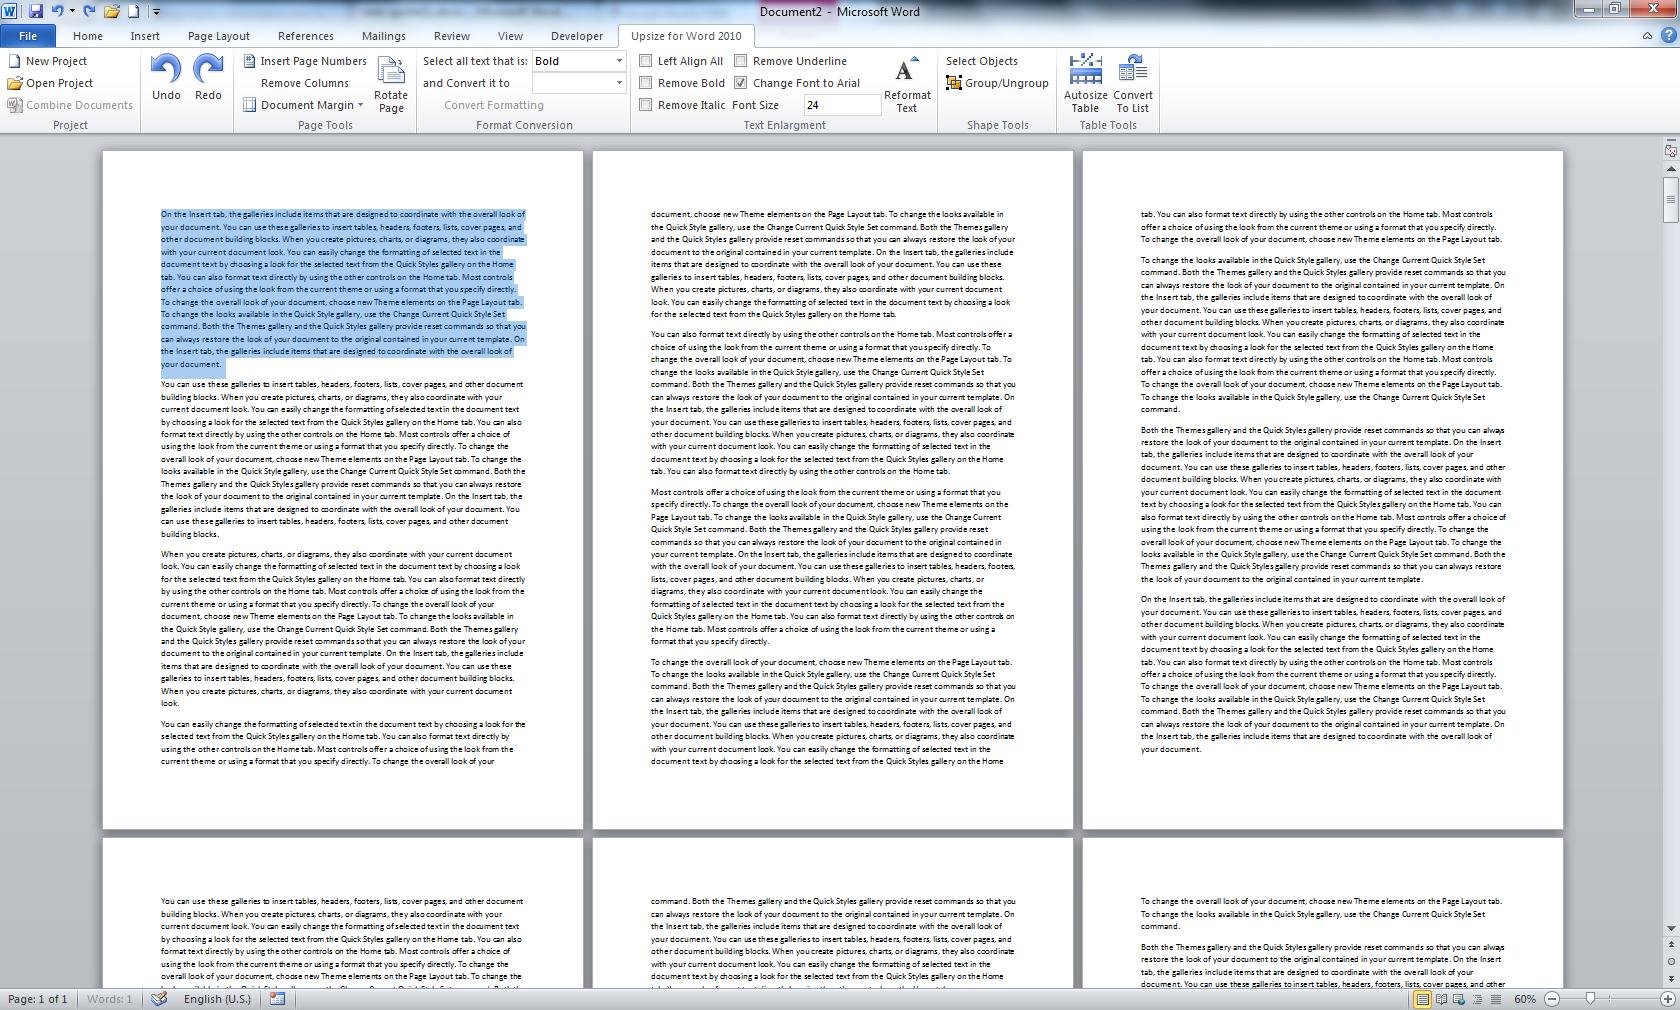
Upsize has the ability to automatically insert page numbers, there are two different methods to do this. The first is as a part of the page splitting tools and is better suited for large documents (See Page Splitting and Joining for more information). The second technique is to use the button Insert Page Numbers found on the Upsize ribbon shown in the figure above, by clicking this button upsize will automatically add page numbers at the top of each page as shown in the figure below. Note:To retain the original page numbers page numbering should be done before any other reformatting.

Page Rotation
Rotating specific pages in word can be quite difficult; Upsize provides a simple method to rotate pages. Rotation acts differently based on the users selection, if you select a specific section of text and use the rotate page tool, the text selected will be placed on a new page, this is shown by the figures below where the highlighted text is moved onto a new section as shown on the right.
The second form of rotation is page rotation, this is where the page the user's caret (Symbol that flashes to show where text will be entered) determines which page to rotate. The entire page is rotated. This generally results in the page being rotated spilling onto another page. Upsize automatically adds a new page if required (as shown below).

Object Selection
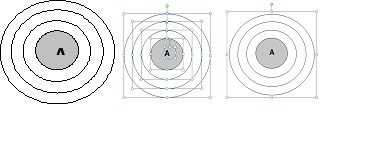
Upsize can assist resizing related objects such as the left diagram shown above. Resizing is more effective if the objects are grouped and you resize the group. To group related objects select any of the components in a diagram, and click the Select Objects button. Upsize will automatically select any objects that overlap with the current object. It is possible that objects may be missed or erroneously included in the group. Objects can be added or removed from the group by holding down the CTRL key and clicking on the object to be added or removed. Once all the objects of interest are selected (middle image above) click the Group button. The group will then have a single frame around it. Use this frame to resize the group.
Page Splitting and Joining
Creating a Resizing Project
For large documents Upsize can break down the document into a series of smaller sections which are easier to resize. These sections are the different pages of the original document, isolated from each other. Upsize stores all the pages and the resizing information in a file with a .wrp (Word Resizing Project) extension. Unfortunately you cannot open a .wrp file by clicking it; you must open word and open it from the upsize ribbon.
To split a document into separate pages, Open the desired document and on the Upsize ribbon select the New Project button.

A dialog will ask you whether you want to insert page numbers, if you do then click yes otherwise no. Once you have selected whether or not to insert page numbers the screen may flash several times and you should see the loading bar progress (Note: If this process takes too long then your document may not be compatible with this feature, see FAQ for more details). Eventually the system should ask you for a file name to save the Document Resizing Project, as shown in the figure below.
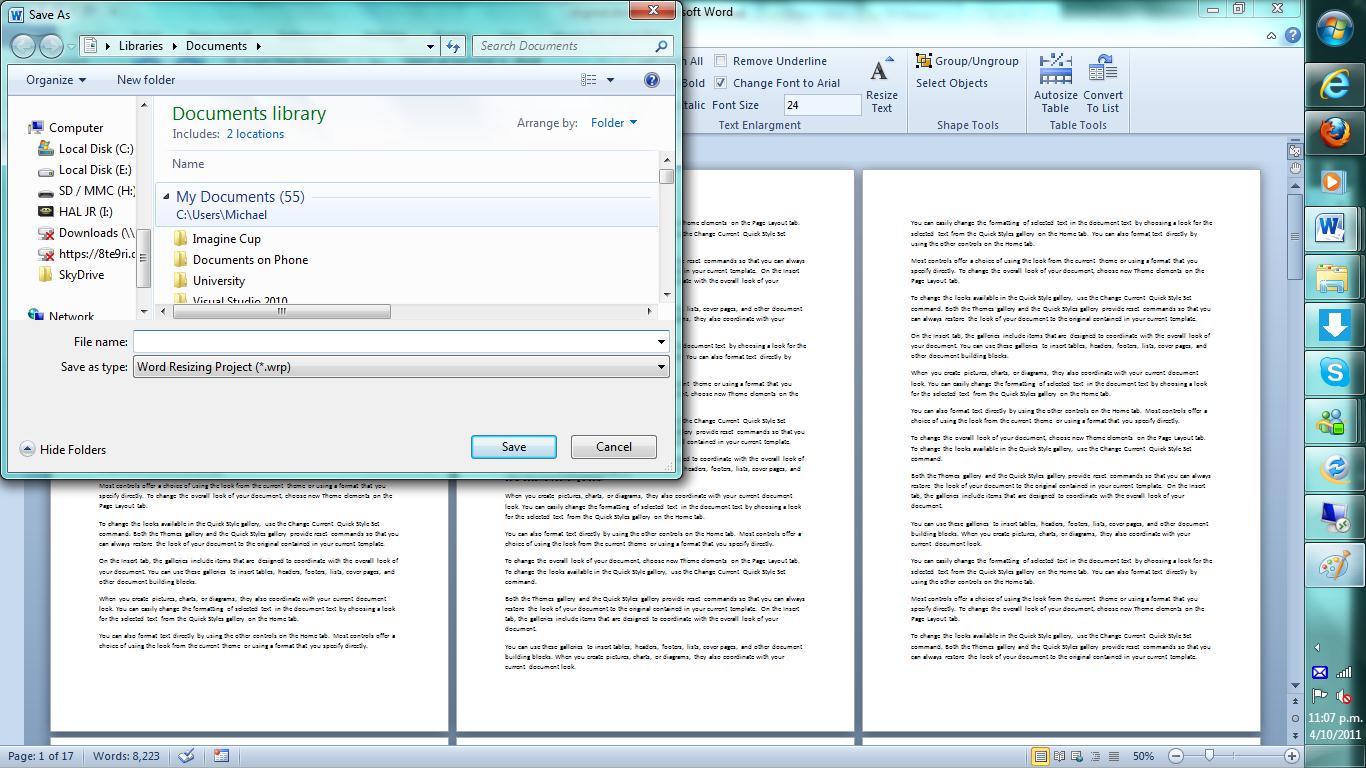
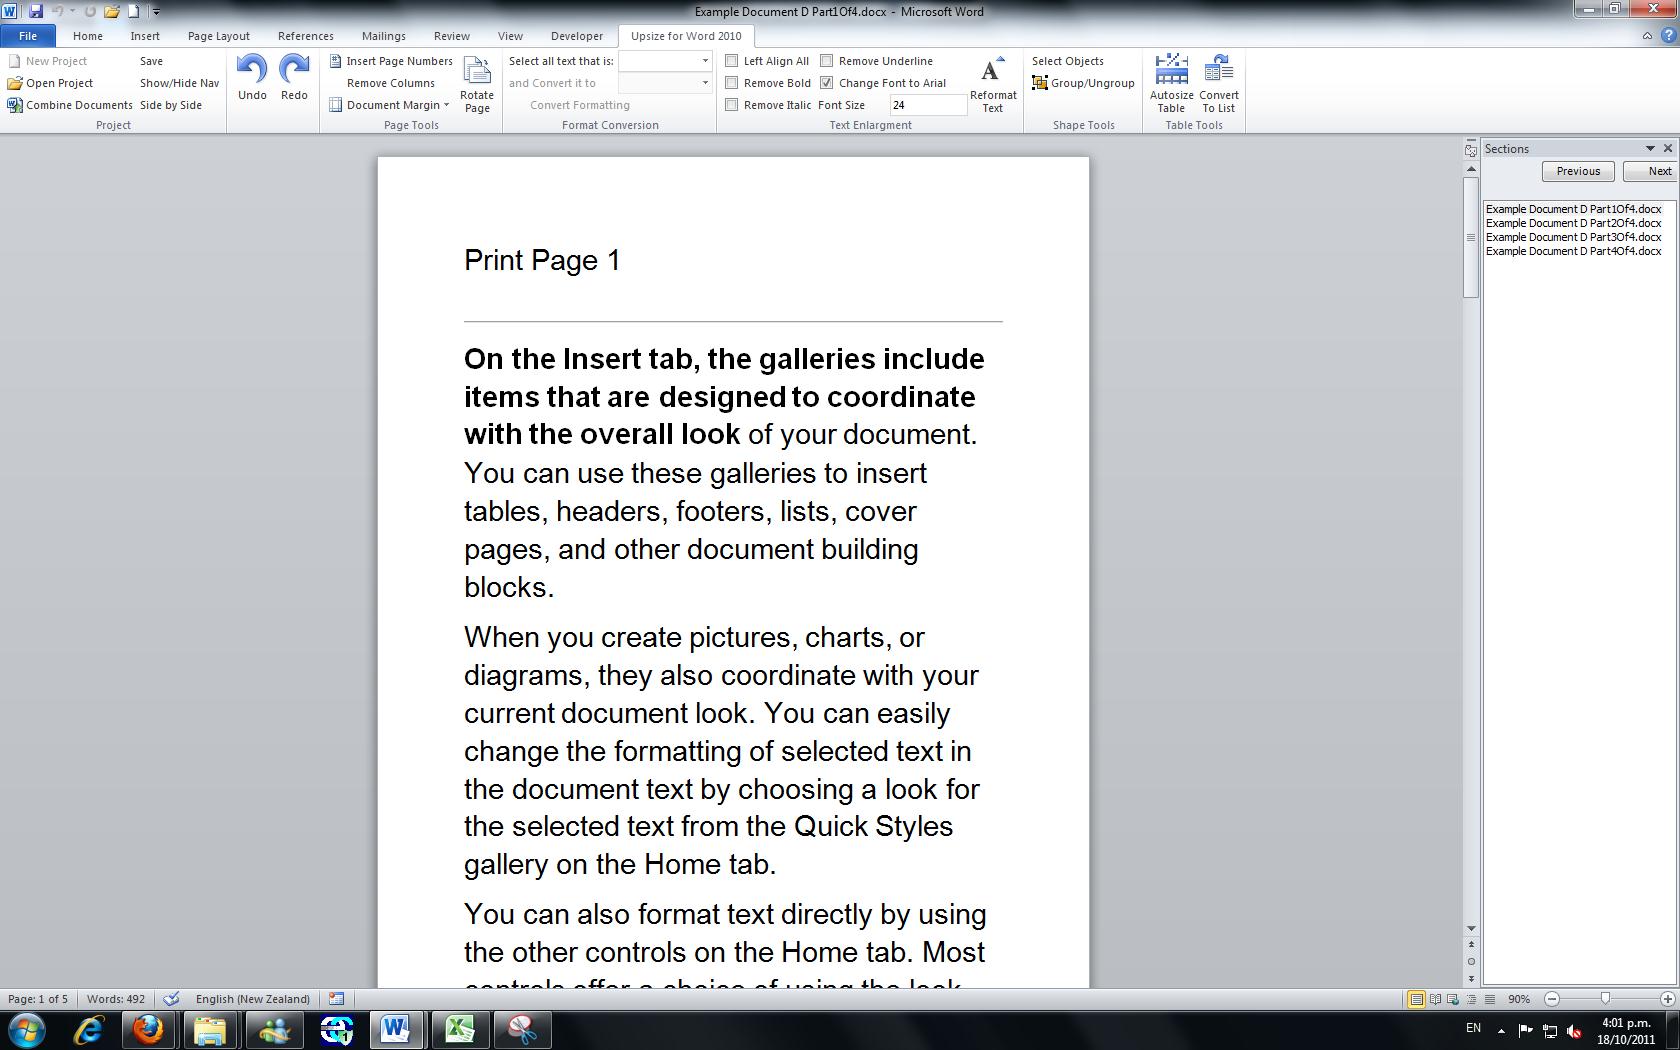
Once you enter the filename and location to save this resizing project, a single page from the original document will be visible, like the one shown below, with a sections panel on the right of the window.
Navigating through a resizing project
Inside a project you are able to resize each original page of the document in isolation
To navigate between the different original pages of the document use the sections panel. The sections represent the original pages of the document, any resizing operations you make are only applied to the current section . This makes it easy to resize pages individually without the affects of one resize damaging another section. You can navigate between sections of the document by either selecting it from the list or by using the previous and next buttons.

Finishing a Resizing project
Once the entire document has been resized to rejoin the document into a single file, select the Complete Project button from the Upsize ribbon. After a brief loading period the combined document should be displayed.
Opening an Resizing Project
To open an existing resizing project, Open Word and go to the Upsize toolbar, select Open Project and navigate to the .wrp file of the resizing project and select open.
Upsize will automatically connect to the internet once a week to look for updates, if you wish to manually update then run setup.exe located on www.cs.auckland.ac.nz/upsize/downloads/setup.exe
To uninstall upsize, close Microsoft word, and follow the steps below:
Step 1) Go to control panel
Step 2) Select 'Uninstall a Program'
Step 3) From the list select 'Upsize' (possibly 'document resizing' in earlier version) and click uninstall
We would appreciate any comments, ideas or bugs to be emailed to us. Please email upsize@auckland.ac.nz
In the event that the documents are too large for email (greater than 5mb) then please use https://webdropoff.auckland.ac.nz/cgi-bin/dropoff
We are especially interested in seeing the differences in documents before and after the resizing process.
If you experience any bugs when using upsize, please email us the document, wrp file (if possible) and a description of the problem that occurred.
Please click on the link below for a list of Frequently Asked Questions:
http://www.cs.auckland.ac.nz/upsize/faq.html