Data Coding and Transmission :
Go to the description of the applet
Applet to demonstrate Digital Coding and Transmission
Dr P.M. Fenwick, Computer Science, The University of Auckland, March 2000
Description of the Applet
This applet demonstrates coding techniques for digital data transmission (or recording) and
transmission in the presence of noise.
It provides a wide variety of digital encoding methods, a variety of noise levels and adjustable
bandwidth or transmission response.
Signal flow and page layout.
- The left hand side of the applet panel consists of a sequence of five panels or screens showing
the signal as it progresses through the system.
Most screens have a pull-down menu which selects appropriate options.
- At the very top is a data input area and related controls.
- On the right hand side is first a scroll bar which controls the expansion of the data displays
(or the number of bits displayed), and below a second scroll bar which controls the transmission
bandwidth or filter.
- Finally, at the bottom right, is an "eye diagram" of the "received" data.
Details of each section.
- Data Input
. At the very top is the data input area, into which data may be entered in
either binary or hexadecimal, controlled by the BIN/HEX menu just to the right.
Spaces may be used as desired to improve readability and hexadecimal input may use either upper
case or lower case for the digits 'A' ... 'F'.
Mostly though you will just click the "Random" button at the extreme right to generate random data.
This is displayed in the input area.
Below the text input area is a waveform of the data.
Time proceeds from earlier on the left to later on the right, with the time scale controlled by the
"Bit Clock Interval" scroll bar to the right.
This same time scale or expansion is used for all of the following displays (but not the eye
diagram). Some of you may recognise this as an oscilloscope display.
- Initial recoding
.
The only function of this stage is to perform a 4B/5B recoding, as needed for FDDI transmission.
Strictly, it is inappropriate to any other transmission (but is interesting to try!)
In 4B/5B recoding 4-bit "nibbles" are changed into carefully-chosen 5-bit codes for transmission.
This gives a controlled frequency of 0/1 transitions to allow higher speed operation. it also
provides several "non-data" codes for transmission control, data framing and so on.
If 4B/5B coding is selected the displays have vertical bars to show the boundaries between the
4-bit or 5-bit units.
- Final Coding
. This section provides a wide variety of methods for encoding digital data
for transmission.
- none
. Just what it says, the output is unchanged from the input
- RZ (Return To Zero)
. The signal always returns to zero before the end of a bit period.
A 0 bit is represented by all-0, while a 1 is a pulse to the 1 level, and back to 0.
- NRZI (Non Return To Zero - Inverted)
There is a change of output (0 to 1, or 1 to 0)
whenever the input data has a 0 bit.
A sequence of 1s in the input gives no change to the output, while a sequence of 0s gives a
change for every bit.
- NRZ1 (Non Return to Zero - One)
This is similar to NRZI, except that the change occurs
for input 1s, while input 0s give no change.
It is very easy to confuse NRZI and NRZ1; they are very similar in operation and also very
similar when written.
- PE (Phase Encoding
) This is identical to Manchester coding, described next.
- Manchester
. The centre of every bit cell has a transition, to the value of the bit.
Thus a 0 data bit has a 1 to 0 transition in the middle of the cell, while a 1 has a 0 to 1
transition.
In contrast to the earlier methods which must somehow derive a separate clock to time each bit,
Manchester coding is "self-clocking" with clock information included in the code.
The display has small blue "tick" marks to show the bit-cell boundaries.
- Differential Manchester
. Traditional Manchester coding is not suitable for sending data of
twisted pairs; if the pairs become reversed, then so is the data.
Differential Manchester coding overcomes this problem by encoding at the boundary between
bit cells.
There is still a transition at the middle of every bit cell.
If the cell represents a 0 data bit, the bit cell always starts with a transition, while a 1
data bit has no transition between the previous cell and current cell.
The display has small blue "tick" marks to show the bit-cell boundaries.
- Modified FM
. A major problem with Manchester codings is the high frequency of transitions
and consequent need for a high transmission bandwidth. The MFM code (or Miller code) reduces
this problem.
A 1 bit always has a change in the middle of the bit cell two consecutive 0s have
a change between cells and a 10 has no change between cells.
The display has small blue "tick" marks to show the bit-cell boundaries.
- Signal to Noise ratio
. Once the signal has been encoded according to digital rules, we now
move into the analogue domain and add noise to it.
The noise level may be varied in steps of 5dB from +5dB (which usually overwhelms the signal)
to -40dB (which is just invisible on this scale).
(A new noise pattern is generated whenever the display changes.)
- Transmission
. We then put the noisy digital signal through a transmission system of finite
bandwidth which reduces the noise and smooths out the steps in the digital waveform (actually
the same thing).
Three options are available -- one with no filtering at all (technically a delta function,
but you don't need to know that), a "square" filter which just averages adjacent values (and
should not be used), and one with a Gaussian filter which emphasises "central values" with a
smooth decrease to values further away.
The Gaussian filter is a reasonable approximation to real transmission systems.
The width of the filter is controlled by the slider in the middle-right of the screen,
with the actual "weighting function" displayed in the window below.
The wider the window, the greater the smoothing.
Eye diagram.
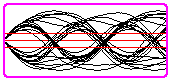
The eye diagram is a standard method of evaluating noisy data transmission.
An oscilloscope is triggered by the signal and set to display just a few data bits.
Many traces, for many data bits, overlay each other on the display.
Any noise in the signal tends to move individual traces vertically and horizontally, giving broad
bands of possible signals.
With luck, or low noise, or good design, there will be eye-shaped areas along the central axis
where the signal never occurs.
If these coincide with the clock times at which the signal is sampled we will get reliable
conversion back to digital.
If any signals encroach on these areas we may get transmission errors.
The eye diagram is drawn with horizontal lines corresponding to +/- 10% of the total display
height; the signal should remain outside these areas for reliable operation.
Note that the eye diagram has a constant width in bit-periods and is largely independent of the
"Bit-clock Interval" control which affects the other displays.
- The eye diagram sometimes has a peculiar grainy appearance if pixels from the transmission
window must be expanded to several display pixels in the eye diagram.
This happens if there is no smoothing or filtering and the main displays are set for minimum
expansion (clock interval slider to the left).
- Sometimes there are odd single traces "wandering" along the eye diagram and clearly different
from those in the main display.
I think that these come from poor handling around the extreme end of the data display (it
actually goes on for several thousand pixels, but most displays include only a few hundred).
I have not yet found the problem. Try to ignore them.