

![]()


Contents
Overview……………………………………. 3
Operation…………………………………… 4
Introduction
to Features…………………... 6
Introduction
to Internet Enabled…………. 7
Features
Switching
Views…………………………… 8
Work Centre
Collapse/Show……………... 10
Change background
colours……………... 11
Change work
order colours………………. 13
Detailed
Tool tips………………………...... 15
Drag and
Drop……………………………... 17
Internet
Enabled…………………………… 19
Glossary……………………………………. 21
![]()
This user manual is to
guide the user through the visual production scheduling system (VPSS). The
intended users of this manual are users of Walstan Systems’ Beacon for Business
software package. This manual has been
created in conjunction with the
October 2004
Visual Production
Scheduling System (VPSS) User Manual
Overview
Welcome
to the VPSS user manual. The VPSS
application has been created to reduce the time it takes to manage the
production schedule. For this reason the
application consists of features and operations that are vital for quick and
efficient production scheduling.
The
VPSS user manual consists of a list of features and step by step instructions
on how to use these features to improve the process of production scheduling
for the user. The instructions have been
written in a simple format to make it easy for the user to understand and
follow.
A
Glossary has been included to provide the user with a list of words that have
been included within this manual and directly relate to production scheduling.
Operation Overview
The
VPSS application can be invoked through Beacon using two commands.
The
first is CRP.VP which displays ‘Look only’ production schedule, which cannot be
modified
The
second command is CRP.VPC, which displays the production schedule and allows
changes to be made, through the drag drop mechanism.
There
are three separate views of the production schedule
The
first being the summary view, which only shows the summary of the capacity of
each work centre
The
Second view is the horizon view, which displays all the buckets that have been
specified on the capacity planning horizon e.g. days, weeks and months
The
third view is day details, which only displays the day buckets specified on the
capacity planning horizon.
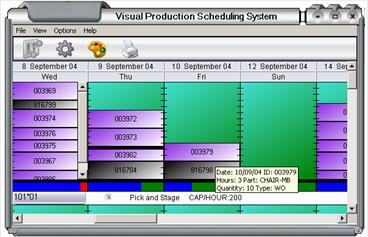
Figure 1: Day details View
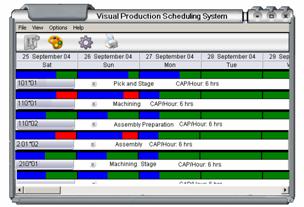
Figure 2: Summary View showing capacity only
Features
As
already mentioned, the VPSS application has been created to make the task of
production scheduling a simple process.
The features that have been included in the application all contribute
to the goal of keeping it simple and easy to understand, therefore step by step
instructions have been included alongside the descriptions of these features
Here
is the list of the features:
Ø
Drag and Drop work
orders
Ø
Change
background colour
Ø
Change work
order colour
Ø
Work centre
expand/hide
Ø
Re-size date
column and Work centre row
Ø
Switching
between views
Ø
Detailed tool
tips

Internet enabled
As
already mentioned the aim of the VPSS application is to make production
schedule simple, which is why VPSS has the ability to work over the
internet. This means users can have
access to and make changes to the production schedule from remote locations.
The user does not need to have the Beacon server or the Beacon client pre-installed
on the computer they are working on, but all they have to do is type in the URL
in the internet browser and the application is automatically be downloaded onto
the user’s computer.
The
VPSS application connects to the web server, which connects to the Beacon
system where the user is requested to login using their Beacon username and
password.

Switching Views
This feature allows the
user to switch between the two views of the production schedule. There
are two views which display the production schedule in different ways.
The first is the Day
Details View, which displays the production schedule in proportion to the
capacity on the work centre, on a particular day. The Shadowboard View
is also the default view of the application when it is first opened.
The second view is the
Horizon View which displays all the buckets specified on the capacity planning
horizon. The scale is the same for each period in the factory calendar.
To use this feature:
To
switch to Horizon
(i) Select view
from the menu bar
(ii) Select Horizon
View
Ø
Note: Alternatively press the horizon
View icon button ![]()
Switch
to Day Details
(i) Select View
from the menu bar
(ii)
Select Day Details
Ø
Note: Alternatively press the day details
icon button ![]()
Full
Screen mode
(i) Select View
from the menu bar
(i)
Select Full screen
Ø
Note: Or the alternative is to press to F12
on the keyboard to switch to full screen view and F11 to return to the
normal
view of the production schedule with the border around it.
Work Centre
Collapse
This feature allows the
user to hide/show the view of each work centre. This feature is used in situations
where the user does not need to view the details of each work centre.
The load indicator is still displayed, even when the work centre is hidden, allowing
the user to be aware of the load on each work centre on every day at all
times.
To use this feature:
(i) Click the hide/show button
which is located next to the work centre name.
If the
arrow is pointing up, the work centre collapses/hides from the view of the
user. If the arrow is pointing down, the work centre details
appear.

Figure 3: The location of the work centre
collapse button.
Change background
colour
This feature allows the
user to change the background colour of the application. There is a choice
of one or two colour shading and four gradient angles to select from to suit
individual preferences.
To use this feature:
(i) Select options from the tool bar and then
select customize.
(ii) Select background colour and the dialogue
box appears.
(iii) Select
either one or two colour background.
(iv) Select
angle
of the gradient from the
shading style box and preview the colour and the angle of the gradient
in the preview box.
(v)
Press ok.
Ø
Note: The colour of the background, now
displays the new colour and the angle of gradient selected. These colour settings are also saved, so they
appear with the same colours specified last time when the user view the
production schedule.
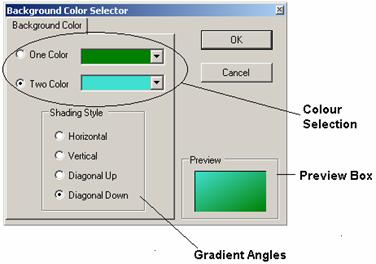
Figure
4: Change background colour dialog box.
Change Work
Order colours
This feature allows the user
to change the colour of each type of work order displayed. Actual work orders
planned work orders and dynamically generated work orders may be shown in
different colours. The angle of the work orders can also be selected to suit
individual preferences.
To use this feature:
(i) Select options
from the tool bar and then select customize.
(ii) Select work order colour
and a dialogue box appears.
(iii) Select one of the
three tabs that relate to the three types of the work orders displayed.
(iv) Select either one or two colours
(v) Select the angle of the gradient
and preview the colour and the angle of the gradient in the preview box.
(vi) After all the selections have
been made, press ok.
Ø
Note: The colour of the work order, now
displays the colour and angle of the gradient that was selected. These colour
settings are also saved, so they appear with the same colours specified last
time when the user view the production schedule.
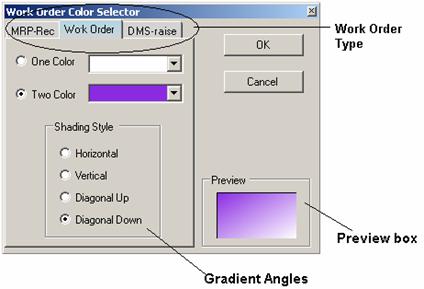
Figure 5: Work Order Colour dialog box
Detailed Tool
Tips
This feature of the VPSS
application allows the user to obtain detailed information about each work
order displayed, in a tool tip. The tool tip works by placing the mouse
cursor over the work order of interest and the tool tip will automatically
appear.
To use this feature:
(i) Place the mouse
cursor over the work order of interest.
(ii) The tool tip appears
while the mouse cursor is still over the work order.
Ø
Note: When
the mouse cursor is moved away from the work order, the tool tip disappears
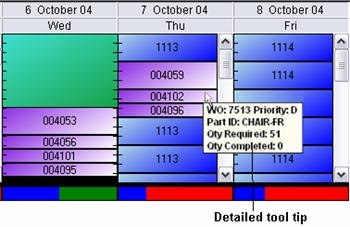
Figure 6: Detailed Tool tip
Tool tip shows order type,
priority (if WO), part ID to make, description of part to make and quantity
required.
Drag and Drop
This feature of VPSS
application enables the user to select a work order and re-schedule it to
another day. This allows the
production schedule to be altered very easily without having to navigate through
the system. After the drag and drop procedure has been completed, the
database is updated with the altered information.
To use this feature:
(i) Select the work order to
be moved by clicking on it with the mouse.
(ii) While having pressing the
mouse, move the work order to its new location and release mouse.
(iv)
The work order
will now be associated with the new date and the work overload indicator is
updated to show the new capacity on that date period.
Ø
Note: The
Database is be updated with the change to the production schedule. Planned orders may not be changed, only WO
and DWO orders.
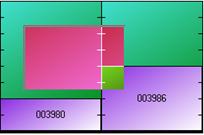
Figure 7: Example of a work order being moved
Internet Enabled
The VPSS application is web
enabled, which means the user can access the application from remote
locations and make changes to the production schedule while being away from the
factory.
First download the VPSS
application form the internet, log into the system using the Beacon login and then
view and make changes to the production schedule.
The user is prompted to
login at two places; first is when the user enters the URL in the internet
browser and the second is when the user tries to log into the Beacon
system.
To use this feature:
(i)
Open internet explorer
(ii) Type
in the URL in the address field
Ø
Note: A
dialogue box appears asking to save the Zip file on the users’ computer
(iii) Click Save and specify the
directory
where the file is to be stored.
(iv) Unzip the folder and 3 files file
will unzipped.
(v) Double click on the .exe
file and the user is prompted to log in using the Beacon login
Ø
Note: Once the
login is authenticated and the connection to the web server has been made, the
production schedule is displayed on the client computer.
Glossary
ERP –
Machine – Where goods are manufactured
Overload – This is when the maximum capacity of the work
centre has been exceeded.
Planning Board –
Used by production planners to create a physical representation of the load on
each work centre.
Production Planner –
Plan timetables and resources allocated to work centres in order to ensure
smooth operation of factory, primary user of VPSS.
Shop Floor - This refers to the area that manufactures the
products that have been included in the Work Order
UniVerse – Extended
relational database ideal for rapid, cost-effective vertical application
development (IBM)
VPSS – Visual Production Scheduling System
Day Details View – Production schedule displayed which only shows
days specified in the shop floor calendar.
Horizon View – Production schedule displayed that shows days,
weeks and months depending on the number of buckets specified.
Bucket – Represents a time bucket on the capacity planning
horizon e.g. days, weeks, months etc.
Work Centre –
This is defined as consisting of one or more machines
Work Order – A document which
authorizes the manufacturing of a particular item.
Planned Work Order – Order raised by MRP, which will be required to
meet the MPS.
DWO Work Order – Order generated by Beacon’s DMS (Dynamic
Manufacturing Scheduling) feature. This
order is required to meet current promises to customers.
MPS – Master Production Schedule. The
plan of what the company intends to make over the planning horizon.
MRP – Material Requirements Planning calculation of what material is
required to meet the MPS
Planning horizon – Time for which a company plans its production,
consisting of planning buckets.
Smart Client Technology – Combines the rich client based model with the
browser based client to provide an effective application that is functional
over the internet.