
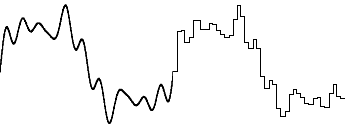
Figure 1. Analogue waveform to digital waveform conversion.
Sound frequencies are measured in Hertz (Hz). Nothing to do with the car rental company, but a measure of the sound wave's cycles per second. The musical note A on the treble clef has a frequency of 440 Hz. The average human ear can hear sounds in the frequency range of approximately 20 Hz to 20 KHz. You are more likely to 'feel' sounds outside this range, rather than actually hear them.
Data from an audio CD is a perfect example of standard audio sampling parameters. 16 bit samples are available 44100 times a second, thus CDs have a sampling rate of 44.1 KHz. Digital Audio Tapes (DAT) also have a 16 bit sampling resolution, but sample at 48 KHz. Why have are all these numbers been used? Read on.
Figure 1. Analogue waveform to digital waveform conversion.
Nyquist's theorem states that the highest reproducible frequency is equal to half the sampling frequency of the waveform. If the human ear can hear up to 20 KHz, then a 40 KHz sampling rate is required. Figure 2 demonstrates how even sampling at twice the required frequency can give pretty bad approximations of the original waveform. Waveforms sampled at a frequency too low sound buzzy or synthetic. Sampling at 44.1 KHz means that CD audio can manage frequencies a little bit over 22 KHz. DAT's 48 KHz rate can encode frequencies up to 24 KHz. MPEG audio can use a number of different source sample rates: 16, 22, 24, 32, 44.1 and 48 KHz. MPEG-2 audio can also encoded at rates as low as 16 KHz and standards are being developed for a 96 KHz, 24 bit high fidelity sound format.
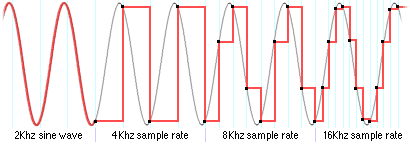
Figure 2. Sampling above the Nyquist frequency.
Each bit available in the sample corresponds to 6 dB of sound level, so the difference between the quietest and loudest sound that can be encoded in 16 bits is 96 dB (referred to as the signal-to-noise ratio, or s/n ratio). It also means that noise introduced into a full-volume sampled wave due to the original wave being quantised (quantisation noise) to 65536 levels is 96 dB quieter than the actual sound. You normally can't hear it. With only 8 bits per sample, the waveform must be roughly represented (see figure 1), and the s/n ratio due to quantisation noise is 48 dB, much easier to hear (similar the background hum/rumble heard off an old record). That's why lower quality wave samples seem to have a hiss in the quieter parts when you listen to them.
MPEG audio compression makes use of psychoacoustics principles to discard the parts of a sound which the ear can't really hear and encode what is left as best as it can, assigning more data to what it considers the most important parts. This means that MPEG audio compression doesn't concern itself so much with traditional audio sound parameters (like s/n ratios, total harmonic distortion or bandwidth) in the same way. Essentially, if it sounds 'good enough' to a variety of listeners, then it is good enough. OK, let's get some theory of psychoacoustics out of the way first.
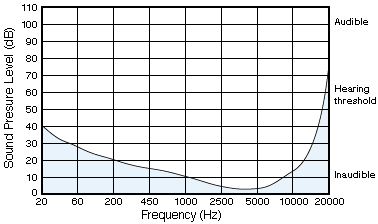
Figure 3. The threshold of human hearing.
Take that same person and play a tone centred around 1 KHz at 80 dB, then play another tone at 1.1 KHz with a much lower volume. Raise the volume of the second tone until it can be hear and repeat for different frequencies (like 2 KHz). The results of this testing would result in a graph like figure 4. This indicates that a quieter tone which is below the green threshold of the louder tone will be inaudible to the listener. The loud sound is said to 'mask' the quieter tone. Again, if you can't hear it, why bother encoding it.
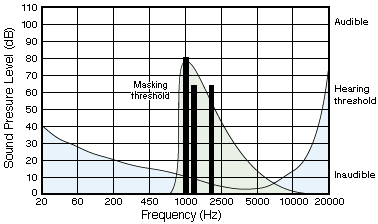
Figure 4. Loud tone Masking a quiet tone.
Another type of masking involves broad-band frequencies. Back in the test room, play a tone centred around 1 KHz but spread from about 600 Hz to 1.8 KHz (at 80 dB), then play another tone at 2 KHz with a much lower volume. Raise the volume of the second tone until it can be hear and again repeat for different frequencies. The results of this testing would result in a graph like figure 5. This indicates that a broad-band sound can mask a nearby narrow-band frequency of equal power (same dB level). And again, if you can't hear it, why bother encoding it.
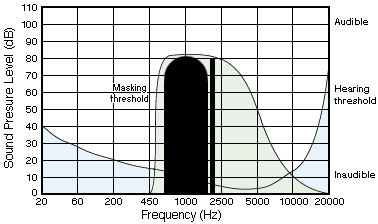
Figure 5. Increased energy and increased frequency band masking.
Masking can also occur before and after a strong sound has been heard (pre and post-masking, respectively). Pre-masking require a great difference in sound level (around 30-40 dB) and is possible because of slight processing delays in the ear/brain. The pre-masking window is only 2-5 ms, whereas post-masking can occur up to 100 ms after the initial sound. A loud sound basically drowns out sounds occurring shortly after.
To tie this all together, look at an example. Figure 6 shows a sound made up of narrow bands of frequencies (for simplicity). Show in green is the threshold level of hearing, which is made up of the maximum masking values of the individual frequencies. The important thing to note here is that some of the frequency bands are below the blue hearing threshold and others are below the green waveform threshold.
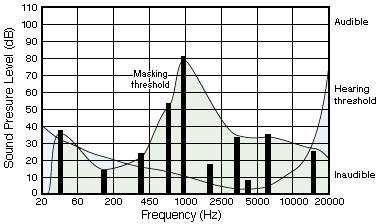
Figure 6. A waveform made up of a number of narrow-band frequencies.
We can discard the all those frequencies below the threshold as our theory states that you can't actually hear them. Figure 7 show this result. There are now only four frequencies that need to be encoded. We can either encode these frequencies at a higher accuracy, or more usefully, use less information to encode the simpler waveform.

Figure 7. The waveform after removing the masked frequencies.
Happily, it turns out that if you divide the total frequency band up into about 32 sub-bands, it much easier to calculate the masking effects (Figure 7 shows just 8 sub-band markings). The loudest frequency tone in each sub-band will usually mask all other tones in the same sub-band. Particularly loud tone may also mask adjacent sub-bands as well.
Layers 1 and 2 are functionally quite similar and less complex than layer 3, so we'll start there.
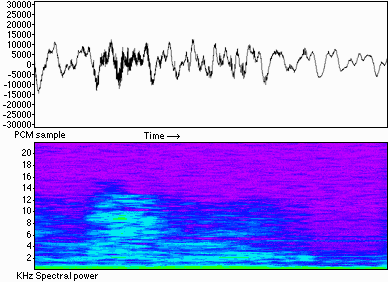
Figure 8. A PCM waveform and its spectral equivalent (with false colour).
MPEG layer 1 samples the PCM data in groups (frames) of 384 to form the spectral powers, whereas layer 2 uses frames of 1152 samples (ie. one frame every 24 ms). The samples are passed through a Fourier Transform and then split into 32 sub-bands. Masking within a sub-band is then calculated, with precedence being given to the loudest sound. The masking effects across adjacent bands is then calculated, bearing in mind pre- and post-masking effects. The available number of bits for each frame is then allocated to the tones in the sub-bands which have the most power - audibly the most important stuff.
The way in which the masking thresholds are calculated is based on a psychoacoustics model using the theories covered above. The quality and accuracy of the model directly affects the quality of the encoded waveform when is recreated. That's why most 'free' MPEG audio encoder sound bad compared to the commercial ones.
As an example (figure 9), if there is a 6500 Hz, 60 dB tone in the upper region
of the 25 th sub-band, and the coder finds that this will masks the entire 25 th
sub-band - not too surprising. The threshold of masking for the entire sub-band
is found to be 25 dB below the original tone. The acceptable s/n ratio for this
sub-band is 60 - 25 = 35 dB. ie. Remembering that each extra bit used to encode
the tone adds 6 dB to the s/n ratio, means that to ensure that the encoded tone
has noise 35 dB below its peak requires 35 / 6 = 6 bits.
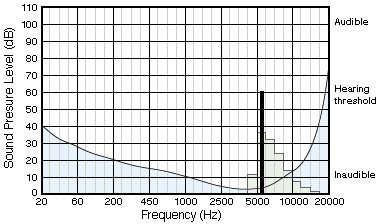
Figure 9. Tone masking in Sub-bands.
If the loudest tone in the 26 th band is less than 32 dB, we can ignore them as they are below the (green) hearing threshold. If the tone is above 32 dB, we can again allocate the required numbers of bits to encode it. A scale factor is also included to scale the reduced resolution tone back to its original dB level.
Those of you who are actually following all this may notice that to encode all the data in a frame, it may require more bits than are actually available to that frame. MPEG audio streams require a fixed data rate (Yes, there is Variable Bit Rate coding. But it's basically a hack, see layer 3 below), so a single channel layer 2 stream might run at 128 Kb/s, or about 3-5 bits per frame TOTAL. Sheesh! Not much really. This is where another lossy part of the compression comes in and the coder has to try and allocate bits to those tones which it believes are most important. Figure 10 shows a waveform before and after coding, just to show how much information is actually thrown away. In this example the MPEG encoder also resampled the waveform to around 24 KHz (hence not much information above 10 KHz).
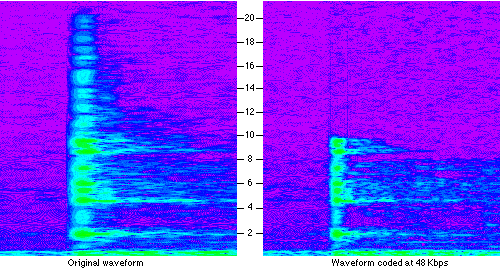
Figure 10. Before and after MPEG encoding.
After the bits are used, the resulting data is packed up and Huffman or arithmetically encoded and slotted into a correctly formatted MPEG bit stream.
All MPEG layers can encode mono and stereo audio channels in a number of ways, some of which make use of the commonality in stereo left and right channels. These can be either single channel mono, dual channel mono, stereo or joint-stereo (intensity - or "m/s" for Layer-3 only) stereo. Stereo mode simply treats each channels as an independent mono channel and splits the total number available bits between the two.
Intensity joint-stereo combines the two channels into one and encodes that, along with a scale factor for the left and right channels. The waveforms in each channel is the same but their volumes (intensities) are different. This is a pretty crummy way of encoding a stereo signal.
Figure 11 shows three versions of the waveform of a castanet, which is quiet before the loud clap and then fades off. This sort of waveform is referred to as a transient and has an extremely loud sound which lasts for only a small amount of time. Notice how in the original waveform, it is very quiet in the purple zone before the loud sound. Because the frame fell across this large transition for the layer 2 coding, noise was inadvertently entered into the coded waveform. This is just like the loss of detail around sharp edges that JPEG images have.
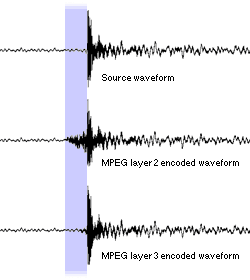
Figure 11. A comparison of the noise introduced for large transitions.
The layer 3 coder was able to use a short frame to code the quiet sounds right up to the transient, and then allow more noise right after it. You can see the layer 3 encoded waveform only has a tiny amount of noise added just before the castanet kicks in (That's obviously where the short frame changed over). The down side of these short frames is that there is still only a third of the bits available as for a long frame (3 * 384 = 1152 by the way).
As well as the stereo channel encoding techniques available to layers 1 and 2, layer 3 can do middle/sideband (m/s) coding. This method codes the sum signal (L + R) in the left channel, and the difference signal (L - R) in the right. Because there is normally a good deal of common information in stereo channels, the difference information can survive greater compression without apparent loss of quality.
The latest method available to layer 3 coding is a limited form of Variable Bit Rate control (VBR). This takes advantaged of the small bit buffer built into the official MPEG specifications (and theoretically in every MP3 player) and allows an intelligent coder to scrimp and save a few bits here and there until a transient or complex sound comes along (like the castanet), and it will then blow all theses bits on coding the transient as best as it can.
How did you find this module? Was it too hard? Too easy? Were there something in
particular you would like graphically illustrated? If you have any sensible comments,
email me and let me know.
References: